Advertisement
Quick Links
Advertisement

Subscribe to Our Youtube Channel
Related Manuals for KOSTAD DC Wallbox


Summary of Contents for KOSTAD DC Wallbox
- Page 1 US ER MAN UAL Kostad DC Wallbox Operating instructions...
-
Page 2: About This Guide
Kostad DC Wallbox 1 About this guide These operating instructions describe the charging station and inform you how to use it. Keep these operating instructions for later use. Read these operating instructions before handling the charging station and follow the instructions. This will ensure hazard-free and fault-free operation as well as a long service life of the charging station. -
Page 3: Safety Instructions
In case of unauthorized conversions and modifications of the system, any liability and warranty of the manufacturer expires! 1.4 Copyright All rights to copyrights, registered brands and trademarks belong to the respective owners. Copyright © 2020 Kostad Steuerungsbau GmbH Operating Instructions 10/2020 2010045v10... -
Page 4: Table Of Contents
Kostad DC Wallbox 2 Table of contents About this guide ..........................2 Information for the person responsible for the installation ...............2 Safety instructions ..........................3 Conversions or alterations ........................3 Copyright .............................3 Table of contents ........................... 4 Glossary ............................6 Introduction ........................... 7 Foreword .............................7... - Page 5 Kostad DC Wallbox 7.14 Diagnosis ............................41 Maintenance guide ........................42 Cleaning the DC Wallbox......................... 42 Filter exchange ..........................43 Maintenance of the charging station ....................44 Special maintenance: ........................44 Problem solving..........................44 Component view with control cabinet door open ................45 Technical data ..........................
-
Page 6: Glossary
Kostad DC Wallbox 3 Glossary Alternating current. Combined Charging System. An international charging standard for electric vehicles. CHAdeMO A DC fast charging standard for electric vehicles. Direct current. Owner The rightful owner of the charging station. Electric vehicle. Human Machine Interface; screen of the charging station. -
Page 7: Introduction
4 Introduction 4.1 Foreword The Kostad DC Wallbox is an easy-to-install DC fast charging system for electric vehicles. Thereby is an electrical installation with high electrical currents. This manual describes the general operation and daily operation of the DC Wallbox. - Page 8 Kostad DC Wallbox WARNING Operation after damage or accidents If there is a fire in or near the charging station; If the charging station has been exposed to water or any other liquid; If the charging station is damaged in any way.
-
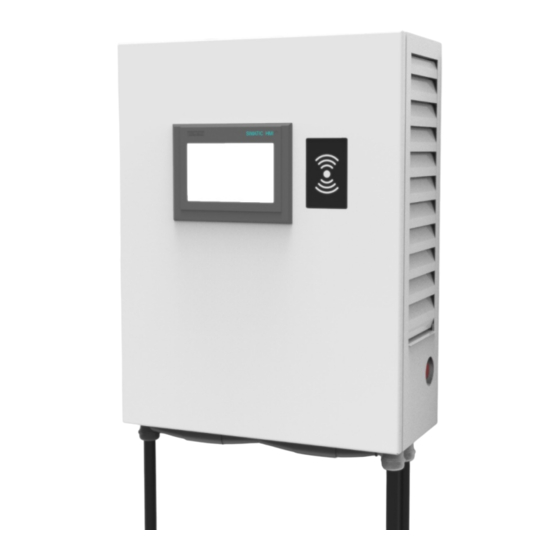
Page 9: Product Description
G. Charging outputs DC Fig 1: View Kostad DC Wallbox 5.2 Hardware configurations The Kostad DC Wallbox supports the following DC charging standards: Abbreviati Description One CCS and one CHAdeMO output up to 80 A / 22 kW; No simultaneous charging possible One CCS output with output current/power;... -
Page 10: Standard Use
Kostad DC Wallbox 5.3 Standard use By default, the Kostad DC wallbox is supplied from the mains. Fig 2: Kostad DC Wallbox Operating Instructions 10/2020 2010045v10... -
Page 11: Installation
Space required for installation and maintenance of the DC Wallbox The DC wallbox requires a minimum space of 900 x 1100mm, which is as follows: Size of the charging station W x D x H: 500 x 230 x 650 mm. -
Page 12: Conductor And Cable Cross-Section
6.4.3 Internet connection The preferred method of communication is to use a 4G wireless modem integrated into the charging station. If no wireless signal is available, OCPP requires a wired internet connection. Please contact the Kostad Support Team for a specific configuration. -
Page 13: Wall Mounting
Fig 6: Cable gland 6.4.6 Wall mounting At least two people are required to lift the DC Wallbox (weight 62kg). In general, local regulations must be observed, as the maximum weight to be lifted may vary from country to country. - Page 14 Kostad DC Wallbox Fig 7: Wall bracket Optional Standard Fig 8: Charging plug holder CCS/CHAdeMO Operating Instructions 10/2020 2010045v10...
-
Page 15: Locking System
The front door can be locked with a separately available half-cylinder lock. In the event that no on-site lock or locking system has been ordered, the DC Wallbox is not delivered lockable. On request, the charging station can be equipped with a customized locking cylinder and delivered. It is possible to install a locking cylinder system, which must also be provided by the customer. -
Page 16: Switching The Charging Station On And Off
Kostad DC Wallbox 6.6 Switching the charging station on and off Switch the following component on to turn it on or off to turn it off: 1. 1F1 Circuit breaker • Wait until the charging station has started up (approx. 3 minutes). -
Page 17: Authorization Procedure
Kostad DC Wallbox 6.7 Authorization procedure The following authorization procedures are supported by the charging station. 6.7.1 Free loading / no authorization Charging does not require authorization. A charging process is started automatically after a plugged-in cable is detected. The charging process is terminated by pressing the STOP button. -
Page 18: Quick Guide To The Charging Process
Kostad DC Wallbox 6.8 Quick guide to the charging process The charging procedure is described below: 6.8.1 Plug in the charging cable 1. Park the electric vehicle with the charging input within reach of the plug and switch off the vehicle. - Page 19 Kostad DC Wallbox 6.8.3 Prepare A wait symbol is displayed during DC charging for the duration until the energy transfer (including cable check). Fig 14: Example of the waiting time when starting DC charging 6.8.4 Charging in progress After starting a charging process, there is an automatic switch to the main menu or to the screen saver (screensaver mode).
- Page 20 Kostad DC Wallbox 6.8.5 Charging process interrupted (by the vehicle) If an ongoing charging process is interrupted by the vehicle (without terminating the transaction), the energy charged to date is displayed. Fig 16: DC charging process "Charging process interrupted by vehicle".
- Page 21 Kostad DC Wallbox ATTENTION Locked connection For CCS charging, the electric vehicle locks the plug. If the user wants to remove the plug from the vehicle, it may be necessary to unlock all doors of the EV or to press the "Unlock Charge Connector But- ton" on the vehicle key, if present.
- Page 22 Kostad DC Wallbox 6.8.10 Charging point not available The availability can be determined by the backend depending on the configuration. If the charging station is not connected to a backend, the charging points are always available in an error-free state.
-
Page 23: Changing The Display Language
Kostad DC Wallbox 6.8.12 Help display for the user Short help texts are available in the main menu to explain how to operate the unit. You can call up the displays by pressing the "Help" button. Press the "Back" button in the menu bar to close the displays. -
Page 24: Service Area
Kostad DC Wallbox 7 Service area 7.1 Service menu The access button to enter the service area can be found on the menu bar of the main view, the dedicated error pages (e.g. EMERGENCY STOP Active) or the start screen. -
Page 25: Basic Menu
Kostad DC Wallbox 7.1.1 Basic menu After successful login, the basic menu opens. The upper 4 buttons lead to deeper menu structures, which are described further in the sub-chapters of the same name. The "Exit Service Menu" button takes you back to the main view and the current user is automatically logged out. - Page 26 Kostad DC Wallbox In the service area "Operator settings", set the charging station numbers, the charging station name and the number of charging points. The serial number and the power are displayed, but cannot be changed. You can disable or enable the display of the "Info" button and the alternative login.
- Page 27 Kostad DC Wallbox ① 7.1.2 Custom wallpaper and screensaver When this option is selected, a customized free background image is displayed instead of the standard background image. This image must be in PDF format and located on an SD card in the "Customer"...
- Page 28 Kostad DC Wallbox 7.1.6 Rest period before display Here you set the duration until the screensaver is activated. 7.1.7 Page display duration If you are using a multi-page PDF file, you can define the display duration of a page here.
-
Page 29: Ocpp
Kostad DC Wallbox 7.2 OCPP In this area you can parameterise the OCPP-J 1.6 client on several pages. Further documentation on the OCPP description can be found on the Internet. On the basic page, the communication settings are made and all OCPP-related parameters are saved. - Page 30 Kostad DC Wallbox If changes are made to the parameters on the following pages, this is indicated in the lower third of this screen. You must accept or discard these changes via the corresponding buttons so that they are stored in a fail-safe manner. Some parameters require a restart of the charging station to be activated.
-
Page 31: Administering The Lists
Kostad DC Wallbox If a master card is then held in front of the reader, the charge is terminated. This works independently of the authorization method, i.e. also with authorization by the CPO via OCPP. This functionality intended petrol station operators, for example, who thus have the option of cancelling charging processes. -
Page 32: Performance Management
Kostad DC Wallbox 7.3.2 Procedure for deleting an entire list 1. Select <Delete Entire List>. 2. Select <Yes> in the prompt pop-up. If you cancel the function then confirm the query with <No>. 3. If you have confirmed with <Yes>, the entire list is deleted. - Page 33 Kostad DC Wallbox Endpoint type • Server: The charging station acts as a Modbus/TCP server. Holding registers are used. If query cycles of a client are detected that are too fast, a RESET of the master functionality is carried out.
- Page 34 Kostad DC Wallbox Use zero-based addressing If the remote station uses zero-based addressing ("address offset"), (register shifted by 1), then this can be activated here. This value may only be set when the connection is deactivated. Start holder register setpoints (partner -> charging station) The holding registers for setpoints and actual data must not overlap.
-
Page 35: Operating Schedule
Kostad DC Wallbox Charging station Telegram version (=ID=1) Uint Mode 0=Off, 1=Feed-in limitation, 2=Charge point limitation Uint Maximum feed line in kW Uint Charging point1 Maximum power in kW Uint Charging point2 Maximum power in kW Uint Charging point3 Maximum power in kW... -
Page 36: Calibrate
Kostad DC Wallbox You can only edit the operating schedule if it has handled separately. Public holidays in the future or been deactivated beforehand. To edit, select the still active public holidays are shown in green and day and either enter the start and end time in the days already in the past are shown in grey. -
Page 37: Plaster Picture
The operator is responsible for the safekeeping of the login information. If you forget your password before logging in for the first time, the manufacturer can send you this password again by e-mail. However, if you forget your changed password after logging in for the first time, please contact Kostad Support. Operating Instructions 10/2020 2010045v10... -
Page 38: Time Setting
Kostad DC Wallbox 7.10 Time setting In the configuration: "Time setting" enter the position and time zones of the charging station. The time is generally synchronised via NTP. The connection via the maintenance router is used for this. By default, the NTP server is reached at the address or reserve address as shown in the figure "Parameterisation of the Siemens NTP server in the Scalance router". -
Page 39: Stop Causes
Kostad DC Wallbox 7.11 Stop causes In the "Stop causes" menu, you can view the triggering and pending faults of the individual charging points or the charging station itself (charging point 0). You can navigate through the charging points using the arrow keys in the upper area. -
Page 40: Charger Service Menu
Kostad DC Wallbox 7.12 Charger Service Menu In this menu, you can obtain information about ongoing charging processes. By pressing the respective charging point button, you can access a diagnostic view. Fig 45: Selection of charging points for diagnosis In the "Charging CCS/CHAdeMO" menu, the current parameters of the charging process are displayed. -
Page 41: Energy Metering
Kostad DC Wallbox 7.13 Energy metering The "Energy measurement" menu shows you the current power and the amount of energy transferred per charging point and in total since the charging station was commissioned. Fig 47: Energy measurement menu 7.14 Diagnosis The message archive is primarily intended for The service area Service area "Messages"... -
Page 42: Maintenance Guide
8 Maintenance guide 8.1 Cleaning the DC Wallbox The DC Wallbox must be kept in good condition. Clean the charging station three times a year as follows: 1. Remove dirt with a soft damp plastic fleece cloth. 2. Optionally, you can treat the front with a stainless steel cleaner for extra protection and shine. -
Page 43: Filter Exchange
8.2.2 Exit filter Open the door of the DC Wallbox. After opening, the filter cassette is located in the outer right area (see illustration). Open it using the two quick-release screws. Then pull the cassette out of the lock, change the filter, reinsert it and close the quick-release screws again. -
Page 44: Maintenance Of The Charging Station
Do not switch on the charging station until it has been checked and approved. 8.5 Problem solving The site operator or Kostad Support is the first point of contact for a customer. Kostad Support can solve simple problems for the customer remotely. -
Page 45: Component View With Control Cabinet Door Open
Kostad DC Wallbox 8.6 Component view with control cabinet door open The main components that can be seen when the control cabinet door is open are listed below: Fig 54: View of the front components A. LTE antennas B. Modem (Backend / CPO) C. -
Page 46: Technical Data
Kostad DC Wallbox 9 Technical data 9.1.1 Electrical data Entrance 3 phases, 400 V Supply voltage AC: PE, L1, L2, L3 Input voltage range 400 V AC +10%, -15%(50 Hz) Maximum rated input current & power 33A, 22kVA Power factor... -
Page 47: Mechanical Data
Kostad DC Wallbox 9.1.2 Mechanical data Dimension (H x W x D) 650 mm x 500 mm x 230 mm Weight 62 kg Dimension incl. packaging (H X W x D) 650 mm x 1200 mm x 800 mm Weight incl. packaging... -
Page 48: Foundation And Stand
Kostad DC Wallbox 9.2 Foundation and stand (optionally available) Fig 55: Dimensioned drawing of foundation and stand (optional) Operating Instructions 10/2020 2010045v10... -
Page 49: Contact Information
Kostad DC Wallbox 10 Contact information Please contact Kostad or your service partner directly for a problem analysis and its solution. 10.1 Manufacturer Kostad Steuerungsbau GmbH Parkallee 20 A-2483 Ebreichsdorf Austria office@kostad.at 10.2 Support Mail: support@kostad.at Web: support.kostad.at Operating Instructions 10/2020 2010045v10...
Need help?
Do you have a question about the DC Wallbox and is the answer not in the manual?
Questions and answers