Table of Contents
Advertisement
Quick Links
User Manual
For model
ST-C801P WUXGA
Laser Light Source DLP
High brightness
30000
hours long life
360°
projection
3D display
function
HDBaseT
function (optional)
Zoom&Focus
Lens shift
function
Multiple lens options
Laser Light Source DLP Projector
Note:
- Before using the product, please read these instructions carefully, and keep for future reference.
- OSD options and pictures shown in this document may differ slightly from your product.
- Changes to this manual may be made without notice.
Projector
contrast (5000000:1)
and
function (standard lens)
function
Projector
HDMI2
DVI
INPUT
LENS SHIFT
FREEZE
KEYSTONE
INFO.
Advertisement
Table of Contents

Related Manuals for Springtree ST-C801P WUXGA


Summary of Contents for Springtree ST-C801P WUXGA
- Page 1 User Manual For model ST-C801P WUXGA Laser Light Source DLP Projector High brightness contrast (5000000:1) Projector 30000 hours long life 360° projection 3D display function HDBaseT function (optional) Zoom&Focus function (standard lens) Lens shift function Multiple lens options function Laser Light Source DLP Projector...
-
Page 2: Features And Design
Features and design Thank you for choosing our laser light source DLP projector! This high-performance projector features advanced laser fluorescent light source technology, delivering a remarkable brightness of 7000–8000 lumens. With an ultra-long lifespan of up to 20,000 hours in standard mode or 30,000 hours in economy mode, it maintains consistent brightness throughout its entire life. -
Page 3: Table Of Contents
Content Safety operation guideline ................5 Safety instruction ......................5 Disposing of your used product .................. 6 Notes ........................... 7 Laser safety caution ....................9 Air ventilation ......................10 Place your projector correctly ..................10 360° projection supports ...................10 Moving your projector ....................11 FCC Caution ......................11 Precautions on dealing with your projector: ..............12 High Altitude Mode ....................12... - Page 4 Content Basic operation....................33 Power on your projector .................... 33 Power off your projector .................... 34 How to operate the OSD ................... 35 Menu item overview ....................36 Lens shift function ..................... 37 Focus adjustment...................... 38 Zoom adjustment ...................... 39 Screen Adjustment Function ..................40 Keystone adjustment ....................
-
Page 5: Safety Operation Guideline
Safety operation guideline Safety instruction This document and your projector employ certain symbols to illustrate how to use your projector safely. Please get yourself familiar with them before going through this document. Ignoring messages indicated by this symbol may lead to personal injuries Caution or deaths due to human errors. -
Page 6: Disposing Of Your Used Product
Safety operation guideline Disposing of your used product In the European Union EU-wide legislation as implemented in each Member State requires that used electrical and electronic products carrying the mark (left) must be disposed of separately from normal household waste. This includes projectors and their electrical accessories. When you dispose of such products,please follow the guidance of your local authority and/or ask the shop where you purchased the product. -
Page 7: Notes
Safety operation guideline Notes Caution Precautions on air outlet: • K eep adequate clearance around your projector for its ventilation and cooling. See figure below for the least clearance requirements. The least clearance is a MUST when your projector is placed within a cabinet or other closed environment. ≥100cm ≥50cm ≥100cm... - Page 8 Safety operation guideline Note: Precautions on using your projector: • U se power as indicated in tags attached to your projector. If you have doubts over • available power type, consult your dealer or local power company first. D O NOT open or remove the casing for maintenance as this may lead to electric shock or other damages.
-
Page 9: Laser Safety Caution
Safety operation guideline Laser safety caution WARNING Class 1 laser products • This product is classified as Category 1 in IEC 60825-1:2014, EN 60825-1:2014+A11: 2011. Using the methods other than those specified herein for control, adjustment, or performance execution may result in harmful radiation. Exposure to laser energy near the aperture may cause burns. -
Page 10: Air Ventilation
Safety operation guideline Air ventilation Place your projector correctly Openings in the casing are designed for ven- Use your projector at specified location in cor- tilation and overheating prevention. DO NOT rect way. Invalid projector location may shorten block or cover these openings to keep your light source 's life-cycle or even lead to severe projector in normal operation and from over- incidents or fire. -
Page 11: Moving Your Projector
Safety operation guideline Note: Precautions on ceiling mount racket installation • • G et qualified technician to install the ceiling mount racket. W arranty of your projector does not cover hazards and damage caused by using ceiling • mount rackets provided by unauthorized dealers. •... -
Page 12: Precautions On Dealing With Your Projector
Safety operation guideline High Altitude Mode Precautions on dealing with your projector: The “High Altitude Mode ” setting is automatically turned on when the projector is DO NOT lift or move your projector by holding used at an altitude of about 1500 meters or the lens or projecting decoration ring as it may higher. -
Page 13: Accessory
Accessory Included Accessories: The projector includes such following accessories. Please check all the packaging. If any items are missing, please contact your dealer immediately. HDMI2 INPUT LENS SHIFT FREEZE KEYSTONE INFO. Note: the AC power cord specification depends on the location of your projector. -
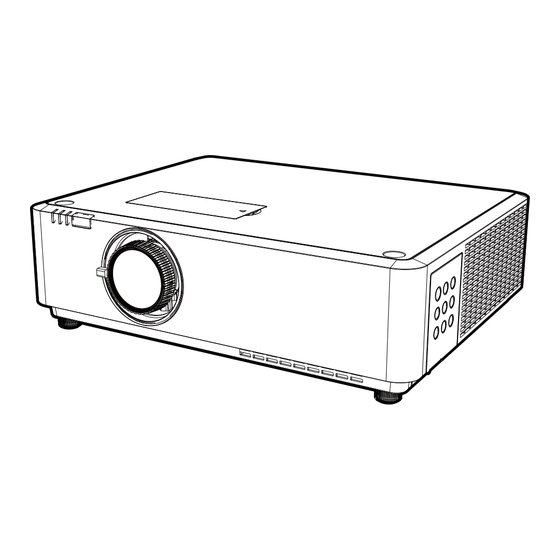
Page 14: Name And Function Of Your Projector
Name and function of your projector 1 LED indicator Front/Top 2 Lens shift 3 Air outlet grille 4 Zoom ring 5 Projection lens 6 Focus ring 7 Keypad 8 Air intake grille Rear 9 AC power cord port 10 Terminal 11 Speaker 9 10 11 12 Adjustment feet... -
Page 15: Terminal
Name and function of your projector Terminal 1. MICRO USB connector 10. MONO(L/R) terminal Software upgrades. The mono audio signal (single audio terminal) should be connected to the MONO(R/L) 2. VGA IN1 terminal connector. Connect the output signal from the computer to this terminal. -
Page 16: Control Panel And Indicators
Name and function of your projector Control panel and indicators 1. POWER Open or close the projector. • 2. Arrow ▲▼ /VOLUME /KEYSTONE ▼ • S elect an item or adjustment data in the on-screen menu. • F or volume setting or trapezoidal correction adjustment. F or password entry. - Page 17 Name and function of your projector ⑤ USB-B ② ① No function. ⑥ HDMI 2 Select the “HDMI 2” input source. ⑥ ③ ⑦ HDMI2 ⑦ HDBASET ④ ⑧ Select the “HDBaseT” input source.” ⑤ INPUT ⑨ ⑧ NETWORK ⑩ Go to the Web Information Editing menu.
-
Page 18: Remote Controller Operation Range
Name and function of your projector ② ① TIMER Enable the timer function. LENS SHIFT ⑥ HDMI2 No function. ③ ⑦ ④ ⑧ FREEZE INPUT ⑤ ⑨ Freeze projected images. ⑩ KEYSTONE Keystone calibration. INFO. Display current status information of your projector. -
Page 19: Install Battery Of Remote Controller
Name and function of your projector Install battery of remote controller ❶ Open the battery cover. Open the battery compartment cover. ❷ Insert two AA batteries battery into the remote controller. Place your batteries with its anode (+) and cathode (-) under the correct direction. Keep both poles in good connection to the contacts within the compartment. -
Page 20: Lens Installation
Name and function of your projector Lens installation Prepare: Remove the dust cover from the projector and � prepare the projection lens. � 1. Open the upper cover flap. 2. Turn the left displacement knob “right” to the end. � Fluted lens 3. -
Page 21: Remove The Lens
Name and function of your projector Remove the lens � � 1. Open the upper cover flap. 2. Turn the left displacement knob “right” to the end. � 3. Push the metal lever in the notch inward to the end and rotate the lens to the left to the end. -
Page 22: Installation
Installation Projector Installation This projector supports the following six projection methods (Rear, Ceiling/Front, Ceiling/Rear, Auto Ceiling/Front, Auto Ceiling/Rear), so please install the projector according to the installation location. The preset projection method is set to Front Projection, and you can change other projection method settings from the menu options. - Page 23 Throw Distance Guide 16:9 Aspect Ratio NOTE: These measurements are intended as a guide. Actual placement should be field verified.
-
Page 25: Optional Lens Specifications
Optional lens specifications Special order For some common operations, it is recommended to use the remote control to complete. Model ST-EC12ZL ST-EC10ZL ST-EC08ZL ST-EC06ZL ST-EC06SL Image Image cycle 23.5mm 21.5mm 25.26mm 22.2mm 21.8mm Lens Type Zoom Lens Zoom Lens Zoom Lens Zoom Lens Zoom/Focus Manual... -
Page 26: Adjustment Feet
Adjustment feet Adjust the left and right tilt. 1、 Place the projector so that it is perpendicular to the screen. • 2. T urn the adjusting foot left or right to make adjustments. Using the adjustable feet, the projection angle can be adjusted to 11 degrees, as shown in •... -
Page 27: Lens Shift Adjustment
Lens shift adjustment The manual lens shift function allows you to move the projection lens left, right, up and down. This function allows the user to easily adjust the position of the projected image. The projector lens moves to the top. Projector position can be shifted upwards by up to 50% of the upper magnitude of the image (based on the scaler) -
Page 28: Connected Devices
Connected Devices Connect to PC (Digital and Analog RGB) Cables for connection VGA cable * Serial cable (Cross type)** ● ● HDMI cable ● (*: This cable is not included.) HDMI Digital VGA Signal Input VGA Signal Output Signal Output HDMI cable(*) cable(*) -
Page 29: Connect To Video Equipment
Connected Devices Connect to video equipment Cables for connection: S terminal cable ** Component color difference cable ** ● ● BNC cable * ● (*: This projector is not equipped with this cable.) (**: Specialized cables can be ordered through your dealer.) Video signal S terminal Component... -
Page 30: Connect To Audio Equipment
Connected Devices Connect to audio equipment Cables for connection: Audio cable* ● (*: This cable is not included.) External audio devices Audio Input Audio Output Audio Output Note: The left and right channels are Audio cable combined when Audio cable Audio cable there is only the (Stereo) -
Page 31: Connect To Usb Or Wireless Card (Usb-A And Usb-B)
Connected Devices Connect to USB or Wireless card (USB-A and USB-B) Cables for connection: USB-A or USB-B cable* ● (*: This cable is not included.) USB-A Support 5V2A output Software upgrades Note Unplug power cords of your projector and all external equipment before connecting any cable to them. ●... -
Page 32: Connect The Ac Power Cord
Connected Devices Connect the AC power cord Standard voltage employed by your projector is AC 100-240V. It adapts to different input voltage automatically. Your projector employs single- phase power cord with neutral ground cable. DO NOT use any other type of power cords or you may face the risks of electric shock. -
Page 33: Basic Operation
Basic operation Power on your projector 1.Before turning on the projector, please first complete the connection of external devices (with computers and VCRs, etc.). 2.Connect the projector's AC power cord to an AC outlet. The power indicator is lit in red. 3.Press the POWER button on the control panel or remote control. -
Page 34: Power Off Your Projector
Basic operation Power off your projector 1. Press the POWER button on the control panel or remote control and the message "Confirm shutdown?" appears on the Confirm shutdown? screen. message appears on the screen. 2. After the message "Confirm power off" appears, it will disappear after 20 seconds by default, if you want to turn off the power, please press the POWER button again. -
Page 35: How To Operate The Osd
Basic operation How to operate the OSD Side control panel You can adjust or set up the projector on the on OSD menu . POWER The menu has a multilayer structure. Each main menu is divided into several sub-level menus, then each submenus is divided into several submenus. -
Page 36: Menu Item Overview
Basic operation Menu item overview Mainmenu Submemu ① ② ③ ④ ⑤ ① • Display menu P icture Fine Tuning: Select the H Position, V Position, Frequency, Tracking, and Auto Adjust • parameters under the VGA signal to make it match with the computer's input signal format. •... -
Page 37: Lens Shift Function
Basic operation Lens shift function Rotate the ① and ② button to make Lens shift adjustment manually. Rotate ① , the screen can be up and down to deviate from the projection height of the center axis of the lens movement. (Refer to the lens parameters). Rotate ②... -
Page 38: Focus Adjustment
Basic operation Focus adjustment Use the focus ring to obtain the best focus. Focus ring... -
Page 39: Zoom Adjustment
Basic operation Zoom adjustment Turn the zoom lever clockwise and counterclockwise. Zoom lever... -
Page 40: Screen Adjustment Function
Basic operation Screen Adjustment Function Side control panel Press the "AUTO" button on the remote control or on the side control panel to select the VGA signal input source and open the screen adjustment menu. Keystone adjustment AUTO HDMI2 If the projected image appears trapezoidal distortion, you can correct the image by Remote control INPUT... -
Page 41: Volume Adjustment
Basic operation HDMI2 Volume adjustment Remote control INPUT Direct operation, recommended to be done with the remote control. VOLUME Press the remote control four-way button +/- to adjust the volume. VOLUME +/- MENU LENS SHIFT FREEZE KEYSTONE INFO. Menu operation Volume menu 1. - Page 42 Basic operation Remote control operation Remote control For some common operations, it is recommended to use the remote control to complete them. D.ZOOM+/- Press the D.ZOOM+/- button on remote control HDMI2 to enter the Digital Zoom mode. Press for +/- screen image size respectively.
-
Page 43: Input Selection
Basic operation Input selection Remote control Basic operation Press the INPUT button on the top control panel or on the remote control to select one of the following input: VGA1, VGA2, HDMI1, HDMI 2, HDMI2 HDMI 2 HDMI 1 HDBaseT, Video , S-Video, Component as input signal. -
Page 44: Menu Introduction
Menu Introduction Display Menu [Picture Fine Tuning] Select the H Position, V Position, Frequency, Tracking, and Auto Adjust parameters under the VGA signal to make it match with the computer's input signal format. Press the MENU key on the remote control or side control panel to display the on-screen menu. - Page 45 Menu Introduction Item Option Description When installing the projector on the table and projecting from the front of the Front screen. When installing a projector on a table and projecting from behind the screen Rear (using a semi transparent screen). When using a projector lifting bracket (optional) to install the projector in front Ceiling/Front Projector...
- Page 46 Menu Introduction Item Option Description Splash Screen Standard (factory), (off) black, blue, green, red, cyan, yellow, magenta, white Blank Screen Standard (factory), (off) black, blue, green, red, cyan, yellow, magenta, white Logo Search Standard (factory), (off) black, blue, green, red, cyan, yellow, magenta, white Screen [3D Mode] The projector supports the 3D picture function.
- Page 47 Menu Introduction Item Option Description Zooming Adjustment range: -5~+5, every 1 is one step. Screen Adjustment Screen Shift Activated only when the projected content is ≥ frame size condition. [Overscan Adjustment] This function is used to set the power-up screen. Press the MENU key on the remote control or side control panel to display the on-screen menu.
-
Page 48: Color Adjust Menu
Menu Introduction Color Adjust Menu Color Adjustment is used to set the image mode and make adjustments to the picture quality of the projected image. [Image Mode] Press the MENU key on the remote control or control panel to display the on-screen menu. Press the ... - Page 49 Menu Introduction 2) Press the <OK>. 3) Press to select [User Image]. 4) Press the <OK> key to activate the gray checkbox. 4) Press the <BACK> key to return to the previous menu and select [Reference Mode]. 5) Press to switch items. Item Option Description...
- Page 50 Menu Introduction [Color Temp] • Press the indicator key to select the color temperature (Low, Mid, High). • [ High ]: Gradually turns blue. • [ Mid ]: Suitable natural color. [ Low] : Turns red. [Color Temp Settings] Press the ...
- Page 51 Menu Introduction [Reset] Press the MENU key on the remote control or control panel to display the on-screen menu. Press the indication key to select the "Color Adjust" menu, and then press the OK or key. 1) Press to select [Reset]. 2) Press the <OK>...
-
Page 52: Setting Menu
Menu Introduction Setting Menu This projector has a "Setup" menu that allows you to set up other functions as described below. [Direct Power On] When this function is set to "On", the projector will turn on automatically when the power cord is connected to the power outlet. - Page 53 Menu Introduction Item Option Description After entering the standby state, the projector detects the signal source VGA1 through VGA1, and the projector turns on immediately. After entering standby mode, the projector detects the signal source through VGA2 VGA2 and the projector turns on immediately. Signal Power On After entering standby mode, the projector detects that the signal source is HDMI1...
- Page 54 Menu Introduction • D o not use the projector at an altitude of 3650m and above, as this will shorten the life of the • internal components and cause malfunction. W hen set to [On], the fan noise becomes louder and the fan speed increases. [Multi angle installation] Select the current machine multi-angle installation mode.
- Page 55 Menu Introduction 3) Press to switch items. Item Option Description The remote control is locked. Remote Lock The remote control works normally. [Standby Mode] This projector offers a choice of three standby modes. Press the MENU key on the remote control or control panel to display the on-screen menu. Press the ...
- Page 56 Menu Introduction Item Option Description Automatic HDMI Range Full Limited HDMI Settings Auto Color Space YPbPr/YCbCr • Note: H DMI setup option, optional only with HDMI1 and HDMI2 channels. [Laser Hours] Displays the projector's current light source runtime.
-
Page 57: Expand Menu
Menu Introduction Expand Menu This projector has an "Extended" menu that allows you to set up additional functions as described below. [Language] The user can switch the language of the screen display. Press the MENU key on the remote control or control panel to display the on-screen menu. Press the ... - Page 58 Menu Introduction Item Option Description 1) Press instruction key to select characters in the keyboard; 2) After entering the current password OK, the display will show Enter new Change password, characters to meet the 4 code after the prompt: Confirm password. Password 3) Press <OK>...
- Page 59 Menu Introduction Item Option Description The projector's multi-scanning system and Auto PC Adjustment feature automatically detects a wide range of signal formats. If a computer is selected as the signal source, the projector will automatically detect its signal format and make its own adjustments to project a perfect image without any other settings.
- Page 60 Menu Introduction Item Option Description 1) Press to select [H Keystone]. 2) Press the <OK> . 3) Press to switch the value , adjustment range: -120 ~ +120. Press the key to reduce Press the key to reduce the width on the right.
- Page 61 Menu Introduction [Network] Users can make projector network settings. This function is suitable for remote control of the projector from computers on the LAN. Press the MENU key on the remote control or control panel to display the on-screen menu. Press the ...
- Page 62 Menu Introduction • Note: T his model does not support wireless network connections. [USB 5V Output] Users can make projector USB 5V output switch settings. Press the MENU key on the remote control or control panel to display the on-screen menu. Press the ...
- Page 63 Menu Introduction [Test Pattern] Users can select the test chart mode for specific scenario testing and demonstration. Press the MENU key on the remote control or control panel to display the on-screen menu. Press the indicator key to select the "Expand" menu, and then press the OK or key. 1) Press ...
-
Page 64: Information Menu
Menu Introduction Information Menu This projector has an "Information" menu that allows you to set other functions as described below. Press MENU on the remote control or control panel to display the on-screen menu. Press to select the "Information" menu, which displays basic information about the current projector. Item Option Description... -
Page 65: Network Control
Network Control Network Control You can control the device from a PC using a web browser. Enter through a Web browser 1) Launch your computer's Web browser. 2) Enter the IP address set on the projector in the URL input field of the Web browser. * Initial network login address: 192.168.0.100. -
Page 66: System Status
Network Control System Status Displays the current status of the projector. You can view system status, projector controls, system Settings, network Settings, and restarts. 1. Select the display bar. 2. Display the current page and projector name. 3. Detailed function Settings. 4. -
Page 67: [ Projector Control] Page
Network Control [ Projector Control] page Remote Control: The projector can be controlled remotely with simple controls including power on/off, mute, menu basic buttons, input source and test mode. Remote Settings: Values can be changed to adjust the projected image. [ Remote Settings] page Change Projector Name: Change the projector name and then click [Apply]. -
Page 68: [ Network Setup] Page
Network Control [ Network Setup] page Wired LAN setup: Click "Edit", the wired LAN parameters can be modified, click "Apply", confirm the modification. [ Reboot] page Reboot: Restarts the network. -
Page 69: Maintenance And Cleaning
Maintenance and cleaning Status light indicator The status light indicator shows status of projector protection function. Check status and POWER light indicator for good maintenance operation. Note: Unplug the AC power cord in case of any abnormality as it may lead to fire or electric shock. The projector is turned off, and the Power status indicator is constantly bright red (economy standby mode) and blinking yellow (normal standby mode). -
Page 70: Clean The Lens
Maintenance and cleaning Note: Unplug the AC power cord before any cleaning operation. Clean the lens Wipe the lens with clean cloth dampened with nonabrasive camera lens cleaner or clean it with lens cleaning paper or air blower. Do not over apply cleaner to the lens. Abrasive cleaner, solution, or other rough chemical may scratch the lens. -
Page 71: Appendix
Appendix Troubleshooting Check the following before calling your dealer or service center: Troubleshooting Solution – Insert the projector power plug into an AC outlet. – Verify that the Power indicator is lit. Power on failure – Check the Status indicator. If the light is blinking, the projector cannot be turned on. - Page 72 Appendix – Check the battery. – Make sure there is no obstacles stand in between your projector Remote control does not and the remote control. work – Make sure the remote control is not too far away from your projector. The maximum operation range is 8m. –...
-
Page 73: Light Indicator Status
Appendix Light indicator status Check light indicator to learn status of your projector. Projector status POWER STATUS FILTER Economy Standby Mode Normal Yellow Blink (light for 1 second, dark for 0.5 seconds) Network standby mode Red Blink (light for 2 seconds, dark for 2 seconds) Power on startup Yellow Blink... -
Page 74: Compatible Computer Screen
Appendix Compatible computer screen Your projector is designed to accept every computer signal below Dot Clock 160MHz . See table below for details on resolution and relevant frequency. Source Specification Pixel OSD Display H-freq H-freq RGB HDMI HDBT Resolution clock (KHz) (KHz) (MHz) - Page 75 Appendix Source Specification Pixel OSD Display H-freq H-freq RGB HDMI HDBT Resolution clock (KHz) (KHz) (MHz) 83.500 1280x800,60Hz ○ ○ ○ 49.702 59.810 106.500 1280x800,75Hz ○ ○ ○ 1280x800 62.795 74.934 122.500 1280x800,85Hz ○ ○ ○ 71.554 84.880 108.000 1280x960,60Hz ○...
-
Page 76: Terminal Configuration
Appendix Terminal configuration VGA OUT Terminal RGB(D-sub 15) Red (Input/output) ----- Green(Input/output) 10 Grounding(field synchronizing) Blue(Input/output) 11 Grounding ----- 12 DDC data Grounding(line 13 Horizontal synchronizing (compound sync.)input/output synchronizing) 14 Vertial synchronizing input/ Grounding(red) output Grounding(green) 15 DDC Clock Grounding(blue) SERIAL Terminal(D-SUB-9) ----- -----... - Page 77 Appendix VGAIN 1 Terminal Red input Green input 10 Grounding(field synchronizing) B input 11 Grounding ----- 12 DDC data Horizontal Grounding(line synchronizing(compound synchronizing) sync.)input Grounding(red) 14 Vertial synchronizing input Grounding(green) 15 DDC clock Grounding(blue)
-
Page 78: Dimensions
Appendix Dimensions Screw Holes for Ceiling Mount Screw: M4 ��� Depth: 8.0mm ��� ��� ��� ���.� ��.� ���.� ��.� ���.� ���.�... -
Page 79: Technical Specifications
Appendix Technical Specifications Mechanical properties Operating Environment Dimensions(WxDxH): 460mm x 355mm x 143mm Operating temperature : 0℃ ~40℃ (39℃ ~ ECO) Dimensions: 10Kg Operating humidity : -20℃ ~60℃ Dimensions: 11° High land :1500 m Remote control Resolution: 1920x1080/1920x1200 Battery: AA alkaline type x 2(without battery) Operating Range: 16.4' (5 m)/±30 Compatible Signals Dimensions: 158.5mm*47.45mm*26mm... -
Page 80: Rs232 Control Mode
Appendix RS232 control mode 1 Serial connections 1.1 Port setting Project Setpoint Communication method Asynchronous communication Communication rate 115200 Length 8-bit Parity check Stop position Flow control 1.2 Connection mode Can only use RS232 serial cross connect PC and projector. Computer terminal Projector terminal CD 1... - Page 81 Appendix 2. Basic commands Distinguish the letter case.and enter Each command ends with [CR] (enter) . Command Option Command Option POWER ON Video Component POWER OFF (Immediately) HD-BaseT S-Video HDMI1 HDMI2 VGA 1 VGA 2 2.1 POWER ON command Command “C00”[CR] Power ON action.
- Page 82 Appendix 2.4 HDMI 1 command Command “C36”[CR],“C37”[CR] Details Select HDMI1 Input. Receive Successfully [ACK][CR] Return Value Receive Unsuccessfully “?” [CR] 2.5 VGA 1 command Command “C05”[CR] Details Selects VGA 1 Input. Receive Successfully [ACK][CR] Return Value Receive Unsuccessfully “?” [CR] 2.6 VGA 2 command Command “C06”[CR] Details...
- Page 83 Appendix 2.9 S-Video command Command “C08”[CR] Details Select S-Video Input . Receive Successfully [ACK][CR] Return Value Receive Unsuccessfully “?” [CR] • Note: [ ACK] [CR] is the return value when a valid command is received.
Need help?
Do you have a question about the ST-C801P WUXGA and is the answer not in the manual?
Questions and answers