Advertisement
Quick Links
Advertisement
Chapters

Subscribe to Our Youtube Channel
Related Manuals for TTGO YY-26ST

Summary of Contents for TTGO YY-26ST
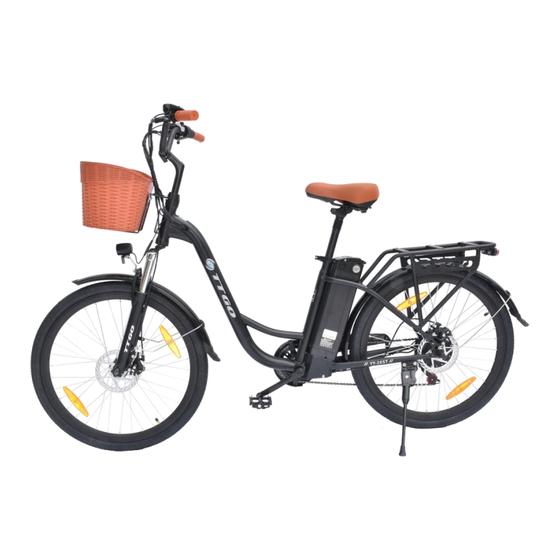
- Page 1 E-Bike Us e r ma n u a l Model: YY-26ST...
-
Page 2: Table Of Contents
Table of Contents Safety Instruction ......1 General Information ......3 Bike Usage . -
Page 3: Safety Instruction
Safety Instruction Thank you for choosing our products. To ensure your safety and health, we encourage you to read this manual thoroughly before you assemble the bike and take the first ride.Safe and effective use can only be assured if the equipment is assembled, maintained, and used properly. - Page 4 Safety Instruction ● Before riding, please check whether the front and rear brakes work normally, check the fastening status of the handlebars and front and rear wheels, and check whether the reflector is damaged or contaminated; ● When using the motor, please be careful not to hit vigorously and keep the rotating shaft lubricated;...
-
Page 5: General Information
General Information 1. About TTGO Electric Bike TTGO electric bike is a leading icon of e-bikes. For years, TTGO has been not only dedicating to innovation, cutting-edge technology and premium materials, but also providing cost effective e-bikes, to satisfy riders' various needs of transportation and even desire of exploring sports &... -
Page 6: Bike Usage
Bike Usage Before Riding ● Before riding the bike on the open road, try all the settings on the electric bike, and get used to various results in a safe and controllable environment. ● Please check the power circuit, lighting circuit, and test the brake system before cycling. -
Page 7: Brake Adjustment
Bike Usage ● If the bicycle is splashed with moisture, please wipe it dry and clean in time. Brake Adjustment Ensure that the brake cables are properly inserted into the brake levers before aligning a mechanical disc brake. If the disc rotor is bent or damaged, replace the rotor first. -
Page 8: Installation And Adjustment
Installation And Adjustment Open the package of the bike, take out the electric bike and all the accessories inside and use the tool to cut off the packing rope. 1. Install the handlebar Insert the stem and tighten the screw. 1.2 Using the wrench from tool kit to loosen the four screws and put the stem into the bike in balance and you can adjust the handlebar in a property angel and position. -
Page 9: Install The Front Wheel
Installation And Adjustment Loosen the screw that secures the fender, fix the fender and then tighten it again. 3. Install the front wheel 3.1 Using the tool to loosen the fixing rod of the front fork and remove it (this accessory is to prevent the front fork from being deformed during delivery). - Page 10 Installation And Adjustment 4. Install the kickstand Unscrew the screw in the kickstand, Install it and tighten the screw with tool. 5. Install the Basket 5.1 Please fix 2 screws at the bottom of the basket first, and then fix the basket and bracket on the bike.
- Page 11 Installation And Adjustment 6. Install the Headlight 6.1 Please remove the screw on the bracket first, then assemble the headlight and tighten the screw. 7. Install the Pedals 7.1 The pedal marked “R” has right-hand threads, tighten it in a clockwise direction. The pedal marked “L”...
-
Page 12: Install The Battery
Installation And Adjustment 9. Install the Battery Please press the blue switch under the saddle andpull up the saddle at the same time. Then follow the steps to insert the battery. Press and lock the saddle. -
Page 13: Meter Operation
Meter Operation 1. Meter Instruction Assistance Level:Low Assistance Level:Mid Assistance Level:High MODE POWER Battery Indicator DOWN ON/OFF UP 2. Meter Operation 3. Operation Cautions ● Avoid the risk of collision. ● Don’t modify system parameters to avoid parameters disorder. ● Contact the seller when error code appears. -
Page 14: Batteryandcharging:further Information
Battery And Charging: Further Information Battery: Further information ● Keep the battery out of reach of children. ● Charging at 0°C~40°C/ 32°F~104°F, and discharging at -5°C~40°C/ 23°F~104°F. Please do not store the battery in temperatures above 35°C/ 95°F or below -5°C/ 23°F. ●... -
Page 15: Battery Disposal
Battery and charging: Further Information Reminder Charge a new battery 5~7 hours before you use it in your product for the first time. If the battery is dropped or damaged due to a bicycle accident, there may be a danger of electrolyte leakage. -
Page 16: Maintenance
Maintenance ● The front and rear wheels of the vehicle should be located in the center of the front fork or frame. ● After riding, please store the bike in a place without sunlight and rain. ● Water showering is forbidden, and the surface of the bike body can be wiped with a semi-dry cloth. -
Page 17: Warranty
Warranty One-Year Limited Hardware Warranty Your electric bike includes a One Year Limited Hardware Warranty. TTGO provides warranty service for the electric bikes. If there is a hardware defect and a valid claim is received during the warranty period, we will resend new parts within the scope permitted by law. -
Page 18: Attachment
Attachment Technical parameters Performance index Project Parameter Bicycle Size 1850*650*1200mm Wheel Size 26* Inches Frame Material Steel Basic Parameters Maximum Load 120KG Bicycle Weight 28KG Maximum Speed 25km/h Maximum Gradient 15 Degrees Performance Rear Derailleur 6 Speed Parameters Mileage Range 30~47 miles (48-75 km) 14°F-113°F (-10℃~45℃) Working Temperature... - Page 19 Attachment Project Performance index Parameter Motor Power 250W Motor Parameters Motor Type Brush-less Gear Motor Maximum Torque 45 N.M Input Voltage 100-240V Input Current 1.8A Charger Parameters Output Voltage DC42V Output Current Display LED Display Disc brake Brake Other Parameters Light Front light Remarks:...
- Page 21 Elektrische fiets Ge b r u i k s a a n w i j z i n g Model: YY-26ST...
- Page 22 Inhoudsopgave Veiligheidsinstructie ......1 Algemene informatie ......3 Fietsgebruik .
-
Page 23: Veiligheidsinstructie
Veiligheidsinstructie Bedankt dat u voor onze producten hebt gekozen. Om uw veiligheid en gezondheid te garanderen, raden wij u aan deze handleiding grondig te lezen voordat u de fiets monteert en de eerste rit maakt. Veilig en effectief gebruik kan alleen worden gegarandeerd als de apparatuur op de juiste manier wordt gemonteerd, onderhouden en gebruikt. - Page 24 Veiligheidsinstructie ● Controleer voor het rijden of de voor- en achterremmen normaal werken, controleer de bevestigingsstatus van het stuur en de voor- en achterwielen en controleer of de reflector beschadigd of vervuild is. ● Bij gebruik van de motor dient u erop te letten dat u niet te hard slaat en dat de draaiende as gesmeerd blijft.;...
-
Page 25: Algemene Informatie
Algemene informatie 1. Over TTGO Elektrische Fiets De TTGO elektrische fiets is een toonaangevend icoon van e-bikes. TTGO is al jaren toegewijd aan innovatie, geavanceerde technologie en hoogwaardige materialen, maar biedt ook kosteneffectieve e-bikes om te voldoen aan de verschillende transportbehoeften van rijders en zelfs de wens om sport en het buitenleven te verkennen. -
Page 26: Fietsgebruik
Fietsgebruik Voor het rijden ● Voordat u op de openbare weg gaat fietsen, probeert u alle instellingen van de elektrische fiets uit en raakt u gewend aan de verschillende resultaten in een veilige en controleerbare omgeving. ● Controleer het stroomcircuit, het verlichtingscircuit en test het remsysteem voordat u gaat fietsen. - Page 27 Fietsgebruik ● Als de fiets nat is geworden, droog hem dan tijdig af en maak hem schoon. Rem afstelling Zorg ervoor dat de remkabels goed in de remhendels zijn geplaatst voordat u een mechanische schijfrem uitlijnt. Als de schijfrotor verbogen of beschadigd is, vervangt u eerst de rotor;...
-
Page 28: Installatie En Afstelling
Installatie en afstelling Open de verpakking van de fiets, haal de elektrische fiets en alle accessoires eruit en gebruik het gereedschap om het verpakkingstouw door te snijden. 1. Stuurmonteren Plaats de steel en draai de schroef vast. 1.2 Gebruik de sleutel uit de gereedschapsset om de vier schroeven los te draaien en de stuurpen in balans te brengen op de fiets. - Page 29 Installatie en afstelling Draai de schroef los die het spatbord vastzet, zet het spatbord vast en draai het vervolgens weer vast. 3. Monteer het voorwiel 3.1 Met behulp van het gereedschap de bevestigingsstang van de voorvork losmaken en verwijderen (dit accessoire is bedoeld om te voorkomen dat de voorvork tijdens de levering vervormt).
- Page 30 Installatie en afstelling 4. Installeer de standaard Draai de schroef in de standaard los, monteer deze en draai de schroef vast met gereedschap. 5. Installeer de mand 5.1 Bevestig eerst 2 schroeven aan de onderkant van de mand en bevestig vervolgens de mand en de beugel aan de fiets.
- Page 31 Installatie en afstelling 6. Koplamp monteren 6.1 Verwijder eerst de schroef op de beugel, monteer vervolgens de koplamp en draai de schroef vast. 7. Pedalen installeren 7.1 Het pedaal gemarkeerd met "R" heeft rechtse schroefdraad, draai deze met de klok mee vast. Het pedaal gemarkeerd met "L" heeft linkse schroefdraad, draai deze tegen de klok in vast (tegen de klok in).
-
Page 32: Batterij Installeren
Installatie en afstelling 9. Batterij installeren Druk op de blauwe schakelaar onder het zadel en trek tegelijkertijd het zadel omhoog. Volg vervolgens de stappen om de batterij te plaatsen Druk op het zadel en vergrendel het. -
Page 33: Meterwerking
Meterwerking 1. Meterinstructie Assistance Level:Low Assistance Level:Mid Assistance Level:High MODE POWER Battery Indicator DOWN ON/OFF UP 2. Meterwerking 3. Bedieningswaarschuwingen ● Vermijd het risico op een botsing. ● Wijzig geen systeemparameters om parameterverstoring te voorkomen. ● Neem contact op met de verkoper wanneer de foutcode verschijnt. -
Page 34: Batterij En Opladen: Meer Informatie
Batterij en opladen: verdere informatie Batterij: Meer informatie ● Houd de batterij buiten bereik van kinderen. ● Opladen bij 0°C~40°C/ 32°F~104 °F, en ontladen bij -5°C~40°C/ 23 °F~104 °F. Bewaar de batterij niet bij temperaturen boven de 35 °C/ 95°F of onder de -5°C/ 23°F.. ●... - Page 35 Batterij en opladen: Meer informatie Herinnering Laad een nieuwe batterij 5 tot 7 uur op voordat u deze voor het eerst in uw product gebruikt.. Als de batterij valt of beschadigd raakt door een fietsongeluk, kan er gevaar zijn voor elektrolytlekkage.
-
Page 36: Onderhoud
Onderhoud ● De voor- en achterwielen van het voertuig moeten zich in het midden van de voorvork of het frame bevinden. ● Na het fietsen, bewaar de fiets op een plek zonder zonlicht en regen. ● Douchen met water is verboden en het oppervlak van de fiets kan worden afgeveegd met een halfdroge doek. -
Page 37: Garantie
Garantie Eén jaar beperkte hardwaregarantie Uw elektrische fiets heeft een beperkte hardwaregarantie van één jaar. TTGO biedt garantieservice voor de elektrische fietsen. Als er een hardwaredefect is en er een geldige claim wordt ontvangen tijdens de garantieperiode, sturen we nieuwe onderdelen binnen de wettelijk toegestane reikwijdte. -
Page 38: Bijlage
Bijlage Technische parameters Prestatie-index Project Parameter Fietsmaat 1850*650*1200mm Wielmaat 26* inch Framemateriaal Staal Basisparameters Maximale belasting 120KG Gewicht van de fiets 28KG Maximale snelheid 25km/h Maximale helling 15 graden Prestatiepar Achterderailleur 6 Snelheid ameters Kilometerstandbereik 30~47 mijl (48-75 km) 14°F-113°F (-10℃~45℃) Werktemperatuur Nominale spanning Batterijcapaciteit... - Page 39 Bijlage Project Prestatie-index Parameter Motorvermogen 250W Motorparameters Motortype Borstelloze tandwielmotor Maximaal koppel 45 N.M Ingangsspanning 100-240V Ingangsstroom 1.8A Laderparameters Uitgangsspanning DC42V Uitgangsstroom Weergave LED-scherm Schijfrem Andere parameters Licht Voorlicht Opmerkingen: ● Nadat de batterij volledig is opgeladen, verandert het indicatielampje van de lader van rood naar groen ●...
Need help?
Do you have a question about the YY-26ST and is the answer not in the manual?
Questions and answers