Table of Contents
Advertisement
Quick Links
Advertisement
Table of Contents

Related Manuals for TRI tool Tube Saw

Summary of Contents for TRI tool Tube Saw
- Page 1 Operation Manual...
- Page 2 ABOUT TRI TOOL TECHNOLOGIES At Tri Tool Technologies, we are committed to your success through relentless innovation and powerful partnership. We insist on developing tools and equipment that exceed your expectations of performance, precision, safety, and durability. As a full-service engineering firm, we are here to support you every step of the way.
-
Page 3: Table Of Contents
TABLE OF CONTENTS TRI TOOL TECHNOLOGIES WARRANTY TOOL BIT RESHARPENING POLICY ABOUT THE MANUAL SAFETY PRECAUTIONS GENERAL DESCRIPTION SPECIFICATIONS UNBOXING AND SETUP CONTROLS MAINTENANCE OPERATION CUTTING SPEEDS AND FEEDS JAWS AND EXTENSIONS SAW BLADES TROUBLESHOOTING ILLUSTRATED PARTS BREAKDOWN... -
Page 4: Tri Tool Technologies Warranty
Tri Tool Technologies Tri Tool Technologies Warranty LIMITED WARRANTY: All products manufactured by Seller are warranted to be free from defects in materials and workmanship under normal use. The period of this warranty shall be three years from the date of shipment for all products, except for welding and Non- Standard Products which shall be one year from the date of shipment. -
Page 5: Tool Bit Resharpening Policy
The Tube Saw Buyer’s notice of a defective Goods must identify the specific Goods affected, and the nature of the defect. It is required when returning the defective Goods, that it is suitably packed, fully insured, and transportation and insurance prepaid in accordance with instructions issued by Seller. -
Page 6: About The Manual
The instructions and descriptions in this manual were accurate when the manual was written. However, the information in the manual is subject to change without notice. Check for updated information before you start any job. The Tri Tool Technologies web site has the most current information. - Page 7 LASER HAZARD READ MANUAL: Read manual before use, refer to manual for Tri Tool Technologies machine being used. READ MANUAL DISCONNECT FROM POWER: Disconnect main plug from electrical outlet before performing all maintenance.
-
Page 8: Safety Precautions
Tri Tool Technologies 2. SAFETY PRECAUTIONS In General Use standard safety equipment such as: hard hats, safety shoes, safety harnesses, protective clothes, and other safety devices when appropriate. Operate this tool only in accordance with specific operating instructions. WARNING: Do not override the deadman switch on the power unit. -
Page 9: Tool Care
Before you start operating the equipment, do no-load tests and feed function checks. Tool Use Use the right tool and tool bit for the job. Contact Tri Tool Technologies to help with your application. Keep the tool bits fully engaged in the tool bit holders. Loose bits are sharp and can cause cuts or punctures. -
Page 10: General Description
Tri Tool Technologies 3. GENERAL DESCRIPTION Tri Tool Technologies’ The Tube Saw is a table mounted OD clamping machine designed to swiftly and easily clamp and sever tube and pipe. The machine is designed to cut thin wall stainless and carbon steel tubing from 1/4-inch to 6-inch diameter and pipe from 1/8-inch diameter to 6-inch diameter. -
Page 11: Specifications
The Tube Saw 4. SPECIFICATIONS Clearance and Dimensions Clamp Wheel 41.0in 1041mm Laser Pointer Maximum Rotating Diameter 8.00in Drive 203mm Wheel 12.00in 305mm 15.50in 394mm 6.00in 152mm 18.89in 480mm Figure 2: Envelope Drawing Pipe and Tube Cutting Capacities Tube Sizes 1/4”... - Page 12 Tri Tool Technologies Weight Machine Body: 65 lbs (29.5 kg) Motor Assembly: Cordless: 15 lbs (6.8 kg) Corded: 11 lbs (5.0 kg) Total: Cordless: 80 lbs (36.3 kg Corded: 76 lbs (34.5 kg) Drive System Cordless motor: 40 VDC Charger:...
-
Page 13: Unboxing And Setup
The Tube Saw 5. UNBOXING AND SETUP 1. Open the shipping box and examine the contents. Look for any signs of damage during shipping. The machine weighs approximately 80 pounds when assembled. 2. Use the lifting eye and a hoist or crane to lift the main body out of the packaging. - Page 14 Raise the stud on the pipe stand. Install the provided set screws into the base plate. Mount The Tube Saw over the stand and slide the stud into the slot. Before tightening the stud, use the set screws to level The Tube Saw with the base.
- Page 15 The Tube Saw 6. Continue rotating the faceplate until the plunge mechanism is at the 6 ‘o clock position. Figure 4: Plunge Mechanism at 6 o’clock 7. Remove the Cutting Head Assembly from the shipping box. Plug it in and make sure the motor functions and was not damaged in shipping.
- Page 16 Tri Tool Technologies 8. Install the saw blade suggested in the SAW BLADES section for the material to be cut. Use the supplied wrench to tighten the Flange Nut making sure the saw blade teeth are pointed in the correct direction (as shown in Figure 5).
- Page 17 The Tube Saw 9. Slide the Cutting Assembly into the plunge mechanism and tighten the two screws using the 6mm Allen wrench provided in the tool kit. 2X TIGHTEN Figure 6: Screw Location 92-2038 Rev. 240912...
- Page 18 Tri Tool Technologies 10. Rotate the Cutting Head around to confirm clearance. 11. Rotate the Cutting Head until the Motor Assembly is at the 3 o’clock position. This is the recommended “HOME” position for the Cutting Head. It allows the operator the most accessibility to all the saw controls and features.
-
Page 19: Controls
The Tube Saw 6. CONTROLS The following is a list of the machine controls: Motor (Cordless) Motor Speed Control (cordless) The Motor Speed Control is a dial with settings 1 thru 5 which allow for speed control. Switch The power switch on the cordless motor is a slide switch that can be locked in the on position by depressing the end after sliding forward. - Page 20 Tri Tool Technologies Motor (Corded) Motor Trigger The Motor Trigger turns the motor on and off. Trigger Lock The Trigger Lock locks the Motor Trigger in the “ON” position for the duration of the cut (corded only). Motor Speed Control The Motor Speed Control is a dial with settings 1 thru 6 which allow for speed control.
- Page 21 The Tube Saw Plunge Lever The Plunge Lever pushes the saw blade into the material at the beginning of the cut. The lever has two positions; “in” and “out”. “In” engages the saw blade into the material, “out” removes it from the material. The plunge system is spring-assisted to return to the out position when actuated by the lever.
-
Page 22: Maintenance
Storage When The Tube Saw is to be stored or left out of service for a period of time (30 days or more) it should be thoroughly cleaned and wiped down. Use a cloth to rub a rust preventative on the steel surfaces to protect them. -
Page 23: Operation
The Tube Saw 8. OPERATION WARNING: Read these operating instructions carefully before attempting to operate The Tube Saw. Failure to do so could result in damage to the machine or injury to the operator. WARNING WARNING: Wear safety glasses and ear protection while operating this machine. - Page 24 Tri Tool Technologies Preparing The Saw Depth 1. Engage the plunge lever on the cutting assembly. 2. Place a piece of material in the jaws as described above, but do not feed it past the saw blade. 3. Loosen slide assembly clamp.
-
Page 25: Cutting Speeds And Feeds
The Tube Saw 9. CUTTING SPEEDS AND FEEDS Cordless Motor Blade Speed MOTOR SETTING Corded Motor Blade Speed GEAR 1 GEAR 2 MOTOR SETTING 92-2038 Rev. 240912... -
Page 26: Jaws And Extensions
Tri Tool Technologies 10. JAWS AND EXTENSIONS JAW EXTENSIONS FOR MATERIAL SIZES RANGE PIPE SIZE TUBE SIZE 4.412 - 6.763 inches 4.5 to 4 (4.50” O.D.) - 6 (6.625”O.D.) Extension (112.06-171.78 mm) 6.5 inch Short 2.305 - 4.680 inches 2.375 to Extension 2 (2.375”... - Page 27 The Tube Saw 4.680 2.305 Figure 11: Short Extensions 2.250 2.380 .220 Figure 12: Long Extensions 92-2038 Rev. 240912...
-
Page 28: Saw Blades
Tri Tool Technologies 11. SAW BLADES Use only premium Tri Tool Technologies saw blades in The Tube Saw Material Part Tooth Diameter Wall Number Count Thickness 30-7417 75 mm 48 tooth .098-.150” 30-7418 75 mm 78 tooth .035-.098 92-2038 Rev. 240912... -
Page 29: Troubleshooting
The Tube Saw 12. TROUBLESHOOTING Problem: Material Rolls In Jaws The jaws are not tight enough. Problem: Cut Is Not Square The jaws are not tight enough. The slide or Plunge Assembly has become loose. The Cutting Head is not mounted straight. -
Page 30: Illustrated Parts Breakdown
Tri Tool Technologies 13. ILLUSTRATED PARTS BREAKDOWN THE TUBE SAW, 110VAC (P/N 01-2635), 220VAC (P/N 01-2642) 92-2038 Rev. 240912... - Page 31 The Tube Saw Parts List, The Tube Saw, 110VAC (P/N 01-2635), 220VAC (P/N 01-2642) Item Part Description 02-3218 SUB-ASSEMBLY, TUBE SAW 04-0225 SPINDLE ASSEMBLY, TUBE SAW, CORDED, 110V 05-1708 KIT, TOOL, TUBE SAW 30-7453 PLATE, DATA, THE TUBE SAW 33-0995...
- Page 32 Tri Tool Technologies SUB-ASSEMBLY, THE TUBE SAW (P/N 02-3218) Parts List, Sub-Assembly, The Tube Saw (P/N 02-3218) Item Part Description 04-0239 DRIVE-CLAMP ASSEMBLY, SAW 30-7451 LIFTING EYE, M8-1.25 30-7452 LASER, LINE POINTER 33-4502 SCREW, CAP, M6X1-30MM 33-4594 SCREW, CAP, M6 X 1 X 12MM 34-0002 WASHER, FLAT, USS, 1/4"...
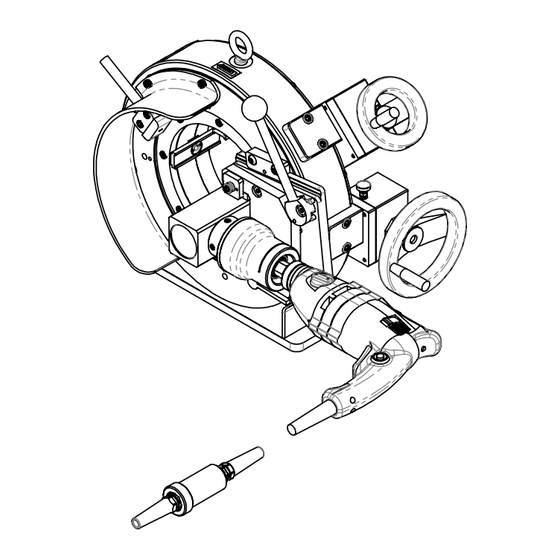
- Page 33 The Tube Saw SPINDLE ASSEMBLY, THE TUBE SAW, CORDED (P/N 04-0225) 30 2X 22 4X 18 4X 92-2038 Rev. 240912...
- Page 34 Tri Tool Technologies Parts List, Spindle Assembly, The Tube Saw, Corded (P/N 04-0225) Item Part Description 19-1987 HOUSING, BEVEL, GEARBOX 19-1990 HOUSING, LID, PLANETARY GEARBOX 19-2018 HOUSING, PLANETARY, 3:1 20-1850 SHAFT, DRIVE, SAW 20-1914 SHAFT ASSEMBLY, OUTPUT, PLANETARY 28-0721 SEAL, RADIAL SHAFT, 25 X 52 X 10MM, NBR...
- Page 35 The Tube Saw DRIVE ASSEMBLY, JAW CLAMP (P/N 04-0234) 92-2038 Rev. 240912...
- Page 36 Tri Tool Technologies Parts List, Drive Assembly, Jaw Clamp (P/N 04-0234) Item Part Description 19-1985 HOUSING, SPUR GEAR 19-2008 HOUSING, COVER 19-2009 HOUSING, WORM GEAR 18:1 20-1870 SHAFT, WORM, CLAMP 18:1 20-1871 SHAFT, WORM GEAR TO SPUR GEAR 18:1 29-0931 BEARING, PLAIN, 1/2"ID, 5/8"...
- Page 37 The Tube Saw DRIVE ASSEMBLY, FEED DRIVE, 3:1 RATIO (P/N 04-0236) 92-2038 Rev. 240912...
- Page 38 Tri Tool Technologies Parts List, Drive Assembly, Feed Drive, 3:1 Ratio (P/N 04-0236) Item Part Description 19-1985 HOUSING, SPUR GEAR 19-2008 HOUSING, COVER 19-2023 HOUSING, WORM GEAR, 3:1 20-1881 SHAFT, WORM AND HANDWHEEL 3:1 20-1891 SHAFT, WITH CLUTCH 29-0931 BEARING, PLAIN, 1/2" ID, 5/8" OD 30-2490 CLUTCH, ROLLER, 1/2"...
- Page 39 The Tube Saw SPINDLE ASSEMBLY, THE TUBE SAW, CORDLESS (P/N 04-0238) 21 4X 18 4X 92-2038 Rev. 240912...
- Page 40 Tri Tool Technologies Parts List, Spindle Assembly, The Tube Saw,Cordless (P/N 04-0238) Item Part Description 19-1987 HOUSING, BEVEL, GEARBOX 19-1989 HOUSING, PLANETARY GEARBOX 19-1990 HOUSING, LID, PLANETARY GEARBOX 20-1850 SHAFT, DRIVE, SAW 20-1914 SHAFT ASSEMBLY, OUTPUT, PLANETARY 28-0721 SEAL, RADIAL SHAFT, 25 X 52 X 10MM, NBR...
- Page 41 The Tube Saw DRIVE CLAMP ASSEMBLY, SAW (P/N 04-0239) 92-2038 Rev. 240912...
- Page 42 Description 04-0234 DRIVE ASSEMBLY, JAW CLAMP 04-0236 DRIVE ASSEMBLY, FEED DRIVE, 3:1 RATIO 08-1873 BLOCK ASSEMBLY, JAW 19-2007 HOUSING, MAIN TUBE SAW 24-5290 PLATE, FOOT, STAND 24-5299 PLATE, FRONT BEARING RETAINING 24-5312 PLATE, FRONT FACE PLATE 24-5313 PLATE, SCROLL PLATE, JAW ACTUATION...
- Page 43 The Tube Saw HOLDER, SAW PLUNGE ASSEMBLY (P/N 49-2058) 7 2X 92-2038 Rev. 240912...
- Page 44 Tri Tool Technologies Parts List, Holder, Saw Plunge Assembly (P/N 49-2058) Item Part Description 24-5314 PLATE, SLIDE, TUBE SAW 24-5315 PLATE, PIVOT, TUBE SAW 24-5316 PLATE, WEAR 30-7387 PLUNGER, BALL, M6 X 1 X 14, 9 LBS 30-7410 HANDLE, ADJUSTABLE, M6...
- Page 45 The Tube Saw Parts List, Tool Kit, The Tube Saw (P/N 05-1708) Item Part Description 30-7456 TOOLBOX 19-3/4 X 6 X 4 BLACK 33-5288 SCREW, SET, M12X1.75 X 40 35-0752 NUT, HEX, M12 X 1.75 36-0063 WRENCH, COMBINATION, 3/4 36-0185 WRENCH, L, HEX, 6MM, 5-1/2"...
- Page 46 • Disconnect power sources before servicing or moving the equipment. • Remove all loose articles of clothing and jewelry before operating the equipment. Be Safety Conscious! 3041 Sunrise Blvd. Rancho Cordova, CA 95742 +1(916) 288-6100 • +1(800) 345-5015 www.tritool.com Copyright Tri Tool Technologies. PN 81-0542 (04-21) ©...
Need help?
Do you have a question about the Tube Saw and is the answer not in the manual?
Questions and answers