Table of Contents
Advertisement
Available languages
Available languages
Quick Links
Advertisement
Chapters
Table of Contents

Related Manuals for Homematic IP HmIP-HCU1


Summary of Contents for Homematic IP HmIP-HCU1
- Page 1 Home Control Unit HmIP-HCU1 | HmIP-HCU1-A Installations- und Manual de instalación Bedienungsanleitung y uso Installation and operating Istruzioni per l‘installazione manual e l‘uso Notice d‘installation et Installatie- en d‘emploi bedieningshandleiding...
-
Page 2: Table Of Contents
Installations- und Bedienungsanleitung Inhaltsverzeichnis Lieferumfang ....................3 Hinweise zur Anleitung ................3 Gefahrenhinweise ..................3 Homematic IP – Smart wohnen, einfach komfortabel Funktion und Geräteübersicht ..............4 Montage ......................5 LAN-Installation ....................5 WLAN-Installation ....................6 Inbetriebnahme ..................... 7 Home Control Unit einrichten ................. 7 LAN-Inbetriebnahme ..................7 WLAN-Inbetriebnahme .................. -
Page 3: Lieferumfang
Lieferumfang Lieferumfang Verwenden Sie das Gerät nicht, wenn es von außen erkennbare 1x Homematic IP Home Control Unit Schäden z. B. am Gehäuse, an 1x Wandhalter Bedienelementen oder an den 1x USB-Stick Anschlussbuchsen bzw. eine Funktionsstörung aufweist. Im 1x Steckernetzteil Zweifelsfall lassen Sie das Gerät 1x Netzwerkkabel von einer Fachkraft prüfen. -
Page 4: Funktion Und Geräteübersicht
HHmematiccIIP – mart wHhnenn, einfach HmfHrtaael 4 HHmematiccIIP – mart Achten Sie bei der Auswahl des Montageortes auf den Verlauf wHhnenn, einfach elektrischer Leitungen bzw. auf HmfHrtaael vorhandene Versorgungsleitun- Mit Homematic IP gelangen Sie in gen. wenigen Schritten zur intelligenten Verlegen Sie Kabel stets so, dass Smart-Home-Steuerung. -
Page 5: Lan-Installation
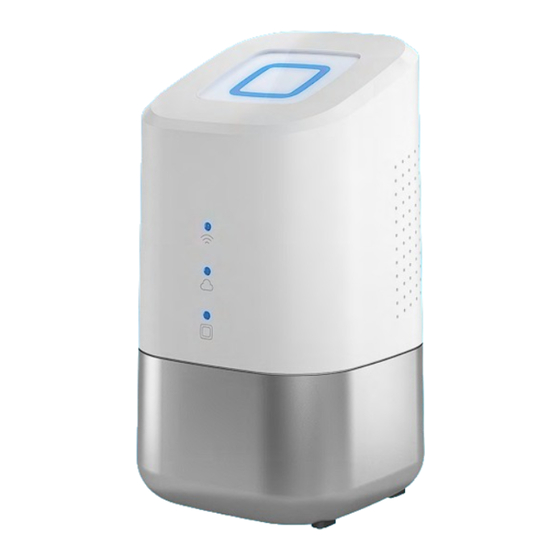
MHntage Geräteübersicht: 6 MHntage (A) Systemtaste (Top-LED) Bitte legen Sie vor Beginn der Inbe- (B) Status-LEDs triebnahme Ihren gewünschten Mon- Internet verfügbar tage- bzw. Aufstellungsort fest. In Cloud-Zugriff verfügbar Abhängigkeit von der bevorzugten Homematic IP Funktion Installation (LAN oder WLAN) ergeben (C) Schnittstelle: Netzwerkkabel sich unterschiedliche Anforderungen, (D) Schnittstelle: USB... -
Page 6: Wlan-Installation
MHntage WLAN-Installation Bei bevorzugter WLAN-Installati- on müssen am Installationsort 30 mm eine Steckdose zur Stromversor- gung und ausreichender WLAN- Empfang vorhanden sein. Stellen Sie sicher, dass bei bevor- 2x Ø 5 mm zugter WLAN-Installation die Home Control Unit mit einem Abstand von >1 m zum Router Abbildung 5 aufgestellt bzw. -
Page 7: Inbetriebnahme
Control Unit manuell in der App rät und nehmen Sie die Home Control eingeben. Unit in Betrieb, wie im nachfolgenden Abschnitt beschrieben. Nach erfolg- Homematic IP reicher Inbetriebnahme der Home Control Unit können Sie weitere Homematic IP Geräte hinzufügen und in Ihr System integrieren. - Page 8 • Wählen Sie die LAN-Inbetriebnah- • Warten Sie, bis die Top-LED Ihrer me beim Installationsvorgang aus. Home Control Unit ausgeschaltet ist. Homematic IP WLAN | LAN Abbildung 10 Abbildung 12 • Verbinden Sie die Home Control Unit über das mitgelieferte Netz-...
-
Page 9: Wlan-Inbetriebnahme
• Die Home Control Unit ist nun ein- gerichtet und einsatzbereit. WLAN-Inbetriebnahme • Wählen Sie die WLAN-Inbetrieb- nahme beim Installationsvorgang aus. Homematic IP Abbildung 17 • Warten Sie, bis die Homematic IP WLAN | LAN Funktions-LED ( ) dauerhaft blau leuchtet. - Page 10 • Verbinden Sie Ihr Endgerät mit dem • Wählen Sie Ihr Heimnetzwerk und WLAN-Hotspot der Home Control geben Sie Ihr Passwort ein. Unit. Geben Sie dazu das Passwort ein, welches auf dem Aufkleber Homematic IP unterhalb der SGTIN steht. WLAN ......
-
Page 11: Hcuweb
Inaetrieanahme Bei einem anderen Blinkverhalten Die HCUweb ist keine Program- der Top-LED s. „8.3 Fehlercodes mieroberfläche und ersetzt nicht die Homematic IP App. und Blinkfolgen“ auf Seite 13 oder folgen Sie den Anweisungen Die HCUweb erreichen Sie im lokalen in der App. Netzwerk unter: •... -
Page 12: Bedienung Und Konfiguration
Fehleraeheaung • Wählen Sie die gewünschte Lösung Die fehlerhafte Übertragung wird in der für Ihr Gerät aus. App angezeigt und kann folgende Ur- sachen haben: • Vergeben Sie in der App abschlie- ßend einen Namen für das Gerät • Empfänger nicht erreichbar und legen Sie einen neuen Raum •... -
Page 13: Fehlercodes Und Blinkfolgen
Fehleraeheaung Fehlercodes und Blinkfolgen 8.3.1 Top-LED Blinkcode Bedeutung Lösung Prüfen Sie, ob die Die Home Control Unit Ausgeschaltet Spannungsversorgung startet nicht. gewährleistet ist. Warten Sie, bis die Die Home Control Unit Orange waberndes Licht Top-LED nicht mehr oran- startet. ge wabert. Drücken Sie die Vorstufe zum Zurückset- Systemtaste erneut für... - Page 14 Fehleraeheaung 8.3.2 Status-LEDs Legende Die LED ist aus. Die LED blinkt. Die LED leuchtet dauerhaft. Blinkcode Bedeutung Lösung Die Home Control Unit Keine Handlungsschritte startet. notwendig. Prüfen Sie Ihre Internetverbindung. Die Home Control Unit • Ist das Netzwerkkabel kann keine Verbindung eingesteck? zum Internet aufbauen •...
-
Page 15: Wiederherstellung Der Werkseinstellungen
Wiederherstellung der Wer seinstellungen 9 Wiederherstellung der Das Gerät führt einen Neustart durch und die Home Control Unit wird zu- Wer seinstellungen rückgesetzt. Durch das Zurücksetzen der Dieser Vorgang muss innerhalb Home Control Unit wird die ge- von 5 Minuten nach dem Starten samte Homematic IP Installation der Home Control Unit erfolgen. -
Page 16: Allgemeine Hinweise Zum Funkbetrieb
Str. 29, 26789 Leer, Deutschland, dass lich an die Behörden wendet und der Funkanlagentyp Homematic IP keine Zusicherung von Eigen- HmIP-HCU1, HmIP-HCU1-A der schaften beinhaltet. Richtlinie 2014/53/EU entspricht. Der vollständige Text der EU-Konformi- Bei technischen Fragen zum Gerät tätserklärung ist unter der folgenden... -
Page 17: 13 Technische Daten
Technische Daten 13 Technische Daten Geräte-Kurzbezeichnung: HmIP-HCU1, HmIP-HCU1-A Versorgungsspannung Steckernetzteil (Eingang): 100 V-240 V/50 Hz Leistungsaufnahme Steckernetzteil max.: 13,0 W Versorgungsspannung: 5,1 V (SELV) Stromaufnahme: max. 2600 mA Leistungsaufnahme Ruhebetrieb: 2,0 W Schutzart: IP20 Umgebungstemperatur: 5 bis 40 °C Abmessungen (B x H x T):... - Page 18 Installation and operating manual Taale Hf cHntents Package contents ..................19 Information about this manual ..............19 Hazard information ..................19 Homematic IP – smart living, simply comfortable Function and device overview ..............20 Installation ....................21 LAN installation ....................21 WiFi installation ....................22 Start-up ......................23 Setting up the Home Control Unit ..............
-
Page 19: Package Contents
IPac age cHntents IPac age cHntents Do not use the device if there are signs of damage to the housing, 1x Homematic IP Home Control Unit control elements or connecting 1x Wall mount sockets, for example, or if it de- 1x USB stick monstrates a malfunction. -
Page 20: Homematic Ip - Smart Living, Simply Comfortable
HHmematiccIIP – smart livingn, simmlly cHmfHrtaale 4 HHmematiccIIP – smart Always lay cables in such a way that they do not become a risk to livingn, simmlly cHmfHrtaale people and domestic animals. With Homematic IP, you can install The device is only suitable for use your smart home solution in just a few in residential environments. -
Page 21: Installation
InstallatiHn Device overview: 6 InstallatiHn (A) System button (top LED) Please choose your desired moun- (B) Status LEDs ting location or set-up location before Internet available starting up the device. Depending on Cloud access available the preferred installation (LAN or WiFi), Homematic IP function there are different requirements, which (C) Interface: Network cable... -
Page 22: Wifi Installation
InstallatiHn WiFi installation Follow the steps below to install the wall mount. If WiFi installation is preferred, a • Mark the drill holes at a distance of power socket and sufficient WiFi 30 mm and drill the holes for the reception must be available at the dowels supplied. -
Page 23: Start-Up
Unit manually in the app. Home Control Unit as described in the following section. Once your Home Homematic IP Control Unit has been set up success- fully, you can add and integrate new Homematic IP devices to your system. - Page 24 „8.3 Error codes and flashing or fol- sequences“ on page 29 low the instructions in the app. Homematic IP • Wait until all three status LEDs on WLAN | LAN your Home Control Unit light up blue continuously.
-
Page 25: Wlan Start-Up
LED ( ) lights up blue conti- • Select WLAN start-up during the nuously. installation process. If the top LED lights up differently Homematic IP see „8.3 Error codes and flashing or fol- sequences“ on page 29 WLAN | LAN low the instructions in the app. -
Page 26: Hcuweb
• Select your home network and en- • Complete the installation steps in ter your password. the Homematic IP app. • The Home Control Unit is now set up and ready for use. Homematic IP WLAN ..HCUweb ....You can use the “HCUweb” web service... -
Page 27: First Steps: Pairing Devices And Adding Rooms
TrHualeshHHting Operation and configuration You can also access the HCUweb via the IP address of the Home Control Once you have successfully paired Unit. your Homematic IP device and added rooms, you can conveniently control You can use your router or the and configure your Homematic IP “NetFinder”... -
Page 28: Duty Cycle
TrHualeshHHting Duty cycle The duty cycle is a legally regulated li- mit of the transmission time of devices in the 868 MHz range. The aim of this regulation is to safeguard the opera- tion of all devices working in the 868 MHz range. -
Page 29: Error Codes And Flashing Sequences
TrHualeshHHting Error codes and flashing sequences 8.3.1 Top LED Flashing code Meaning Solution The Home Control Unit Check that the power Switched off does not start. supply is ensured. The Home Control Unit Wait until the top LED Flickering orange light starts. - Page 30 TrHualeshHHting 8.3.2 Status LEDs Legend The LED is off. The LED flashes. The LED lights up continuously. Flashing code Meaning Solution The Home Control Unit No action required. starts. Check your internet con- nection. • Is the network cable The Home Control Unit plugged in? cannot connect to the Internet and there is no...
-
Page 31: Restoring Factory Settings
AG, Maiburger Straße 29, 26789 Home Control Unit. Leer, Germany hereby declares that the radio equipment type Homematic IP HmIP-HCU1, HmIP-HCU1-A is compli- ant with Directive 2014/53/EU. The full text of the EU declaration of conformi- ty can be found at:... -
Page 32: Disposal
DismHsal 12 DismHsal Instructions for disposal This symbol means that the device must not be disposed of as household waste, general waste, or in a yellow bin or a yellow bag. For the protection of health and the envi- ronment, you must take the product and all electronic parts included in the scope of delivery to a municipal collec- tion point for old electrical and elect-... -
Page 33: Technical Specifications
Technical smecificatiHns 13 Technical smecificatiHns Device short description: HmIP-HCU1, HmIP-HCU1-A Supply voltage Plug-in mains adapter (input): 100 V-240 V/50 Hz Power consumption – plug-in mains adapter (max.): 13.0 W Supply voltage: 5.1 V (SELV) Current consumption: max. 2600 mA Power consumption in standby: 2.0 W... - Page 34 Notice d‘installation et d‘emploi Taale des matières Contenu de la livraison ................35 Remarques sur le mode d’emploi ............35 Mises en garde .....................35 Homematic IP – un habitat intelligent, en tout confort, tout simplement ....................36 Fonction et aperçu de l’appareil ............. 36 Montage ......................37 Installation LAN ....................
-
Page 35: Contenu De La Livraison
CHntenu de la livraisHn CHntenu de la livraisHn N’utilisez pas l’appareil s’il présen- te des dommages extérieurs visib- 1x Home Control Unit Homematic IP les, par exemple sur le boîtier, les 1x Support mural éléments de commande ou sur les 1x Clé USB connecteurs, ni s’il présente un dysfonctionnement. -
Page 36: Homematic Ip - Un Habitat Intelligent, En Tout Confort, Tout Simplement
Homematic IP. Tous les appareils du système Homematic IP peuvent être configu- rés et commandés confortablement et individuellement avec un smartphone ou une tablette à l’aide de l’application Homematic IP. Pour les experts, une configuration par le biais d’une inter-... -
Page 37: Montage
MHntage Aperçu de l’appareil : 6 MHntage (A) Touche système (LED supérieure) Avant de commencer la mise en ser- (B) DEL d’état vice, veuillez déterminer le lieu de Internet disponible montage ou d’implantation souhaité. Accès au cloud disponible En fonction de l’installation préférée Fonction Homematic IP (LAN ou WLAN), les exigences sont dif- (C) Interface : Câble réseau... -
Page 38: Installation Wlan
MHntage Installation WLAN Pour monter le support mural, obser- vez les étapes suivantes. Si une installation WLAN est privi- • Tracez les trous à percer à 30 mm légiée, une prise de courant doit d’intervalle et percez les trous pour être disponible sur le lieu les chevilles fournies. -
Page 39: Mise En Service
TIN) de la Home Control Unit dans mettez la Home Control Unit en ser- l’application. vice comme décrit dans la section ci-après. Après la mise en service de la Homematic IP Home Control Unit, vous pouvez ajou- tez d’autres appareils Homematic IP et les intégrer à votre système. Configurer la Home Control Unit XXXX L’application Homematic IP est... - Page 40 • Sélectionnez la mise en ser- • Attendez que la LED supérieure vice LAN lors de la procédure de votre Home Control Unit soit d’installation. éteinte. Homematic IP WLAN | LAN Figure 12 Figure 10 • Connectez votre Home Con- Si la LED supérieure clignote diffé- trol Unit au routeur avec le câble...
-
Page 41: Mise En Service Wlan
Mise en service WLAN • Sélectionnez la mise en ser- vice WLAN lors de la procédure d’installation. Homematic IP Figure 17 • Attendez que la LED de fonction Homematic IP ( ) soit allumée en WLAN | LAN bleu en permanence. - Page 42 • Connectez votre terminal au point • Sélectionnez le réseau domestique d’accès WLAN de la Home Con- et saisissez votre mot de passe. trol Unit. Pour cela, entrez le mot de passe indiqué sur l’autocollant Homematic IP au-dessous du SGTIN. WLAN ......
-
Page 43: Hcuweb
Mise en service Si la LED supérieure clignote diffé- Le HCUweb n’est pas une inter- remment, v. „ 8.3 Codes d’erreur et face de programmation et ne remplace pas l’application séquences de clignotement „ à la Homematic IP. page 45 ou bien suivez les instructions contenues dans Vous pouvez accéder à... -
Page 44: Utilisation Et Configuration
Démannage • Suivez chaque étape des instruc- Une transmission défectueuse est affi- tions de l’application. chée dans l’application et peut avoir les causes suivantes : • Choisissez la solution souhaitée pour votre appareil. • le récepteur n’est pas accessible • Pour finir, attribuez un nom à •... -
Page 45: Codes D'erreur Et Séquences De Clignotement
Démannage Codes d’erreur et séquences de clignotement 8.3.1 LED supérieure Code de clignotement Signification Solution Vérifier si l’alimentation en La Home Control Unit ne Désactivé tension démarre pas. est garantie. Attendez jusqu’à ce que la La Home Control Unit Éclairage orange vacillant LED supérieure cesse de démarre. - Page 46 Démannage 8.3.2 LED d’état Légende La LED est éteinte. La LED clignote. La LED est allumée en continu. Code de clignotement Signification Solution La Home Control Unit Aucune action nécessaire. démarre. Vérifiez votre connexion Internet. • Le câble réseau est-il La Home Control Unit ne branché ? peut pas se connecter à...
-
Page 47: Restauration Des Réglages D'usine
RestauratiHn des réglages d’usine 9 RestauratiHn des réglages Cette opération doit être effec- tuée dans les 5 minutes suivant le d’usine démarrage de la Home Con- trol Unit. La réinitialisation de la Home Con- trol Unit réinitialise l’ensemble de l’installation Homematic IP. Il faut 10 Entretien et nettHlyage ensuite restaurer l’état par défaut de chacun de vos appareils L’appareil n’exige aucune mainte-... -
Page 48: Remarques Générales Sur Le Fonctionnement Radio
êtes seul res- lectrique Homematic IP HmIP-HCU1, ponsable de la suppression des don- HmIP-HCU1-A est conforme à la di- nées à caractère personnel contenues rective 2014/53/UE. L’intégralité de la dans les appareils électriques et élect- déclaration européenne de conformité... -
Page 49: 13 Caractéristiques Techniques
Caractéristiques techniques 13 Caractéristiques techniques Désignation abrégée de l’appareil : HmIP-HCU1, HmIP-HCU1-A Tension d’alimentation Bloc d’alimentation (entrée) : 100 V-240 V/50 Hz Puissance absorbée maximale du bloc d’alimentation : 13,0 W Tension d’alimentation : 5,1 VCC (SELV) Courant absorbé : max. 2600 mA Puissance absorbée en mode veille : 2,0 W Type de protection :... - Page 50 Manual de instalación y uso Índice Volumen de suministro ................51 Advertencias sobre estas instrucciones ..........51 Advertencias de peligro ................51 Homematic IP – Hogar inteligente, simplemente cómodo Funciones y esquema del dispositivo............52 Montaje ......................53 Instalación LAN ....................53 Instalación WLAN ....................54 Puesta en servicio ..................55 Configurar la Home Control Unit ..............
-
Page 51: Volumen De Suministro
VHlumen de suministrH VHlumen de suministrH No utilice el dispositivo si presenta daños visibles desde el exterior (p. 1x Homematic IP Home Control Unit ej., en la caja, los elementos de 1x Interruptor de pared mando o la toma de red) o altera- 1x Lápiz USB ciones en el funcionamiento. -
Page 52: Funciones Y Esquema Del Dispositivo
Homematic IP se pueden configurar y manejar de manera cómoda e individu- al con el smartphone o tablet a través de la app Homematic IP. Los profesi- onales pueden acceder a la configu- ración a través de una interfaz web (HCUweb). La gama de funciones de su sistema varía según el tipo de com-... -
Page 53: Montaje
MHntaje Vista general: 6 MHntaje (A) Botón del sistema (LED superior) Especifique el lugar de instalación o (B) LEDs de estado configuración deseado antes de iniciar Internet disponible la puesta en servicio. Dependiendo de Acceso a la nube disponible la instalación preferida (LAN o WLAN), Función Homematic IP existen diferentes requisitos que se de- (C) Interfaz: Cable de red... -
Page 54: Instalación Wlan
MHntaje Instalación WLAN Si se prefiere la instalación WLAN, en el lugar de instalación debe 30 mm haber una toma de corriente y suficiente recepción WLAN. Asegúrese de que la Home Con- trol Unit se instala o monta a una 2x Ø... -
Page 55: Puesta En Servicio
Home Control Unit aplicación. tal y como se describe en el sigui- ente apartado. Tras la correcta pu- Homematic IP esta en servicio de la Home Control Unit, puede añadir más dispositivos Homematic IP e integrarlos en su siste-... - Page 56 „8.3 Códigos de er- rores y secuencias intermitentes“ o siga las indica- en página 61 Homematic IP ciones de la aplicación. WLAN | LAN • Espere hasta que los tres LED de estado de la Home Control Unit se iluminen en azul de forma conti- nua.
-
Page 57: Puesta En Marcha Con Wlan
Puesta en marcha con WLAN • Seleccione Puesta en servicio WLAN durante el proceso de ins- talación. Homematic IP Figura 17 • Espere hasta que el LED de función WLAN | LAN de Homematic IP ( ) se ilumine en azul de forma continua. - Page 58 • Seleccione su red doméstica e int- página 61 o siga las indicacio- roduzca la contraseña. nes de la aplicación. Homematic IP • Concluya los pasos de instalación WLAN indicados en la app Homematic IP....
-
Page 59: Hcuweb
IPuesta en serviciH HCUweb Puede averiguar la dirección IP a través de su router o mediante el Para realizar ajustes de red especiales software adicional “NetFinder”. para la Home Control Unit o para vin- cular soluciones de otros socios, utilice el servicio web «HCUweb». -
Page 60: Manejo Y Configuración
Remaracicn de fallHs Manejo y configuración es del 1% de una hora (es decir, 36 se- gundos en una hora). Cuando se alcan- Un vez que haya conectado correcta- za ese límite del 1%, los dispositivos no mente sus dispositivos Homematic IP pueden seguir transmitiendo hasta que y haya añadido salas, podrá... -
Page 61: Códigos De Errores Y Secuencias Intermitentes
Remaracicn de fallHs Códigos de errores y secuencias intermitentes 8.3.1 LED superior Secuencia intermitente Significado Solución La Home Control Unit no Compruebe si Encendido arranca. hay alimentación. Espere hasta que el LED La Home Control Unit Luz naranja flotante superior deje de parpade- arranca. - Page 62 Remaracicn de fallHs 8.3.2 LED de estado Leyenda El LED está apagado. El LED parpadea. El LED se enciende de forma continua. Secuencia intermitente Significado Solución La Home Control Unit No es necesario acciones arranca. adicionales. Compruebe su conexión a internet. •...
-
Page 63: Restablecimiento De La Configuración De Fábrica
RestaalecimientH de la cHnfiguracicn de fáarica 9 RestaalecimientH de la El dispositivo ejecuta un reinicio y el Home Control Unit se restablece. cHnfiguracicn de fáarica Este proceso debe realizarse en Al reiniciar la Home Control Unit los 5 minutos siguientes a arran- se reinicia toda la instalación car la Home Control Unit. -
Page 64: 12 Eliminación
Str. 29, 26789 Leer, Alemania, de- mente a las autoridades y que no clara que la instalación inalámbrica implica ninguna garantía de de- Homematic IP HmIP-HCU1, HmIP- terminadas características. HCU1-A cumple la Directiva 2014/53/ UE. El texto de la declaración de con- Si tiene consultas técnicas sobre... -
Page 65: Datos Técnicos
DatHs técnicHs 13 DatHs técnicHs Nombre abreviado del dispositivo: HmIP-HCU1, HmIP-HCU1-A Tensión de alimentación Fuente de alimentación enchufable (entrada): 100 V-240 V/50 Hz Potencia máx. absorbida de la fuente de alimentación enchufable: 13,0 W Tensión de alimentación: 5,1 VDC (SELV) Consumo de corriente: máx. - Page 66 Istruzioni per l‘installazione e l‘uso Indice Fornitura .......................67 Indicazioni su queste istruzioni ..............67 Indicazioni di pericolo ................67 Homematic IP – Vivere in modo intelligente, semplice e pratico Funzioni e vista d’insieme dell’apparecchio Montaggio ....................69 Installazione LAN ....................69 Installazione WLAN ................... 70 Messa in funzione ..................
-
Page 67: Istruzioni Per L'installazione E L'uso
FHrnitura FHrnitura Non utilizzare l’apparecchio se dall’esterno siano riconoscibili 1x Homematic IP Home Control Unit danni, ad esempio sulla scatola, su 1x Supporto a parete elementi di controllo o sulle prese 1x Chiavetta USB o vi sia un guasto funzionale. In caso di dubbio far controllare 1x Alimentatore a spina l’apparecchio da un tecnico spe-... -
Page 68: Homematic Ip - Vivere In Modo Intelligente, Semplice E Pratico
Homematic IP Home Control Unit è la centralina del sistema Homematic IP Smart-Home e comunica tramite il protocollo radio Homematic IP. Tutti gli apparecchi del sistema Homematic IP possono essere con- figurati e utilizzati comodamente e singolarmente da smartphone o tablet tramite l’app Homematic IP. Per esper-... -
Page 69: Montaggio
MHntaggiH Vista d’insieme dell’apparecchio: 6 MHntaggiH (A) Tasto di sistema (LED superiore) Prima di iniziare la messa in funzione, (B) LED di stato specificare il luogo di installazione o Internet disponibile di allestimento desiderato. A secon- Accesso al cloud disponibile da dell’installazione preferita (LAN o Funzione Homematic IP WLAN), esistono requisiti diversi, de-... -
Page 70: Installazione Wlan
MHntaggiH Installazione WLAN Per montare il supporto a parete, pro- cedere come segue. Se si preferisce l’installazione • Segnare i fori a una distanza di 30 WLAN, nel luogo di installazione mm e praticare i fori per i tasselli in devono essere disponibili una dotazione. -
Page 71: Messa In Funzione
Home Control Unit Home Control Unit. come descritto nel paragrafo seguente. Una volta attivata la Home Control Unit Homematic IP è possibile aggiungere ulteriori appa- recchi Homematic IP e integrarli nel proprio sistema. Installazione della Home Control... - Page 72 • Selezionare la messa in funzione • Attendere che il LED superiore del- della LAN durante il processo di la Home Control Unit si spenga. installazione. Homematic IP WLAN | LAN Figura 12 Figura 10 Se il LED superiore lampeggia •...
-
Page 73: Messa In Funzione Della Rete Wlan
LAN durante il processo di installazione. Figura 17 • Attendere che il LED di funzione Homematic IP ( ) emetta una luce Homematic IP blu continua. WLAN | LAN Se il LED superiore lampeggia „8.3 Codici di errore e sequenze di lampeggio“... - Page 74 Messa in funziHne • Connettere il terminale all’hotspot • Selezionare la propria rete dome- WLAN della Home Control Unit. stica e inserire la password. Inserire la password indicata sotto il SGTIN sull’adesivo. Homematic IP WLAN ....Homematic IP ..WLAN HCU1-XXXX ..
-
Page 75: Hcuweb
Messa in funziHne • Concludere i passaggi di in- le ultime quattro cifre del SGTIN). stallazione illustrati nell’app L’SGTIN si trova sul lato inferiore della Homematic IP. Home Control Unit (vedere la figura). • La Home Control Unit è ora confi- È... -
Page 76: Uso E Configurazione
RisHluziHne dei guasti Duty Cycle Scegliere il nome dell’apparecchio con molta attenzione, in modo da Il Duty Cycle descrive una limitazione potere eseguire un’associazione del tempo di trasmissione, regolata univoca nel caso in cui siano in per legge, di apparecchi nella gamma uso diversi apparecchi dello stesso 868 MHz. -
Page 77: Codici Di Errore E Sequenze Di Lampeggio
RisHluziHne dei guasti Codici di errore e sequenze di lampeggio 8.3.1 LED superiore Codice di segnalazione Significato Soluzione La Home Control Unit Verificare la presenza di Spento non si avvia. alimentazione elettrica. Attendere che il LED su- Luce arancione lampeg- La Home Control Unit si periore smetta di lampeg- giante... - Page 78 RisHluziHne dei guasti 8.3.2 LED di stato Legenda Il LED è spento. Il LED lampeggia. Il LED è acceso in continuo. Codice di segnalazione Significato Soluzione La Home Control Unit si Non sono necessarie azi- avvia. oni. Verificare la connessione Internet. •...
-
Page 79: Ripristino Delle Impostazioni Di Fabbrica
RimristinH delle immHstaziHni di faaarica 9 RimristinH delle Questa procedura deve essere eseguita entro 5 minuti dall’avvio immHstaziHni di faaarica della Home Control Unit. Il reset della Home Control Unit resetta l’intera installazione di 10 ManutenziHne e mulizia Homematic IP. In seguito, per consentire una nuova inizializzazi- L’apparecchio non necessita di one dei singoli dispositivi... -
Page 80: 12 Smaltimento
Str. 29, 26789 Leer, Germania, dichiara nalmente della cancellazione dei dati che l’apparecchio radio Homematic IP personali negli apparecchi elettrici ed modello HmIP-HCU1, HmIP-HCU1-A elettronici da smaltire. è conforme alla Direttiva 2014/53/UE. Il testo integrale della dichiarazione di conformità UE è disponibile al seguen- Dichiarazione di conformità... -
Page 81: 13 Dati Tecnici
Dati Tecnici 13 Dati Tecnici Sigla dell’apparecchio: HmIP-HCU1, HmIP-HCU1-A Tensione di alimentazione Alimentatore a spina (in ingresso): 100 V-240 V/50 Hz Max. potenza assorbita alimentatore a spina: 13,0 W Tensione di alimentazione: 5,1 VDC (SELV) Corrente assorbita: max. 2600 mA... - Page 82 Installatie- en bedieningshandleiding InhHudsHmgave Leveringsomvang ..................83 Instructies bij deze handleiding .............. 83 Gevarenaanduidingen ................83 Homematic IP – slim wonen, gewoon comfortabel Werking en overzicht van het apparaat ..........84 Montage ....................... 85 LAN-installatie ....................85 WLAN-installatie ....................86 Inbedrijfstelling ....................87 Home Control Unit installeren ...............
-
Page 83: Leveringsomvang
LeveringsHmvang LeveringsHmvang Gebruik het apparaat niet als het uiterlijk zichtbare schade ver- 1x Homematic IP Home Control Unit toont, bijv. aan de kast, bedie- 1x Wandhouder ningselementen of aansluitbussen, 1x USB-stick of wanneer een storing actief is. In geval van twijfel dient u het ap- 1x Netadapter paraat door een specialist te laten 1x Netwerkkabel... -
Page 84: Werking En Overzicht Van Het Apparaat
Met Homematic IP realiseert u in leidingen. slechts enkele stappen een intelligente Leg het snoer altijd zodanig neer, smarthomebesturing. dat dit geen risico’s voor mensen De Homematic IP Home Control Unit... -
Page 85: Montage
MHntage Overzicht apparaten: 6 MHntage (A) Systeemtoets (topled) Leg voor het begin van de inbedrijfstel- (B) Statusleds ling uw gewenste montage- en opstel- Internet beschikbaar lingslocatie vast. Afhankelijk van de Cloud-toegang beschikbaar voorkeursinstallatie (LAN of WLAN) zijn Homematic IP-functie er verschillende vereisten, die hierna (C) Interface: Netwerkkabel worden beschreven. -
Page 86: Wlan-Installatie
MHntage WLAN-installatie Volg de onderstaande stappen om de wandhouder te monteren. Als de voorkeur wordt gegeven • Teken de boorgaten af op een af- aan WLAN-installatie, moet er op stand van 30 mm en boor de gaten de installatielocatie een stopcon- voor de meegeleverde pluggen. -
Page 87: Inbedrijfstelling
Installeer eerst de Homematic IP- matig in de app invoeren. app op uw eindapparaat en neem de Home Control Unit in gebruik zoals Homematic IP in de volgende paragraaf is beschre- ven. Na de succesvolle inbedrijfstel- ling van de Home Control Unit kunt u Homematic IP-apparaten toevoegen... - Page 88 • Selecteer de LAN-inbedrijfstelling • Wacht tot de bovenste led van uw tijdens het installatieproces. Home Control Unit is uitgescha- keld. Homematic IP WLAN | LAN Afbeelding 10 Afbeelding 12 • Verbind de Home Control Unit via de meegeleverde netwerkkabel (I)
-
Page 89: Wlan-Inbedrijfstelling
• De Home Control Unit is nu geïn- stalleerd en klaar voor gebruik. WLAN-inbedrijfstelling • Selecteer de WLAN-inbedrijfstelling tijdens het installatieproces. Homematic IP WLAN | LAN Abbildung 23 • Wacht tot de Homematic IP-func- tieled ( ) permanent blauw brandt. Bij een ander knippergedrag van de bovenste led zie ‚8.3 Foutcodes... - Page 90 • Verbind uw eindapparaat met de • Selecteer uw thuisnetwerk en voer WLAN-hotspot van de Home Con- uw wachtwoord in. trol Unit. Voer hiervoor het wacht- woord in dat op de sticker onder Homematic IP de SGTIN staat. WLAN ......
-
Page 91: Hcuweb
Inaedrijfstelling Bij een ander knippergedrag van U kunt HCUweb in het lokale netwerk de bovenste led zie ‚8.3 Foutcodes bereiken op: https://hcu1-XXXX.local (XXXX beschri- en knipperreeksen‘ op pagina volgt u de instructies in de jft de laatste vier cijfers van de SGTIN). app. -
Page 92: Bediening En Configuratie
tHringen HmlHssen Duty cycle Selecteer de apparaatnamen heel zorgvuldig om bij het gebruik van De duty cycle beschrijft een wettelijk meerdere apparaten van hetzelfde geregelde begrenzing van de zendtijd type een duidelijke toewijzing te van apparaten in het 868MHz-bereik. kunnen uitvoeren. U kunt de na- Het doel van deze regeling is om de men van de apparaten en ruimtes werking van alle in het 868MHz-bereik... -
Page 93: Foutcodes En Knipperreeksen
tHringen HmlHssen Foutcodes en knipperreeksen 8.3.1 Bovenste led Knippercode Betekenis Oplossing De Home Control Unit Controleer of de Uitgeschakeld start niet. voeding gegarandeerd is. Wacht tot de bovenste led De Home Control Unit Oranje flikkerend licht stopt met oranje te flikke- start. - Page 94 tHringen HmlHssen 8.3.2 Statusleds Legenda De led is uit. De led knippert. De led brandt continu. Knippercode Betekenis Oplossing De Home Control Unit Geen handelingen vereist. start. Controleer uw internetverbinding. De Home Control Unit • Is de netwerkkabel kan geen verbinding ma- aangesloten? ken met het internet en er •...
-
Page 95: Herstellen Van De Fabrieksinstellingen
Herstellen van de faarie sinstellingen 9 Herstellen van de Dit proces moet binnen 5 minuten na het opstarten van de Home faarie sinstellingen Control Unit worden uitgevoerd. Door de Home Control Unit te resetten, wordt de hele 10 OnderhHud en reiniging Homematic IP-installatie gereset. -
Page 96: Algemene Instructies Voor De Draadloze Werking
Str. 29, 26789 Leer, Duitsland, dat het van nuttige toepassing van oude appa- draadloze apparaattype Homematic IP raten. HmIP-HCU1, HmIP-HCU1-A in Wij wijzen u er nadrukkelijk op dat u als overeenstemming is met de richtlijn eindgebruiker verantwoordelijk bent 2014/53/EU. De volledige tekst van de... -
Page 97: 13 Technische Gegevens
Technische gegevens 13 Technische gegevens Apparaatcode: HmIP-HCU1, HmIP-HCU1-A Voedingsspanning Netadapter (ingang): 100 V-240 V/50 Hz Opgenomen vermogen netadapter max.: 13,0 W Voedingsspanning: 5,1 VDC (SELV) Stroomopname: max. 2600 mA Opgenomen vermogen bij stand-by: 2,0 W Beschermingsgraad: IP20 Omgevingstemperatuur: 5 tot 40 °C... - Page 98 Kostenloser Download der Homematic IP App! Free download of the Homematic IP app! Bevollmächtigter des Herstellers: Manufacturer’s authorised representative: eQ-3 AG Maiburger Straße 29 26789 Leer / GERMANY www.eQ-3.de...
Need help?
Do you have a question about the HmIP-HCU1 and is the answer not in the manual?
Questions and answers