Table of Contents
Advertisement
Available languages
Available languages
Quick Links
Technical Support and E-Warranty Certificate www.vevor.com/support
LIVESTOCK TRIMMING STAND
USER MANUAL
We continue to be committed to provide you tools with competitive price.
"Save Half","Half Price" or any other similar expressions used by us only represents an
estimate of savings you might benefit from buying certain tools with us compared to the major
top brands and does not necessarily mean to cover all categories of tools offered by us. You
are kindly reminded to verify carefully when you are placing an order with us if you are
actually saving half in comparison with the top major brands.
Advertisement
Table of Contents

Related Manuals for VEVOR SCJ002-W


Summary of Contents for VEVOR SCJ002-W
- Page 1 Technical Support and E-Warranty Certificate www.vevor.com/support LIVESTOCK TRIMMING STAND USER MANUAL We continue to be committed to provide you tools with competitive price. "Save Half","Half Price" or any other similar expressions used by us only represents an estimate of savings you might benefit from buying certain tools with us compared to the major top brands and does not necessarily mean to cover all categories of tools offered by us.
- Page 2 This is the original instruction,please read all manual instructions carefully before operating. VEVOR reserves a clear interpretation of our user manual. The appearance of the product shall be subject to the product you received. Please forgive us that we won't inform you again if there...
-
Page 3: Safety Precautions
Safety precautions WARNING: Read this instructions before using this product. Failure to do so can result in serious injury. the basic precautions should always be followed,including the following: 1. The livestock trimming stand may not be used or stored in hazardous areas. It is not allowed to use the appliance in hazardous locations. -
Page 4: Product List
Product List... - Page 5 (Spare parts *1) (Spare parts *1) (Spare parts *1)
-
Page 6: Product Description
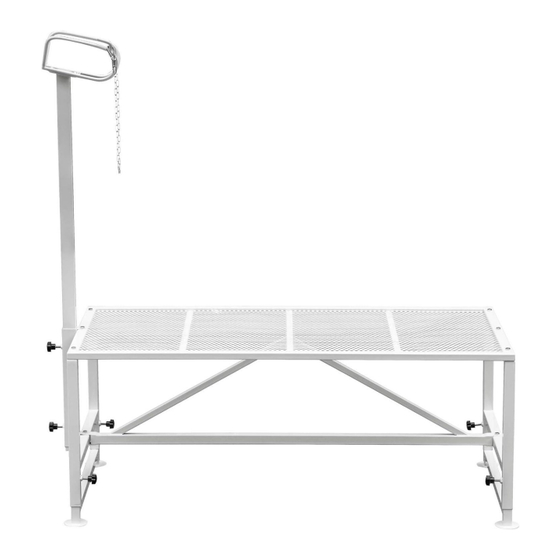
Product Description Adjustable The upright weight Table size Model Colour height of the rod adjusts capacity countertop the height SCJ002-W white 47*23inch Ⅰ 21in/533mm; SCJ003-W Ⅱ 25in/635mm; white 51*23inch 18in/457mm 500lbs SCJ002-B Ⅲ 29in/736mm; black 47*23inch Ⅳ 33in/838mm; SCJ003-B black... -
Page 7: Installation Steps
Installation Steps Parts Explanatory Chart Explain table legs 1. Insert the adjustable table leg into the table leg. adjustable 2. Secure the table table legs leg with a plastic knob. plastic knobs *2 M8x35 *5 1. Support the countertop with gasket *5 assembled table legs. - Page 8 1. Jam the fixed rods countertop with fixed rods and align the holes. M8x35 *1 2. Thread 1 M8x35 through the hole of gasket *1 the fixed rods, attach the small M8 *1 spacer, and secure it with a nut. triangular Thread 1 M8x35 bracket *1...
- Page 9 upright 1. Insert the upright poles *1 poles into the fixed rods square hole in plastic the downward knobs *2 direction of the bevel. 2. Secure the upright poles with 2 plastic knobs. headbands 1. Put the A *1 headbands B first. 2.
-
Page 10: Product Usage
Product Usage The height of the table corresponding to the four bolt hole gears. - Page 11 Manufacturer: Shanghaimuxinmuyeyouxiangongsi Address:Baoshanqu Shuangchenglu 803long 11hao 1602A-1609shi Shanghai Imported to AUS: SIHAO PTY LTD, 1 ROKEVA STREETEASTWOOD NSW 2122 Australia Imported to USA: Sanven Technology Ltd., Suite 250, 9166 Anaheim Place, Rancho Cucamonga, CA 91730 SHUNSHUN GmbH Römeräcker 9 Z2021,76351 Linkenheim-Hochstetten,Germany euvertreter@gmail.com +49 1727041930...
- Page 12 Technical Support and E-Warranty Certificate www.vevor.com/support...
-
Page 13: Instrukcja Obsługi
Techniczny Certyfikat wsparcia i e-gwarancji www.vevor.com/support STANOWISKO DO PRZYCINANIA BYDŁA INSTRUKCJA OBSŁUGI We continue to be committed to provide you tools with competitive price. "Save Half","Half Price" or any other similar expressions used by us only represents an estimate of savings you might benefit from buying certain tools with us compared to the major top brands and does not necessarily mean to cover all categories of tools offered by us. - Page 14 This is the original instruction,please read all manual instructions carefully before operating. VEVOR reserves a clear interpretation of our user manual. The appearance of the product shall be subject to the product you received. Please forgive us that we won't inform you again if there...
-
Page 15: Środki Ostrożności
Środki ostrożności OSTRZEŻENIE: Przeczytaj tę instrukcję przed użyciem tego produktu. Niezastosowanie się do tego może spowodować poważne obrażenia. należy zawsze przestrzegać podstawowych środków ostrożności , w tym: 6. Stanowisko do przycinania bydła nie wolno używać ani przechowywać w obszarach niebezpiecznych. Nie wolno używać urządzenia w miejscach niebezpiecznych. - Page 16 ZACHOWAJ TE INSTRUKCJE Lista produktów...
- Page 18 (Spare parts *1) (Spare parts *1) (Spare parts *1)
-
Page 19: Opis Produktu
Opis produktu Pionowy Rozmiar Regulowana drążek Model Kolor udźwig tabeli wysokość blatu reguluje wysokość SCJ002-W Ⅰ 21 cali/533 biały 47*23 cale SCJ003-W biały 51*23 cale SCJ002-B Ⅱ 25 cali/635 czarny 47*23 cale 18 cali/457 SCJ003-B czarny 51*23 cale Ⅲ 29 cali/736 funtów... - Page 20 Kroki instalacji Części _ Wykres wyjaśniający Wyjaśnić _...
- Page 21 nogi do 3. Włóż stołu *2 regulowaną nogę stołu do nogi stołu. regulowane 4. Zabezpiecz nogi stołu nogę stołu plastikową gałką. plastikowe gałki *2 M8x35 *5 3. Podeprzyj blat za pomocą uszczelka zmontowanych nóg stołu. 4. Przewlecz 5 M8*5 otworów M8x35 przez blat stołu, przymocuj małe elementy...
- Page 22 3. Zablokuj blat za stałe pręty pomocą stałych prętów i wyrównaj otwory. M8x35 *1 4. Przewlecz 1 M8x35 przez otwór uszczelka w prętach stałych, zamocuj małą podkładkę i M8*1 zabezpiecz ją nakrętką. wspornik Wkręć 1 śrubę trójkątny *1 M8x35 przez środkowy otwór M8x35 *1 wspornika...
- Page 23 słupki 3. Włóż pionowe pionowe *1 słupki do kwadratowych plastikowe otworów stałych gałki *2 prętów w kierunku skosu w dół. 4. Zabezpiecz słupki pionowe za pomocą 2 plastikowych pokręteł. opaski 5. Najpierw załóż głowę A *1 opaski B. 6. Następnie załóż opaski opaski A.
- Page 24 Użycie produktu Wysokość stołu odpowiadająca czterem otworom na śruby koła zębate.
- Page 25 Producent: Shanghaimuxinmuyeyouxiangongsi Adres: Baoshanqu Shuangchenglu 803long 11hao 1602A-1609shi Szanghaj Import do AUS: SIHAO PTY LTD, 1 ROKEVA STREETEASTWOOD NSW 2122 Australia Import do USA: Sanven Technology Ltd., Suite 250, 9166 Anaheim Place, Rancho Cucamonga, CA 91730 SHUNSHUN GmbH Römeräcker 9 Z2021,76351 Linkenheim-Hochstetten,Germany euvertreter@gmail.com +49 1727041930...
- Page 26 Techniczny Certyfikat wsparcia i e-gwarancji www.vevor.com/support...
- Page 27 Technisch Support- und E-Garantie-Zertifikat www.vevor.com/support VIEHTRIMMSTAND BENUTZERHANDBUCH We continue to be committed to provide you tools with competitive price. "Save Half","Half Price" or any other similar expressions used by us only represents an estimate of savings you might benefit from buying certain tools with us compared to the major top brands and does not necessarily mean to cover all categories of tools offered by us.
- Page 28 This is the original instruction,please read all manual instructions carefully before operating. VEVOR reserves a clear interpretation of our user manual. The appearance of the product shall be subject to the product you received. Please forgive us that we won't inform you again if there...
- Page 29 Sicherheitsvorkehrungen WARNUNG: Lesen Sie diese Anweisungen, bevor Sie dieses Produkt verwenden. Andernfalls kann es zu schweren Verletzungen kommen. Die grundlegenden Vorsichtsmaßnahmen sollten immer befolgt werden , einschließlich der folgenden: 11. Der Viehtrimmstand dürfen nicht in explosionsgefährdeten Bereichen verwendet oder gelagert werden. Es ist nicht gestattet, das Gerät in explosionsgefährdeten Bereichen zu verwenden.
- Page 30 Produktliste _...
- Page 32 (Spare parts *1) (Spare parts *1) (Spare parts *1)
- Page 33 Produktbeschreibung Die aufrechte Gewicht Tischgröß Höhenverstellba Stange Modell Farbe skapazit re Arbeitsplatte verstellt die ät Höhe SCJ002-W Ⅰ 21 Zoll/533 Weiß 47 * 23 Zoll mm; SCJ003-W Ⅱ 25 Zoll/635 Weiß 51*23 Zoll SCJ002-B mm; 18 Zoll/457 Schwa 47 * 23 Ⅲ...
- Page 34 Installationsschritte Teile _ Erläuterndes Diagramm Erklären _...
- Page 35 Tischbeine *2 5. Stecken Sie das verstellbare verstellbare Tischbein in das Tischbeine *2 Tischbein. 6. Befestigen Sie Kunststoffknöp das Tischbein mit fe *2 einem Kunststoffknopf. M8x35 *5 5. Stützen Sie die Arbeitsplatte mit Dichtung *5 montierten Tischbeinen. M8 *5 6. Schrauben Sie 5 M8x35-Löcher durch die Tischplatte, bringen...
- Page 36 5. Klemmen Sie feste Stangen die Arbeitsplatte mit festen Stangen fest und richten Sie die M8x35 *1 Löcher aus. 6. Fädeln Sie 1 Dichtung *1 M8x35 durch das Loch der festen M8 *1 Stangen, bringen Sie das kleine Distanzstück an und sichern Sie es mit einer Mutter.
- Page 37 Abstandshalter und der Mutter. aufrechte 5. Führen Sie die Stangen *1 aufrechten Stangen in der Kunststoffknöp Abwärtsrichtung der fe *2 Abschrägung in das quadratische Loch der festen Stangen ein. 6. Sichern Sie die aufrechten Stangen mit 2 Kunststoffknöpfen.
- Page 38 Stirnbänder 9. Legen Sie zuerst die Stirnbänder B. Stirnbänder B 10. Dann legen Sie die Stirnbänder A. 11. Befestigen Sie M6x20 *4 die Stirnbänder mit 4 Schrauben M6 *4 M6x20. 12. Ziehen Sie die Sicherungsschraub en mit 4 M6-Muttern fest. Produktnutzung Die Höhe des Tisches entspricht den vier Schraubenlöchern Getriebe.
- Page 39 Hersteller: Shanghaimuxinmuyeyouxiangongsi Adresse: Baoshanqu Shuangchenglu 803long 11hao 1602A-1609shi Shanghai...
- Page 40 Importiert nach AUS: SIHAO PTY LTD, 1 ROKEVA STREETEASTWOOD NSW 2122 Australien In die USA importiert: Sanven Technology Ltd., Suite 250, 9166 Anaheim Place, Rancho Cucamonga, CA 91730 SHUNSHUN GmbH Römeräcker 9 Z2021,76351 Linkenheim-Hochstetten,Germany euvertreter@gmail.com +49 1727041930 Pooledas Group Ltd Unit 5 Albert Edward House, The Pavilions Preston, United Kingdom pooledas123@gmail.com...
- Page 41 Technisch Support- und E-Garantiezertifikat www.vevor.com/support...
-
Page 42: Manuel De L'utilisateur
Technique Assistance et certificat de garantie électronique www.vevor.com/support SUPPORT DE PARAGE DU BÉTAIL MANUEL DE L'UTILISATEUR We continue to be committed to provide you tools with competitive price. "Save Half","Half Price" or any other similar expressions used by us only represents an estimate of savings you might benefit from buying certain tools with us compared to the major top brands and does not necessarily mean to cover all categories of tools offered by us. - Page 43 This is the original instruction,please read all manual instructions carefully before operating. VEVOR reserves a clear interpretation of our user manual. The appearance of the product shall be subject to the product you received. Please forgive us that we won't inform you again if there...
-
Page 44: Précautions De Sécurité
Précautions de sécurité AVERTISSEMENT: Lisez ces instructions avant d'utiliser ce produit. Ne pas le faire peut entraîner des blessures graves. les précautions de base doivent toujours être suivies , notamment les suivantes : 16. Le stand de parage du bétail ne peut pas être utilisé ou stocké dans des zones dangereuses. - Page 45 Liste de produits...
- Page 47 (Spare parts *1) (Spare parts *1) (Spare parts *1)
-
Page 48: Description Du Produit
Description du produit La tige Hauteur du capacit Taille du Coule verticale Modèle comptoir é de tableau ajuste la réglable poids hauteur SCJ002-W Ⅰ 21 blanc 47*23 pouces pouces/533 SCJ003-W mm ; blanc 51*23 Ⅱ 25 pouces SCJ002-B pouces/635 noir 47*23 mm ;... -
Page 49: Étapes D'installation
Étapes d'installation Les pièces Tableau explicatif Expliquer _... - Page 50 pieds de 7. Insérez le pied table * 2 de table réglable dans le pied de pieds de table. table 8. Fixez le pied de réglables * table avec un bouton en plastique. boutons en plastique * M8x35 *5 7. Soutenez le comptoir avec les joint *5 pieds de table...
- Page 51 7. Bloquez le tiges fixes * comptoir avec des tiges fixes et alignez les trous. M8x35 *1 8. Enfilez 1 M8x35 dans le trou des joint *1 tiges fixes, fixez la petite entretoise et M8 *1 fixez-la avec un écrou. support Enfilez 1 vis M8x35 triangulaire...
- Page 52 poteaux 7. Insérez les verticaux *1 poteaux verticaux dans le trou carré boutons en des tiges fixes dans plastique * la direction vers le bas du biseau. 8. Fixez les poteaux verticaux avec 2 boutons en plastique. bandeaux A 13. Mettez les bandeaux B en premier.
-
Page 53: Utilisation Du Produit
Utilisation du produit La hauteur de la table correspondant au trou des quatre boulons engrenages. - Page 54 Fabricant : Shanghaimuxinmuyeyouxiangongsi Adresse : Baoshanqu Shuangchenglu 803long 11hao 1602A-1609shi Shanghai Importé en Australie : SIHAO PTY LTD, 1 ROKEVA STREETASTWOOD NSW 2122 Australie Importé aux États-Unis : Sanven Technology Ltd., Suite 250, 9166 Anaheim Place, Rancho Cucamonga, CA 91730 SHUNSHUN GmbH Römeräcker 9 Z2021,76351 Linkenheim-Hochstetten,Germany...
- Page 55 Fabriqué en Chine...
- Page 56 Technique Assistance et certificat de garantie électronique www.vevor.com/support...
- Page 57 Technisch Ondersteuning en e-garantiecertificaat www.vevor.com/support STAND VOOR HET TRIMMEN VAN VEE HANDLEIDING We continue to be committed to provide you tools with competitive price. "Save Half","Half Price" or any other similar expressions used by us only represents an estimate of savings you might benefit from buying certain tools with us compared to the major top brands and does not necessarily mean to cover all categories of tools offered by us.
- Page 58 This is the original instruction,please read all manual instructions carefully before operating. VEVOR reserves a clear interpretation of our user manual. The appearance of the product shall be subject to the product you received. Please forgive us that we won't inform you again if there...
- Page 59 Veiligheidsmaatregelen WAARSCHUWING: Lees deze instructies voordat u dit product gebruikt. Als u dit niet doet, kan dit leiden tot ernstig letsel. de basisvoorzorgsmaatregelen moeten altijd worden gevolgd , waaronder de volgende: 21. De stand voor het trimmen van vee mag niet worden gebruikt of opgeslagen in gevaarlijke gebieden.
- Page 60 Product lijst...
- Page 62 (Spare parts *1) (Spare parts *1) (Spare parts *1)
- Page 63 Productomschrijving Verstelbare rechtopstaan Tafelgroott draagve Model Kleur hoogte van het de stang rmogen aanrecht verstelt de hoogte SCJ002-W 47*23 inch Ⅰ 21 inch/533 SCJ003-W 51*23 inch SCJ002-B Ⅱ 25 inch/635 zwart 47*23 inch 18 inch/457 SCJ003-B zwart 51*23 inch pond Ⅲ...
- Page 64 Installatiestappen Onderdelen _ Verklarende grafiek Uitleggen _...
- Page 65 tafelpoten *2 9. Steek de verstelbare verstelbare tafelpoot in de tafelpoten *2 tafelpoot. 10. Zet de kunststof tafelpoot vast knoppen *2 met een plastic knop. M8x35 *5 9. Ondersteun het aanrecht met pakking *5 gemonteerde tafelpoten. M8 *5 10. Rijg 5 M8x35 gaten door het tafelblad, bevestig kleine...
- Page 66 9. Zet het vaste staven *1 aanrecht vast met vaste M8x35 *1 stangen en lijn de gaten uit. pakking *1 10. Steek 1 M8x35 door het M8 *1 gat van de vaste stangen, bevestig het kleine afstandsstuk en zet het vast met een moer.
- Page 67 afstandsstuk en de moer. rechtopstaand 9. Steek de e palen *1 rechtopstaande palen in het kunststof vierkante gat van knoppen *2 de vaste stangen in de neerwaartse richting van de afschuining. 10. Zet de rechtopstaande palen vast met 2 plastic knoppen.
- Page 68 hoofdbanden A 17. Plaats eerst de hoofdbanden hoofdbanden B 18. Plaats vervolgens de hoofdbanden A. M6x20 *4 19. Bevestig de hoofdbanden met M6 *4 4 M6x20 schroeven. 20. Draai de borgschroeven vast met 4 M6-moeren. Productgebruik De hoogte van de tafel komt overeen met het vier boutgat versnellingen.
- Page 69 Fabrikant: Shanghaimuxinmuyeyouxiangongsi Adres: Baoshanqu Shuangchenglu 803long 11hao 1602A-1609shi Shanghai...
- Page 70 Geïmporteerd naar AUS: SIHAO PTY LTD, 1 ROKEVA STREETEASTWOOD NSW 2122 Australië Geïmporteerd naar de VS: Sanven Technology Ltd., Suite 250, 9166 Anaheim Place, Rancho Cucamonga, CA 91730 SHUNSHUN GmbH Römeräcker 9 Z2021,76351 Linkenheim-Hochstetten,Germany euvertreter@gmail.com +49 1727041930 Pooledas Group Ltd Unit 5 Albert Edward House, The Pavilions Preston, United Kingdom pooledas123@gmail.com...
- Page 71 Technisch Ondersteuning en e-garantiecertificaat www.vevor.com/support...
- Page 72 Teknisk Support och e-garanticertifikat www.vevor.com/support TRIMSTÄLL FÖR BOSKAP ANVÄNDARMANUAL We continue to be committed to provide you tools with competitive price. "Save Half","Half Price" or any other similar expressions used by us only represents an estimate of savings you might benefit from buying certain tools with us compared to the major top brands and does not necessarily mean to cover all categories of tools offered by us.
- Page 73 This is the original instruction,please read all manual instructions carefully before operating. VEVOR reserves a clear interpretation of our user manual. The appearance of the product shall be subject to the product you received. Please forgive us that we won't inform you again if there...
- Page 74 Säkerhetsåtgärder VARNING: Läs dessa instruktioner innan du använder denna produkt. Underlåtenhet att göra det kan resultera i allvarliga skador. de grundläggande försiktighetsåtgärderna bör alltid följas, inklusive följande: 26. Boskapsklippningsstället _ får inte användas eller förvaras i farliga områden. Det är inte tillåtet att använda apparaten på farliga platser. 27.
- Page 75 Produktlista _...
- Page 76 (Spare parts *1) (Spare parts *1) (Spare parts *1)
- Page 77 Produktbeskrivning upprättståen Bordsstorl Justerbar höjd viktkapa Modell Färg de stången på bänkskivan citet justerar höjden SCJ002-W Ⅰ 21in/533mm; 47*23 tum SCJ003-W Ⅱ 25in/635mm; 51*23 tum 18 tum/457 SCJ002-B Ⅲ 29in/736mm; svart 47*23 tum pund Ⅳ 33in/838mm; SCJ003-B svart 51*23 tum...
- Page 78 Installationssteg Delar _ Förklarande diagram Förklara _...
- Page 79 bordsben *2 11. Sätt in det justerbara justerbara bordsbenet i bordsben *2 bordsbenet. 12. Fäst plastknoppar bordsbenet med en plastknopp. M8x35 *5 11. Stöd bänkskivan med packning *5 monterade bordsben. M8 *5 12. Trä 5 M8x35 hål genom bordsskivan, fäst små...
- Page 80 11. Kläm fast fasta stavar *1 bänkskivan med fasta stavar och M8x35 *1 rikta in hålen. 12. Trä 1 M8x35 packning *1 genom hålet på de fasta M8 *1 stängerna, fäst den lilla distansen och fäst den med en mutter. triangulärt Trä...
- Page 81 upprättstående 11. Sätt in de stolpar *1 upprättstående stängerna i det plastknoppar fyrkantiga hålet för fasta stängerna i riktningen nedåt mot avfasningen. 12. Fäst de upprättstående stolparna med 2 plastknoppar. pannband A *1 21. Sätt pannbanden B pannband B *1 först.
- Page 82 Produktanvändning Höjden på bordet som motsvarar hålet med fyra bultar växlar.
- Page 83 Tillverkare: Shanghaimuxinmuyeyouxiangongsi Adress: Baoshanqu Shuangchenglu 803long 11hao 1602A-1609shi Shanghai Importerad till AUS: SIHAO PTY LTD, 1 ROKEVA STREETEASTWOOD NSW 2122 Australien Importerad till USA: Sanven Technology Ltd., Suite 250, 9166 Anaheim Place, Rancho Cucamonga, CA 91730 SHUNSHUN GmbH Römeräcker 9 Z2021,76351 Linkenheim-Hochstetten,Germany euvertreter@gmail.com +49 1727041930...
- Page 84 Teknisk Support och e-garanticertifikat www.vevor.com/support...
- Page 85 Técnico Soporte y certificado de garantía electrónica www.vevor.com/support PUESTO DE RECORTE DE GANADO MANUAL DE USUARIO We continue to be committed to provide you tools with competitive price. "Save Half","Half Price" or any other similar expressions used by us only represents an estimate of savings you might benefit from buying certain tools with us compared to the major top brands and does not necessarily mean to cover all categories of tools offered by us.
- Page 86 This is the original instruction,please read all manual instructions carefully before operating. VEVOR reserves a clear interpretation of our user manual. The appearance of the product shall be subject to the product you received. Please forgive us that we won't inform you again if there...
-
Page 87: Precauciones De Seguridad
Precauciones de seguridad ADVERTENCIA: Lea estas instrucciones antes de usar este producto. De lo contrario, se pueden producir lesiones graves. Siempre se deben seguir las precauciones básicas , incluidas las siguientes: 31. El puesto de recorte de ganado No se puede utilizar ni almacenar en zonas peligrosas. -
Page 88: Lista De Productos
Lista de productos... - Page 90 (Spare parts *1) (Spare parts *1) (Spare parts *1)
-
Page 91: Descripción Del Producto
Descripción del Producto La varilla Tamaño capacid Altura ajustable vertical de la Modelo Color ad de de la encimera. ajusta la mesa peso altura. SCJ002-W Ⅰ 21 blanco 47*23 pulgadas pulgadas/533 SCJ003-W blanco 51*23 Ⅱ 25 pulgadas SCJ002-B pulgadas/635 negro 47*23 18 pulg./457... -
Page 92: Pasos De Instalación
Pasos de instalación Partes _ Cuadro explicativo Explicar _... - Page 93 patas de 13. Inserte la pata mesa *2 de la mesa ajustable en la pata patas de de la mesa. mesa 14. Asegure la pata ajustables * de la mesa con una perilla de plástico. perillas plástico * 2 M8x35 *5 13.
- Page 94 13. Bloquee la varillas fijas encimera con varillas fijas y alinee los agujeros. M8x35 *1 14. Pase 1 M8x35 por el orificio de las junta * 1 varillas fijas, coloque el M8 *1 espaciador pequeño y asegúrelo con una tuerca. soporte Pase 1 tornillo triangular *...
- Page 95 postes 13. Inserte los verticales * postes verticales en el orificio cuadrado de las varillas fijas perillas en la dirección plástico * 2 hacia abajo del bisel. 14. Asegure los postes verticales con 2 perillas de plástico. diademas A 25. Pon las cintas para la cabeza B primero.
-
Page 96: Uso Del Producto
Uso del producto La altura de la mesa correspondiente al orificio de los cuatro pernos. engranajes. - Page 97 Fabricante: Shanghaimuxinmuyeyouxiangongsi Dirección: Baoshanqu Shuangchenglu 803long 11hao 1602A-1609shi Shanghai Importado a AUS: SIHAO PTY LTD, 1 ROKEVA STREETEASTWOOD NSW 2122 Australia Importado a EE. UU.: Sanven Technology Ltd., Suite 250, 9166 Anaheim Place, Rancho Cucamonga, CA 91730 SHUNSHUN GmbH Römeräcker 9 Z2021,76351 Linkenheim-Hochstetten,Germany euvertreter@gmail.com +49 1727041930...
- Page 98 Hecho en china...
- Page 99 Técnico Certificado de soporte y garantía electrónica www.vevor.com/support...
- Page 100 Tecnico Supporto e certificato di garanzia elettronica www.vevor.com/support SUPPORTO PER LA RIFINITURA DEL BESTIAME MANUALE D'USO We continue to be committed to provide you tools with competitive price. "Save Half","Half Price" or any other similar expressions used by us only represents an estimate of savings you might benefit from buying certain tools with us compared to the major top brands and does not necessarily mean to cover all categories of tools offered by us.
- Page 101 This is the original instruction,please read all manual instructions carefully before operating. VEVOR reserves a clear interpretation of our user manual. The appearance of the product shall be subject to the product you received. Please forgive us that we won't inform you again if there...
-
Page 102: Misure Di Sicurezza
Misure di sicurezza AVVERTIMENTO: Leggere queste istruzioni prima di utilizzare questo prodotto. In caso contrario si potrebbero causare lesioni gravi. È necessario seguire sempre le precauzioni di base , incluse le seguenti: 36. Il banco di rifinitura del bestiame non può essere utilizzato o conservato in aree pericolose. - Page 103 Elenco prodotti...
- Page 105 (Spare parts *1) (Spare parts *1) (Spare parts *1)
-
Page 106: Descrizione Del Prodotto
Dimensio Altezza del capacit verticale ni della Modello Colore piano di lavoro à di regola tavola regolabile peso l'altezza SCJ002-W Ⅰ 21 pollici/533 bianco 47*23 pollici SCJ003-W Ⅱ 25 pollici/635 bianco 51*23 pollici 18 pollici/457 SCJ002-B Ⅲ 29 pollici/736 nero... - Page 107 Passaggi di installazione Parti _ Grafico esplicativo Spiegare _...
- Page 108 gambe del 15. Inserire la tavolo *2 gamba del tavolo regolabile nella gambe del gamba del tavolo. tavolo 16. Fissare la regolabili *2 gamba del tavolo con una manopola manopole in di plastica. plastica *2 M8x35*5 15. Sostenere il piano di lavoro con guarnizione le gambe del tavolo assemblate.
- Page 109 15. Blocca il piano aste fisse *1 di lavoro con aste fisse e allinea i fori. M8x35*1 16. Infilare 1 M8x35 attraverso il foro guarnizione delle aste fisse, collegare il piccolo distanziale e M8*1 fissarlo con un dado. staffa Avvitare 1 vite triangolare M8x35 attraverso il foro centrale della...
- Page 110 M8x70*2 Avvita 2 viti M8x70 attraverso il guarnizione distanziale grande, grande *2 quindi attraverso i fori su entrambi i lati M8*2 della staffa triangolare e fissale guarnizione con il distanziale e il dado. pali verticali 15. Inserire i pali verticali nel foro quadrato dell'asta manopole in fissa nella direzione...
-
Page 111: Utilizzo Del Prodotto
fasce 29. Metti prima le capelli A *1 fasce B. 30. Poi metti le fasce B *1 fasce A. 31. Fissare le fasce M6x20*4 con 4 viti M6x20. 32. Stringere le viti M6*4 di bloccaggio con 4 dadi M6. Utilizzo del prodotto L'altezza del tavolo corrisponde ai quattro fori per i bulloni ingranaggi. - Page 112 Produttore: Shanghaimuxinmuyeyouxiangongsi Indirizzo: Baoshanqu Shuangchenglu 803long 11hao 1602A-1609shi Shanghai...
- Page 113 Importato in AUS: SIHAO PTY LTD, 1 ROKEVA STREETEASTWOOD NSW 2122 Australia Importato negli Stati Uniti: Sanven Technology Ltd., Suite 250, 9166 Anaheim Place, Rancho Cucamonga, CA 91730 SHUNSHUN GmbH Römeräcker 9 Z2021,76351 Linkenheim-Hochstetten,Germany euvertreter@gmail.com +49 1727041930 Pooledas Group Ltd Unit 5 Albert Edward House, The Pavilions Preston, United Kingdom pooledas123@gmail.com...
- Page 114 Tecnico Supporto e certificato di garanzia elettronica www.vevor.com/support...
Need help?
Do you have a question about the SCJ002-W and is the answer not in the manual?
Questions and answers