Table of Contents
Advertisement
Quick Links
Advertisement
Table of Contents

Related Manuals for Huananzhi X11D-8D


Summary of Contents for Huananzhi X11D-8D
- Page 1 User Manual X11D-8D...
-
Page 2: Table Of Contents
目录 安全信息 此包装中包含的组件有可能静电放电 (ESD) 损坏。 请遵守 以下注意事项, 以确保成功组装计算机 安全信息 ..............确保所有组件连接牢固。 若连接不紧可能会导致计算机 无法识别组件或无法开启 包装说明 ..............拿取主板时为防止静电损坏其配置, 请在拿取主板前通 过接触其它金属物体释放自身的静电 简介 ................ 拿起主板时请手持主板边缘, 避免触及主板的敏感组件 主板图解 在不安装主板时,请将主板放在静电屏蔽容器或防静电垫上 ..............在打开计算机前,确保计算机机箱内的主板或任何位置上 后置I/O面板 ............没有松动的螺丝或金属组件 在安装完成之前不要启动计算机。 否则可能会导致组件 安装与设置 ............永久性损坏以及伤害使用者 在任何安装步骤中,如果您需要帮助,请咨询专业的售后客 驱动程序的安装 ..........服人员 BIOS设置 安装或拆卸计算机任何组件之前,请先关闭电源,并将电源 ............ -
Page 3: 包装说明
: 2 x 英特尔I210千兆网口 扩展插槽: 2 x PCIe 3.0 x16 3 x PCIe 3.0 x8 请确认您所购买的主板包装是否完整, 如果有包装损坏或是 1 x M.2 NVME PCIe 3.0X4 (key M)22110 任何配件损坏、 短缺的情况, 请尽快联系我们 2 x OCULink PCIE3.0X4 1.华南金牌X11D-8D双路主板一片 2.SATA数据线 2根 3.I/O后挡板一块 4.保修卡一张 03 包装说明 简介 04... -
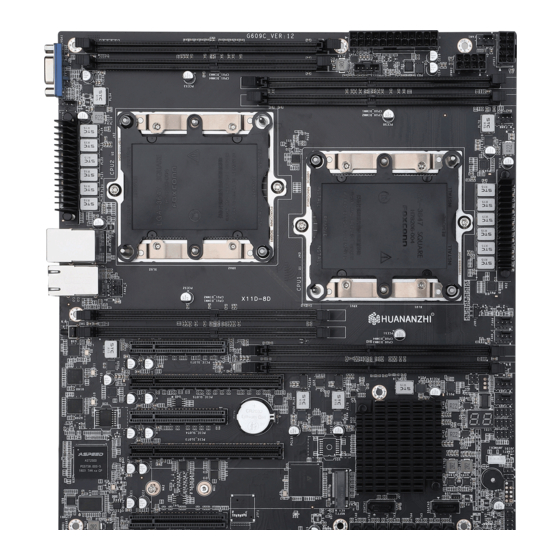
Page 4: 主板图解
网络未连接 关 传输速率 10Mbps 黄色 网络已连接 绿色 传输速率 100 Mbps 闪烁 网络数据在使用中 橙色 传输速率 1 Gbps 图1-3 LAN端口状态表 注:①X11D-8D主板规格为305*265MM E-ATX规格 ②8个FAN插针,其中FAN2、FAN6为CPU风扇插针 Ground Power Button Ground Reset Button 默认为温控模式UID不可控制调节,其余FAN插针 Power Fail LED 3.3V 图1-1 X11D-8D双路主板图解 OH/Fan Fail LED UID LED 为系统风扇插针,默认为温控模式可通过UID控制... -
Page 5: 安装与设置
安装与设置 请仔细查看主板, 凡有表明 “1” 或是白色粗线标记的接脚均为1脚位置。 注意 ! +3.3V SPI_CS# VCC 电源正极 VCC 电源负极 SPI_MISO 数据负信号 RESET# 数据负信号 SPI_CLK 数据正信号 数据正信号 SPI_MOSI GND 接地 GND 接地 +3.3V Stdby SPI_IRQ# KEY 空脚 N.C 空 图2-1 TMP扩充接口 图2-3 USB扩充接口 Power USB3_RX_DN Power Button Ground USB3_RX_DP Ground... - Page 6 如果你的IPMI在未接入网线的情况下,在此界面需等待2分钟左右 打开浏览器输入https://xxx.xxx.xxx.xx(输入IPMI设定好的IP地址) 您可以按Shift + Esc跳过此界面 默认账户:admin 默认密码:admin waiting for BMC IP...retry 2 press Shift + Esc to skip... Prese <DEL> or <ESC> to enter setup Prese <F11> to enter Boot Menu. 图2-5 IPMI检测IP界面 图2-7 IPMI登录 1. 将内存插槽两端的卡扣往外扳开, 内存条 与插槽的凸出位置做对应, 确定安装的方向 SATA3.0*1 SATA3.0*1 2.
- Page 7 Non-Fabric CPU和处理器(倒过来) 1.用螺丝刀拆除主机箱上的挡板和螺丝 CPU上的三角形 2.安装显卡时需掰一下卡槽的卡头 3.把显卡插到显卡的卡槽中 CPU塑料卡扣上的三角形 4.安装到位以后,卡头会自动归位 5.用螺丝把显卡固定在机箱上 6.装好电源线即可 散热片(倒过来) 图2-9 显卡安装 图2-10 CPU安装 注意:确保安装槽口插入到位 ! 在(C,D)的位置上,将切口贴到散热器的安装孔上 在位置(A, B)上,凹槽卡在散热器的侧面 图2-11 CPU安装 11 安装与设置 安装与设置 12...
- Page 8 椭圆形 C 椭圆形 D 大导柱 T30内梅花头螺丝刀 小导柱 打印出来的三角形 将处理器散热器模块安装到CPU插槽(在主板上) 按照1、2、3、4的顺序拧紧 图2-12 CPU安装 13 安装与设置 安装与设置 14...
- Page 9 按4、3、2、1的顺序 拆下螺钉 CPU插座 拆卸螺钉后,将处理器散热器模块从 CPU插座上拔下。 图2-13 CPU拆卸 15 安装与设置 安装与设置 16...
-
Page 10: 驱动程序的安装
驱动程序的安装 1.驱动程序目录一览: 驱动程序目录 驱动程序说明 适用操作系统 X11D-8D Chipset Driver Intel 芯片信息安装 win7/win10 X11D-8D LAN Driver Intel 千兆网卡安装 win7/win10 2.Intel 芯片信息安装 3.外置显卡驱动程序安装 运行:控制面板—系统—硬件—设备管理器 运行外置显卡 《驱动程序》 : 目录下的 Setup.exe “右击” 改动驱动程序的硬件设备, 继续下面安装 点击 “下一步” , 继续 选择:属性-更新驱动程序-不连接到Internet-手动安装 点击 “是” , 继续 —找到对应的目录 点击 “下一步” , 继续... -
Page 11: Bios设置
5.网卡驱动程序的安装 1.主菜单功能 运行 《驱动程序》 : X11D-8D LAN DRIVER /setup.exe Platform Socket Main Advanced Server Mgmt Security boot save&exit Configurat Configuration 点击 “下一步” , 继续 选择 “安装” 进行下面的安装 Main System Overview(系统信息) 选择 “完成” , 重新启动计算机, 系统将自动查找设备完成安装 Advanced Advanced Settings(高级BIOS功能设置) 设置BIOS提供的特殊功能, 例如病毒警告、 开机引导磁盘... -
Page 12: Safety Precautions
If you need any assistance in the process of installation, please contact our after-sales customer service or reach us on BIOS Settings HUANANZHI official E-mail:business@huananzhi.com for professional technical support. Prior to installation or disassembly, please switch off the power and pull the power cable from the socket. -
Page 13: Packing Instructions
Please confirm that the motherboard is properly packaged upon purchase of the product. If there is any damage to packaging or lack of accessories, contact us as soon as possible . 1.HUANANZHI X11D-8D motherboard 2.SATA data cable 3.I/O shield back plat 4.Warranty Card... -
Page 14: Motherboard Diagram
The transmission rate is 100Mbps flicker Network data is in use orange The transmission rate is 1 Gbps Figure 1-3 LAN port status table Note: (1) The X11D-8D mainboard specifications are 305*365MM E-ATX specifications Ground Power Button Ground Reset Button (2) Eight FAN pins. -
Page 15: Installation And Setup
INSTALLATION AND SETUP Please look carefully at the motherboard, where there is a "1" or white thick line markpin is 1 position. Pay attention ! +3.3V SPI_CS# SPI_MISO RESET# SPI_CLK SPI_MOSI +3.3V Stdby SPI_IRQ# Figure 2-1 Extended TMP interface Figure 2-3 USB expansion port Power USB3_RX_DN Power Button... - Page 16 If your IPMI is not connected to a network cable, wait about 2 minutes Open your browser, type in https://xxx.xxx.xxx.xx(and enter the IPMI IP on this screen, You can press Shift + Esc to skip this screen address.) Default user: admin Default password: admin User name cipher Remember username...
- Page 17 Non-Fabric cpus and processors (inverted) 1. Remove the baffle plate and screws from the main box using a screwdriver Triangle on the CPU 2. When installing the video card break the card tip of the card slot 3. Insert the video card into the video card slot 4.
- Page 18 Oval C Large guide post Oval D T30 Torx Driver Miniature guide post Printed Triangle Mounting the Processor Heatsink Module Tighten the screws in the into the CPU socket (on the motherboard) sequence of 1, 2, 3, 4 (top 3 quarter view) Figure 2-12 Installing a CPU 13 Installation and Settings Installation and Settings 14...
- Page 19 Removing the screws in the sequence of 4, 3, 2, 1 CPU Socket After removing the screws, lift the Processor Heatsink Module off the CPU socket. Figure 2-13 Removing a CPU 15 Installation and Settings Installation and Settings 16...
-
Page 20: Driver Installation
Driver installation 1. Driver directory list: Driver directory Driver specification Applicable operating system X11D-8D Chipset Driver Intel chip information installation win7/win10 X11D-8D LAN Driver Intel Gigabit nics win7/win10 2. Install Intel chip information 3. Install the external graphics card driver Run: Control Panel - System - Hardware - Device Manager Run the external graphics card Driver: Setup.exe... -
Page 21: Bios Settings
5. Install the NIC driver 1. Main course menu function Run DRIVER: X11D-8D LAN driver /setup.exe Platform Socket Main Advanced Server Mgmt Security boot save&exit Configurat Configuration Click "Next" to continue Select Install to perform the following installation Main System Overview Select "Finish", restart the computer, the system will...
Need help?
Do you have a question about the X11D-8D and is the answer not in the manual?
Questions and answers