
Related Manuals for PV-ezRack Elevate Series

Summary of Contents for PV-ezRack Elevate Series
- Page 1 Elevate Series – SolarBalcony Solar PV Mounting frame for high-rise installations Ver 1.3 / Last Updated - Jul. 2023...
-
Page 2: Table Of Contents
Ensuring that PV-ezRack and other products are appropriate for the particular installation and the installation environment; • Using only PV-ezRack parts and installer supplied parts as specified by PV-ezRack project plan (substitution of parts may void the warranty and invalidate the letter of certification);... -
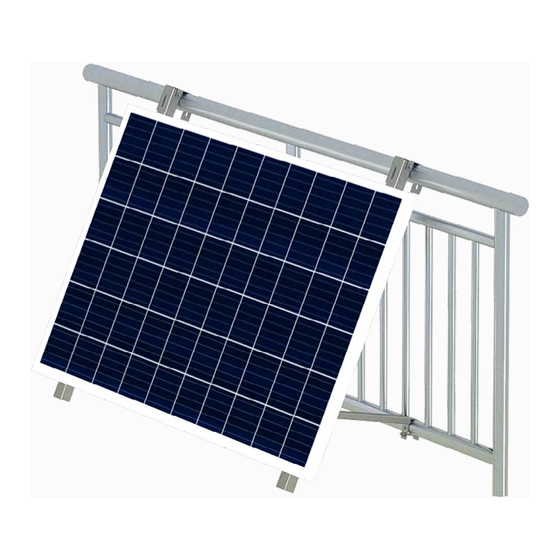
Page 3: Solarbalcony
Installation Guide /SolarBalcony Tools & Components Tools 6mm Allen Key Spanner Torque Wrench (M8/M12/M16) (M8 hex socket screw) Components SolarBalcony - Tools & Components - Code-Compliant Planning and Installation Guide V 2.0... -
Page 4: System Overview
Installation Guide /SolarBalcony System Overview Overview of SolarBalcony Top railing Bottom railing Note: Please install the SolarBalcony on balconies with top and bottom railings. Top railing diameter: 50-70mm Bottom railing diameter: 25-45mm Precautions during Stainless Steel Fastener Installation Improper operation may lead to a deadlock of Nuts and Bolts. The steps below should be applied to stainless steel nut and bolt assembly to reduce this risk. -
Page 5: Installation Instructions
Installation Guide /SolarBalcony Installation Instructions PV Module Installation Adjust the connecting hole of Check whether the modules, components and U-Rail based on the angle of tools are ready. installation. Adjust the connecting hole of U-Rail and C-Rail based on the installation angle. Do not fasten the bolt. -
Page 6: Bracket Installation
Installation Guide /SolarBalcony Bracket Installation The installer should take essential safety measures following local regulations and the surrounding environment. Attach the upper bracket to the balcony with an M8*125 bolt (one plain washer, washer, nut and bolt). Keep the bolts loose for further adjustment, as shown in Figure 3. - Page 7 Clenergy 999-1009 Min’an Rd, Phone: +86 592 311 0088 Huoju Hi-tech Ind. Dev. Zone Email: sales@clenergy.com Xiang’an District 361101, Xiamen, Web: www.clenergy.com Fujian, China @ClenergyGlobal / @ClenergyClub / @ClenergyAUS / @ClenergyThailand @Clenergy_global @Clenergy @Clenergy @ClenergyClub A Clenergy Technologies Company...
Need help?
Do you have a question about the Elevate Series and is the answer not in the manual?
Questions and answers