Table of Contents
Advertisement
Quick Links
Advertisement
Chapters
Table of Contents

Related Manuals for Clevo PRO BOARD


Summary of Contents for Clevo PRO BOARD
- Page 1 CLEVO PRO BOARD Benutzerhandbuch User Manual...
- Page 2 Auch die Wahl des Ortes, wo du trainieren möchtest, erweitert sich auf allen Wänden und Decken oder auch an Türrahmen. Unser Ziel von CLEVO ist es, so viele Kunden wie möglich mit unseren hoch- wertigen Produkten dabei zu unterstützen, ein 100% flexibles Training zu er- möglichen.
-
Page 3: Table Of Contents
Benutzerhandbuch Seite 3 Inhaltsverzeichnis S. 4 Geräteübersicht S. 6 Sicherheitshinweise und Entsorgung S. 9 Montage S. 12 Aufbewahrung und Pflege S. 13 Garantie und Rückgaberecht S. 15 Kontakt... -
Page 4: Geräteübersicht
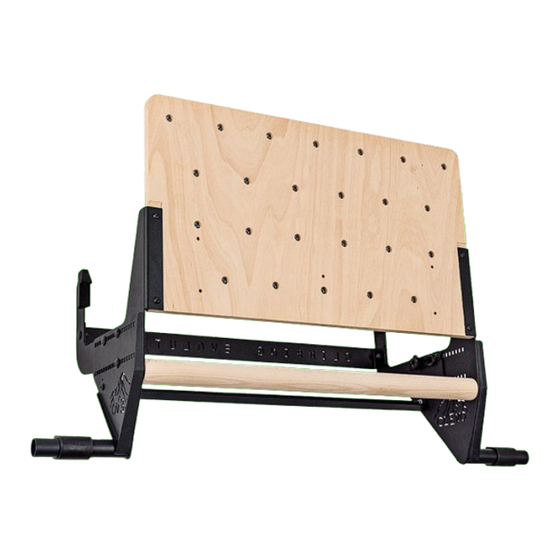
1 Geräteübersicht Seite 4 Bezeichnung aller Teile... - Page 5 1 Geräteübersicht Seite 5 Lieferumfang Schrauben Menge Anschraubmutter M10 silber Holzschraube 3 x 10 mm silber Halbrundkopfschraube M6 x 16 schwarz Mutter M6 schwarz Scheibe 6,4 schwarz Einzelteile Menge Holzplatte / Multiplex 646 x 370 x 18 mm Querstrebe 654 mm schwarz (optional im Lieferumfang enthalten)
-
Page 6: Sicherheitshinweise Und Entsorgung
2 Sicherheitshinweise und Entsorgung Seite 6 Wichtige Sicherheitshinweise WICHTIG! Mache dich vor Inbetriebnahme des Gerätes mit allen in dieser gedruckten Anleitung erwähnten Sicherheits-, Montage-, Bedienungs- und Trainingshin- weisen vertraut. – Alle Sicherheitshinweise sind strikt zu befolgen, um Risiken von Verlet- zungen zu verhindern. - Page 7 3. Die MAXIMALE BELASTBARKEIT deines CLEVO-Moduls darf beim Klettern bzw. bei der Nutzung unter keinen Umständen überschritten werden! Montierst du CLEVO Add-Ons, wie das Pro Board, an deinem CLEVO Modul, gilt folgende MAXIMALE BELASTBARKEIT: – 130 KG bei CLEVO DOOR Modul 4.
- Page 8 Erhöhung dynamischer Kräfte beitragen, zusätzlich an das Gerät an- gebracht werden. 9. Bei der Verwendung mit dem CLEVO DOOR Modul: Das Gerät sollte vorsichtig und langsam im Türrahmen angebracht werden, um mögliche Kratzer an der Zarge zu vermeiden. Zudem sollte ein kleiner Belastungstest nach Anbringung im Stehen gemacht werden, um zu sehen ob das Gerät auch sauber am Türrahmen aufliegt.
-
Page 9: Montage
CLEVO DOOR Modul, die an dem vorderen Holzbrett mon- tiert sind und nehme das Brett heraus. Die Senkkopfschrauben M6x25 und die silbernen M6 Muttern mit Sperr- verzahnung werden zusammen mit dem Pro Board weiterhin benötigt. Bewahre diese Schrauben für die Montage auf. - Page 10 3 Montage Seite 10 Anleitung Schritt 2 Montiere 26x die Anschraubmuttern M10 (1) mit den Holzschrauben (2) an der Holzplatte (6). Beachte dabei, dass du die An- schraubmuttern auf der Rückseite der Holzplatte verschraubst. Kante als Orientierung nutzen Schritt 3 Verwende die Senkkopfschrauben M6x25 und die silbernen M6 Mut- tern mit Sperrverzahnung, die du in...
- Page 11 Schritt 4 Um die Stabilität deines CLEVO DOOR Moduls zu erhöhen, die Quer- strebe (7) an der CLEVO DOOR Aufnahme links und rechts mit den Halbrundkopfschrauben M6x16 (3), den Scheiben 6,4 (5) und der Mutter M6 schwarz (4) ca. 15 Nm (handfest) verbinden.
-
Page 12: Aufbewahrung Und Pflege
3 Montage Seite 12 Anleitung Montage Querstrebe - Ansicht Rückseite: 4 Aufbewahrung und Pflege Bewahre dein Gerät im Innenbereich auf. Vermeide, dass das Gerät bei der Aufbewahrung direkter Sonneneinstrahlung oder Feuchtigkeit ausgesetzt ist. Bewahre das Gerät nicht in der Nähe von Wärmequellen auf. Reinige das Gerät sowie die Holzgriffe mit einem feuchten, weichen und sau- beren Tuch. -
Page 13: Garantie Und Rückgaberecht
5 Garantie und Rückgaberecht Seite 13 Die Garantiezeit beträgt zwei Jahre und beginnt mit dem Tag des Rechnungs- datums. Bitte bewahre die Rechnung als Nachweis für den Kauf und damit den Garantieanspruch auf. Es gelten folgende Garantiebestimmungen: Der Hersteller garantiert kostenfreie Behebung von Mängeln, die auf Material- oder Fabrikationsfehler zurückzuführen sind. - Page 14 Funktion des Produktes und sind lediglich optischer Natur. Setze dich im Falle eines Garantiefalles umgehend mit unserem Serviceteam in Verbindung: info@clevo-climbing.com Um die Ware im Falle einer Reparatur oder Retoursendung ausreichend zu schützen, bitten wir dich, falls möglich, die Originalverpackung für die Dauer der Garantiezeit aufzubewahren.
-
Page 15: Kontakt
5 Kontakt Seite 15 Fragen oder Kommentare? Clevo Climbing Evolution FT Fitness Technology GmbH Im Oberhof 4 88260 Argenbuehl, Germany www.clevo-climbing.com +49 89 215300-747 info@clevo-climbing.com facebook.com/clevoclimbing youtube.com/@clevoclimbing instagram.com/clevoclimbing/ Solltest du weitergehende Fragen zum Produkt oder Schwierig- keiten bei der Montage des Produktes haben, kannst du uns sehr gerne kontaktieren. - Page 16 Also, the choice of where you want to train expands to all walls and ceilings or even door frames. Our goal at CLEVO is to support as many customers as possible with our high quality products to enable a 100% flexible training.
- Page 17 User Manual Seite 17 Table of contents p. 18 Product overview p. 20 Safety instructions and disposal p. 23 Mounting p. 26 Storage and care p. 27 Guarantee and return policy p. 29 Contact...
-
Page 18: Product Overview
1 Product Overview page 18 Designation of all parts... -
Page 19: Scope Of Delivery
1 Product Overview page 19 Scope of delivery screws quantity screw-on nut M10 silver wood screw 3 x 12 mm silver button head screw M6 x 16 black nut M6 black disc 6,4 black separate parts quantity wooden plate / multiplex 646 x 370 x 18 mm cross strut 654 mm black (optionally included in the scope of delivery) -
Page 20: Safety Instructions And Disposal
2 Safety Instructions and Disposal page 20 Important safety instructions IMPORTANT! Before using the product, familiarise yourself with all the safety, mounting, ope- rating and training instructions mentioned in this printed manual. – All safety instructions must be strictly followed to prevent the risk of injury. –... - Page 21 CLEVO add-ons, such as the High Bar, on your CLEVO module, the following MAXIMUM LOADING CAPACITY applies: – 130 KG (287 LBS) for CLEVO DOOR module 4. The product may only be installed indoors or in a covered outdoor area.
- Page 22 8. DO NOT attach additional (children‘s) swings or other loads that contribute to the increase of dynamic forces to the device. 9. When product will be used with the CLEVO DOOR module: The product should be placed carefully and slowly in the door frame to avoid possible scratches on the frame.
-
Page 23: Mounting
Instruction Step 1 Loosen the four screws and nuts from your CLEVO DOOR or CLEVO WALL module that are mounted on the front wooden board and take the board out. The M6x25 countersunk screws and... -
Page 24: Required Tools
3 Mounting page 24 Required tools Step 2 Mount the M10 screw nuts (1) 26x on the wooden plate (6) using the silver wood screws (2). Make sure that you screw the M10 screw nuts and the screws from the correct side (back side). - Page 25 To increase the stability of your CLEVO DOOR module, connect the cross strut (7) to the CLEVO DOOR adapters on the left and right using the M6x16 button head screws (3), the washers 6.4 (5) and the M6 black nut (4) approx. 15 Nm (hand-tight)..
-
Page 26: Storage And Care
Do not use abrasive, corrosive, acidic or alkaline cleaning agents, as these may damage the surface of the appliance or cause scratches. The wood of the CLEVO DOOR is natural. If necessary, the wood can be trea- ted with sandpaper to smooth its surface. In this case, only use sandpaper with... -
Page 27: Guarantee And Return Policy
5 Guarantee and Return Policy page 27 The guarantee period is two years and begins on the date of the invoice. Plea- se keep the invoice as proof of purchase and thus the warranty claim. The following guarantee conditions apply: The manufacturer guarantees free-of-charge repair of defects that are due to material or manufacturing faults. - Page 28 In the event of a guarantee case, please contact our service team immediately: info@clevo-climbing.com In order to protect the product sufficiently in case of repair or return, we ask you to keep the original packaging for the duration of the warranty period, if possible.
-
Page 29: Contact
6 Contact page 29 Questions or comments? Clevo Climbing Evolution FT Fitness Technology GmbH Im Oberhof 4 88260 Argenbuehl, Germany www.clevo-climbing.com +49 89 215300-747 info@clevo-climbing.com facebook.com/clevoclimbing youtube.com/@clevoclimbing instagram.com/clevoclimbing/ If you have any further questions about the product or difficulties with the installation of the product, please do not hesitate to contact us.
Need help?
Do you have a question about the PRO BOARD and is the answer not in the manual?
Questions and answers