Advertisement
Quick Links
SOUND REINFORCEMENT
LS6CT CEILING SPEAKER
INSTALLATION GUIDE
Instructions
Required Tools and Parts
Pencil
•
Phillips screwdriver
•
Fine-tooth saw (power or manual)
•
1. Cut the ceiling tile.
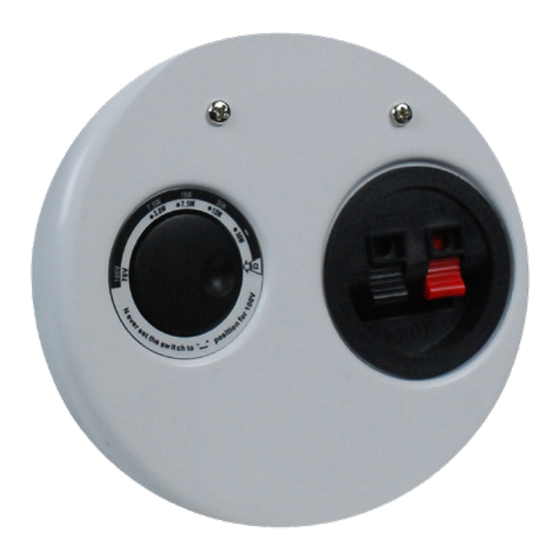
2. Set the transformer as needed for your system.
a. For connection to a low-impedance power amplifier, turn the dial to the 8Ω
symbol.
b. For a 70 V constant-voltage amplifier, adjust the dial to the desired wattage on
the inner white ring.
c. For a 100 V constant-voltage amplifier, adjust the dial to the desired wattage on
the outer black ring.
Caution! For 100 V systems, do not set the
transformer to " — ".
a. On the provided cutout template, punch out along the larger perforated circle.
b. Place the cutout template against the bottom of the ceiling tile and with a pencil,
trace the inside.
c. With a fine-tooth saw, carefully cut out the ceiling material along the circle.
d. (Optional) Install the Ceiling Tile Bridge.
e. The tile bridge helps distribute the weight of the speaker across a larger area of
the ceiling tile, preventing sagging or damage, especially with lightweight or fragile
ceiling tiles.
Great Ideas Need to be Heard!
AUDIO
CONFERENCING
Caution!
• Install in accordance with all applicable
local codes.
• Before you start, ensure that power to the
amplifier is
off.
®
Advertisement

Related Manuals for ClearOne LS6CT


Summary of Contents for ClearOne LS6CT
- Page 1 AUDIO CONFERENCING SOUND REINFORCEMENT LS6CT CEILING SPEAKER INSTALLATION GUIDE Instructions Required Tools and Parts Caution! Pencil • Install in accordance with all applicable • local codes. Phillips screwdriver • • Before you start, ensure that power to the Fine-tooth saw (power or manual) •...
- Page 2 Other product names and logos may be registered trademarks of their respective owners who do not necessarily endorse ClearOne or ClearOne’s products. All rights reserved. Information in this document subject to change without notice. QSG-0174-001v1.0 September 2024 © 2024 ClearOne, Inc.
Need help?
Do you have a question about the LS6CT and is the answer not in the manual?
Questions and answers