
Related Manuals for Merlin EVO-CHIPS


Summary of Contents for Merlin EVO-CHIPS
- Page 1 User ManUal BIoMass MoIsTUre MeTer MerlIn evo-ChIps ® Measuring Technique Better Business Conditions.
-
Page 2: Design Of The Device
Design of the device Measuring head Insertion probe Water content POWER button Batteries slot Temperature (flipside) Grap bar... -
Page 3: Measuring Procedure
1. For a correct measurement please ensure that the device has the same temperature than the wood chips (+/-3°C). For that rea- son, let your EVO-CHIPS adjust to the surrounding temperature of the material for at least half an hour before measuring. -
Page 4: Calibration Curves
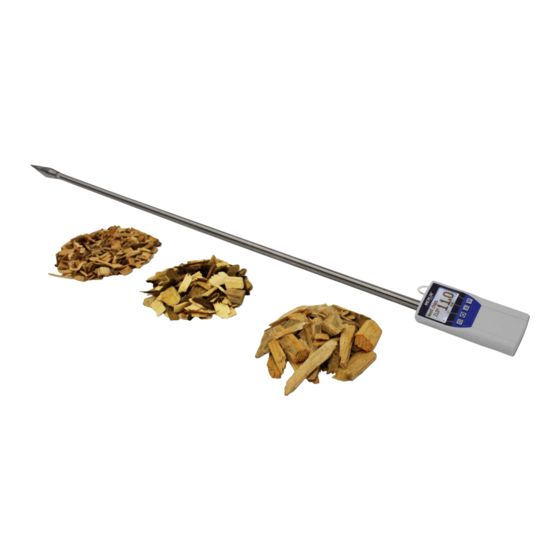
75% of the bulk is between 8 and 63 mm Compression of wood chips The EVO-CHIPS is calibrated for normally compressed wood chips. If the measured wood chips are compressed to a much lesser or greater extent, this will cause measuring imprecisions. Normally com- pressed wood chips are defined in norm EN 15103 (determination of the bulk density). - Page 5 Determination of the material reference moisture The principle is a comparison measurement with the dehydration method according to EN14774. Take the measured sample and weigh it. Dry it out in an oven and weigh it again. %F = x 100 : Mass with average moisture content : Mass of the dried sample %F: Calculated absolute moisture...
- Page 6 Keypad symbols Menu level overview Measuring window: Store menu Rolling Menu Watch the saved data (logs) Power ON / OFF Save new value Power off (3 sec.) Switch upper Type selection menu Switch lower Save Next calibration curve Previouse calibration curve Hold Power off (3 sec.) Watch the...
-
Page 7: Changing Batteries
IMMEDIATELY. If you do not use your EVO-CHIPS device for a longer period, remove the batteries. For eventual resulting damages we cannot provide any warranty. -
Page 8: Running The Instrument
Running the instrument Switch on: Press the key for 3 seconds Set the clock: Press 3 times the key -> Options -> Date/Time Save measuring value: Save the measuring value by pressing the button below the symbol. The storage was successful when the number in front of the symbol increased. -
Page 9: Changing The Userlevel
Changing from single user to advanced user: Keep both the buttons pressed directly after switching on the device. Your EVO-CHIPS automatically starts the main menu. Activate the the “super user” functions according to the instructions above. Navigate to “Options – o Userlevel” and confirm by pressing the button. -
Page 10: Transfer Saved Data To The Pc
USB slot on your PC. Start the LogMemorizer software on your PC and switch on your EVO-CHIPS. The data transfer can be started on your EVO-CHIPS or on the soft- ware. Starting the data transfer on the EVO-CHIPS:... - Page 11 To print your saved data, connect the device to the printer using the printer cable that was delivered with your device. Carefully loose the protection cap on the EVO-CHIPS. At first plug in the side of the connector with the close plastic casing at the EVO-CHIPS. Then switch on the device.
-
Page 12: Exemption From Liability
Therefore we recommend a plausibility check of the measuring results. Each device includes a serial number and the guarantee stamp. If those are broken, no claims for guarantee can be made. In case of a faulty device, please contact MERLIN Technology GmbH (www.merlin-technology.com) or our dealer. - Page 13 It is not allowed to load the measuring head incorrect (stress, bending), other wise it can be broken. Plug and remove the insertion probe of your meter straight into the wood chips. move EVO-CHIPS crosswise insertion direction after plugging drop...
-
Page 14: Technical Data
Degree of protection IP 40 Scope of supply 4 x 1.5Volt AA Alkaline Batteries Options Test block for EVO-CHIPS EVO-CHIPS USB data interface modul for connection to PC Thermo printer runs by battery (only with USB data interface) Risk of injury by measuring head! - Page 15 Better Business Conditions.
- Page 16 MERLIN ® Technology GmbH – Hannesgrub 40 – 4910 Ried im Innkreis – AUSTRIA Tel +43 (0) 7752 71966 – Fax +43 (0) 7752 71988 – office@merlin-technology.com merlin-technology.com...
Need help?
Do you have a question about the EVO-CHIPS and is the answer not in the manual?
Questions and answers