Table of Contents
Advertisement
Quick Links
Advertisement
Table of Contents

Related Manuals for Xenosys LooksCAM

Summary of Contents for Xenosys LooksCAM
- Page 1 LooksCAM CAMERA SYSTEM User Manual Optical Device Medical Device System Engineering XENOSYS CO., LTD. 2, Venture-ro, 100 beon-gil, Yeonsu-gu, Incheon, 406-840 Korea TEL. 82-32-875-9811~2 FAX. 82-32-875-9813 www.xenosys.co.kr / sales@xenosys.co.kr...
-
Page 2: Table Of Contents
Connect the Main Body ........................19 OSD (On Screen Display) Explanation .................... 20 How to Update the Firmware ......................20 Check Video with WiFi ....................21 Connect the Main Body ........................21 Connect Wireless LAN Device ......................21 CAMERA SYSTEM (LooksCAM) www.xenosys.co.kr... - Page 3 Power Cord ..............................30 (10) Video Out Cable ............................30 (11) Wireless LAN Device ..........................31 Detailed Specification ..................... 31 ELECTROMAGNETIC COMPATIBILITY ............... 32 TRANSPORTATION ....................33 STORAGE ........................ 33 CLEANING INSTRUCTIONS .................. 34 SERVICE & WARRANTY ..................34 CAMERA SYSTEM (LooksCAM) www.xenosys.co.kr...
-
Page 4: Introduction
Certificate Registration No. 1909 Gyeongin Jesin 07-117 Product Category General Instruments Class Class 1 Product Category Product A31020.01 External Medical A31000 Medical Mirror Category III Camera Product Model No. LooksCAM Manufacturer Xenosys Co., Ltd. Origin Korea CAMERA SYSTEM (LooksCAM) www.xenosys.co.kr... -
Page 5: Safety & Precautions
Do not touch the power cord with wet hand which may cause electric shock or equipment damage. Do not use LooksCAM with connecting directly to the battery pack during the operation or medical practice. WARNING for Main Body: ... - Page 6 LED optic outside emits heat, so be careful on touching. Do not look directly into LED lens module or some one’s eyes to avoid the risk of permanent eye damage. Refer to the below label for the caution. CAMERA SYSTEM (LooksCAM) www.xenosys.co.kr...
- Page 7 The battery operating time may shorten using in the cold place (below 0℃) even fully charged one. In that case, warm up the battery within the pocket before using LooksCAM. Do not heat up the battery with microwave or any heater. Recommended ambient temperature to operate is 6℃...
-
Page 8: Features
1) Protection Classification: ① Battery operated equipment ② Charger, DC Power Supply: Class II device 2) Protection Type: N/A 4. Safety Circuit: LooksCAM contains protection circuit for overcurrent & overvoltage. 5. Block Diagram: Refer to below figure CAMERA SYSTEM (LooksCAM) www.xenosys.co.kr... -
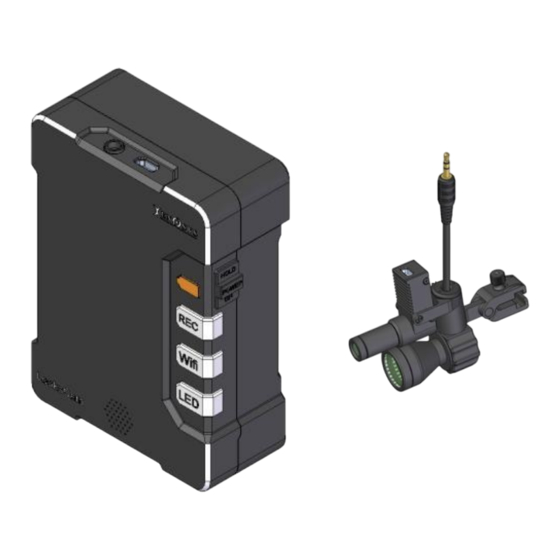
Page 9: Components
Remote Controller DC Power Supply Head Assembly Cable USB Cable Power Cord MLC Type Class 10 10. Video Out Cable (3.6M) 11. Wireless LAN Device (N150UA) 12. Micro SD Card (32GB) 13. Rigid Headband 14. Battery (AAA) CAMERA SYSTEM (LooksCAM) www.xenosys.co.kr... -
Page 10: Each Component & Functions
OFF: System is booting or Check the status WiFi ON/OFF Button ⑥WiFi Button WiFi Button LED ON: WiFi is working OFF: WiFi is NOT working Blinking: No SD card LED Light ON/OFF button (3 steps) ⑦LED Light Button CAMERA SYSTEM (LooksCAM) www.xenosys.co.kr... -
Page 11: Head Assembly Unit
⑬Charging Port WARNING: Charging port is VERY weak at the external shock, so be careful in assembling the battery pack. If the charging port is broken, the operation of LooksCAM may NOT be possible. Head Assembly Unit ② Camera Sensor Port ④... -
Page 12: Head Assembly Cable
- Charging port is VERY weak at the external shock, so be careful in assembling the battery pack. If the charging port is broken, the operation of LooksCAM may NOT be possible. ②Charger Connecting Phone jack: The phone jack to connect from DC8.4V charger to the charging plug. -
Page 13: Remote Controller
3. Hold the pairing switch more than 5 seconds-> Blinking blue several remote controllers. 4. Press [REC] button of Remote controller & release -> Blue LED will go on 2 sec. and OFF 5. Complete releasing pairing. CAMERA SYSTEM (LooksCAM) www.xenosys.co.kr... -
Page 14: Installation
Micro SD card is expendables with certain period of lifespan, so it needs periodical check up and exchange. Recommended using Xenosys provided Micro SD card. If there is any defective happen while using non-Xenosys provided one, we don’t have the responsibility for that defective. ... -
Page 15: Assemble The Control Unit And Battery Pack
- Charging port is VERY weak at the external shock, so be careful in assembling the battery pack. If the charging port is broken, the operation of LooksCAM may NOT be possible. - Store the main body and battery pack with separated to prevent the battery discharging. -
Page 16: Assemble The Main Body And Head Assembly Unit
- If the connection is bad on head assembly unit cable, UMS mode (connecting to USB) may not work well. - If the camera sensor plug of head assembly cable is twisted or damaged by hard pull off, HDMI cable can be severely damaged which will cause loose contact to image transfer. CAMERA SYSTEM (LooksCAM) www.xenosys.co.kr... -
Page 17: Connect Video-Out Port
②Hold ON/OFF: When you push the power switch to upward after system booting process, RED, WiFi, LED button will not operate, but “REC” and “LED” button will operate normally. Hold function is to prevent any unexpected (unwanted) button touch which may cause malfunction. CAMERA SYSTEM (LooksCAM) www.xenosys.co.kr... -
Page 18: Video Record
Recorded file will be generated every 50 minutes. (Time is fixed) The location of recorded file is <sd card:d> d:/DCIM/100MEDIA. File extension name is mp4 and the encoding mode is H.264. Example of generated file name: MMDDhhmm_XXXX.mp4 (Month-Day-Hour- CAMERA SYSTEM (LooksCAM) www.xenosys.co.kr... -
Page 19: Check Video With Video-Out Port
The system booting process will begin when it turns on with fully charged battery. The LED sign of REC button shows the completion of the system booting. Video will be shown on TV or monitor with OSD (On Screen Display). Check the real time video with Video-Out port. CAMERA SYSTEM (LooksCAM) www.xenosys.co.kr... -
Page 20: Osd (On Screen Display) Explanation
If there is any error occur, start the process from number 1). WARNING: - You should be careful on power save during the firmware update which may cause the system damage. Important files & videos should be transferred to another computer before the update. CAMERA SYSTEM (LooksCAM) www.xenosys.co.kr... -
Page 21: Check Video With Wifi
System booting process will begin when the battery is fully charged and turned on. ②If the LED of [REC] button turns on, the system booting is now completed. After the LED of ③[WiFi] button turns on, now it is ready to use LooksCAM. (2) Connect Wireless LAN Device ②... -
Page 22: How To Change Wifi Password & Ssid
Search ②wireless LAN according to the user manual of ipTIME N150UA. Select the wireless name (SSID) “ LooksCAM ” and press the icon of ③Connect wireless LAN. When you see profile window, then press the icon of “... -
Page 23: Check Video With Vlc Media Player
If REC button is pressed under the REC waiting mode, WiFi connection will be terminated automatically. If you press “play” button during recording or repeat play button ( ) is pressed, the video size will be 432*240 on screen. CAMERA SYSTEM (LooksCAM) www.xenosys.co.kr... -
Page 24: How To Set Up The Time
Press “Change Time & Date” to change desired time set up and click “confirm”. Click “Save Config” to close and store the time set up. If you see “rtctime.info” file, it means time set up is completed. CAMERA SYSTEM (LooksCAM) www.xenosys.co.kr... -
Page 25: Turn On Led Light
Execute config.exe in CONFIG folder of SD card to change LED brightness. After you execute config.exe file and change “Light Level” with desired value. Press “Save Config” to store the setting. LooksCAM re-booting process should be done to use changed value. CAMERA SYSTEM (LooksCAM) www.xenosys.co.kr... -
Page 26: Battery Status Led Explanation
About 1 hours 30 minutes About 10 to 30 minutes Blinking Red Less than 10 minutes Alarm message will go off every 2 minutes Battery LED shows LooksCam status Blinking Green Booting process Blinking Orange NO SD card Blinking Red... -
Page 27: Basic Troubleshooting
BASIC TROUBLESHOOTING WARNING before asking for after-sales services: Important data which are stored in LooksCAM must be moved or downloaded to other devices or personal computer periodically. All data can be deleted for after-sales services. Important data must be backed up by the user before applying after-sales services. - Page 28 WiFi Analyzer application or other proper Not occupied channel or less Wifi connection is bad surveillance program to find traffic channel change out less traffic channel to LooksCAM wifi. change LooksCAM wifi. LooksCam LooLoo ksCam ksCam CAMERA SYSTEM (LooksCAM) www.xenosys.co.kr...
-
Page 29: Specification
Measurement: Refer to below picture Measurement: Refer to below picture Weight: 70 g Weight: 170 g (3) Head Assembly Unit (4) Remote Controller Measurement: Refer to below picture Measurement: Refer to below picture Weight: 46 g Weight: 56g CAMERA SYSTEM (LooksCAM) www.xenosys.co.kr... -
Page 30: Charger
(7) Head Assembly Cable (8) USB Cable Measurement: 1.5 m Measurement: 1.5 m Weight: 65 g Weight: 40 g (9) Power Cord (10) Video Out Cable Measurement: 1.8 m Measurement: 3.5 m Weight: 92 g Weight: 152 g CAMERA SYSTEM (LooksCAM) www.xenosys.co.kr... -
Page 31: Wireless Lan Device
3 hours (3000 mAh) Input power of DC Power Supply 100/240 VAC, 50/60 Hz, 0.5A Output power of DC Power Supply DC 12V 1.5A Charger Input DC 12V 1.5A Charger Output DC8.4V 1.0A CAMERA SYSTEM (LooksCAM) www.xenosys.co.kr... -
Page 32: Electromagnetic Compatibility
When the device is powered on, you can find out if it generates electromagnetic interruption or not. Recommend to choose one and more ways to solve the trouble in the following ways. Relocate the equipments receiving the interruptive wavelength. Put the each equipment in longer distance. CAMERA SYSTEM (LooksCAM) www.xenosys.co.kr... -
Page 33: Transportation
2. Load LooksCAM boxes up and down evenly by handcart and any vehicle trunk to transport. 3. When you carry LooksCAM by hand, hold it with two hands firmly and disconnect charger, and power cord from the main body for safe transportation. -
Page 34: Cleaning Instructions
1. This service & warranty statement applies to all countries to the extent that there is no special warranty rule. 2. All services & warranty should be provided by Xenosys Co., Ltd. or authorized personnel by Xenosys Co., Ltd. 3. Warranty becomes effective from the sales date for material, production defective, or defect under the normal use. - Page 35 12. There are no user serviceable parts in this product. Please send the product to the distributor (dealer) for servicing. Technical description or manual is available upon request. 13. Warranty Period of LooksCAM 1) LooksCAM (except the battery & non-Xenosys provided parts): 1 year 2) Battery & Micro SD Card: 6 months EU Representative (EU Repräsentant) 1.
- Page 36 7. Resolution of Monitor: 1920 ⅹ 1080 ※ Revision List Version No. Distribution Date Remark Version 1.0 Feb., 2014 Initial distribution Applied the medical DC 5V power supply due to CE Version 2.0 July, 2014 certification CAMERA SYSTEM (LooksCAM) www.xenosys.co.kr...
Need help?
Do you have a question about the LooksCAM and is the answer not in the manual?
Questions and answers