
Related Manuals for Mogabi MSG 580AC-200

Summary of Contents for Mogabi MSG 580AC-200
- Page 1 User’s Manual Steel Strings Model MSG 580AC-200, 200M Nylon Strings Model MSG 580CL-200, 200M...
- Page 2 Owner's Manual before use. After reading the manual, keep it at a convenient location for future reference. Mogabi Smart Guitar® and the Mogabi brand logo are trademarks of ZIM Corporation. This manual deals with basic operations Please download the user manual to the QR code below, read it thoroughly, understand the function, and store it with the guitar.
-
Page 3: Table Of Contents
Steel Strings Model MSG 580AC-200, 200M Nylon Strings Model MSG 580CL-200, 200M Contents Specification The external appearance Safety Precautions Components Names of Parts Terminal for External Devices Control Panel / Knob Operation Preamp Panel Rest Frame Attachment Rest Frame Detachment... -
Page 4: Specification
Specification Model Name Acoustic : MSG 580AC-200, MSG 580AC-200M Classical : MSG 580CL-200, MSG 580CL-200M Size 703 x 84 x 88mm (Main Body) 1086 x 348 x 45mm (with Color Rest Frame) 1086 x 343 x 45mm (with Wood Rest Frame) Weight Guitar: approx. -
Page 5: The External Appearance
The external appearance 200 Color 200 Wood Round or Rectangular Headstock option Bent Wood... -
Page 6: Safety Precautions
•Do not open the inside of this product or disassemble or modify the internal parts. Such may cause electrocution, fire, injury or malfunction. If a malfunction is suspected, stop using the product immediately and have it inspected by an authorized MOGABI A/S center. -
Page 7: Installation
•Do not use the product near electronic devices, such as •When carrying, place the product in a MOGABI Backpack or speakers, TVs, and radios. Electronic circuitry of the product place a head cover on it as the product damage to one’s face may cause noise to the TV or radio. -
Page 8: Components
Components When you open the package, make sure that all the parts listed below are in it. Take caution not to inflict damage on the product by acts such as placing it with the bridge facing down, placing objects on it or hitting it with objects. -
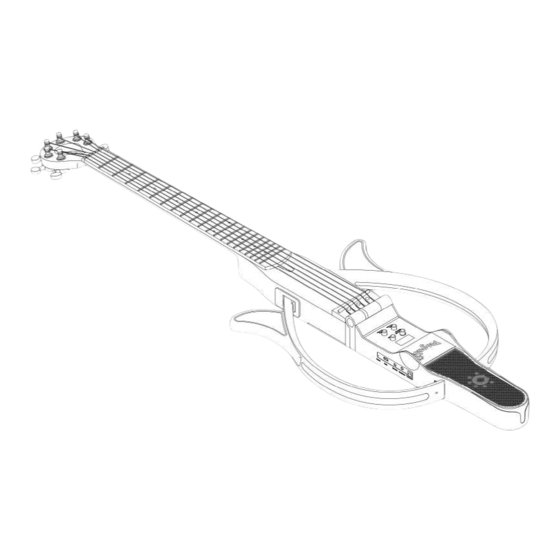
Page 9: Names Of Parts
Names of Parts Front Rear Machine Head Rectangular Headstock (option) Round Headstock (option) Neck String Finger board Strap Jock (option) Truss Rod Cap Rest Frame Horn Pre-Amp Saddle Piezo Pickup Bridge Hinge Lock Shaft Control Knob Mainboard OLED Display Rest Frame Audio Box Strap Lock (option) -
Page 10: Terminal For External Devices
•As the terminal is a data terminal, do not connect USB-C type chargers other than the dedicated charger. •For iOS devices, use a USB-C adapter (sold separately). •Update the firmware to the latest version from the MOGABI Mogabi website (www.mogabi.net). •Various functions are offered through the Mogabi app. -
Page 11: Control Panel / Knob Operation
Control Panel / Knob Operation ➎ ➊ Main Volume / Power •Press to turn on the power. •Rotate the knob to adjust the volume. •Factory default is set to volume level 6, so adjust the volume according to the situation (levels 1 to 15). •When the power is on, press once to enter sleep mode and press again to end sleep mode. -
Page 12: Preamp Panel
Preamp Panel ➌ ➋ ➎ ➍ 200M(Microphone Preamp EQ) ➊ 200 Preamp EQ ➊ (200) EQ Control •Vol.: Adjusts the input volume of the guitar. •Base: Adjusts the bass input volume. •Middle: Adjusts the mid-range input volume. •Treble: Adjusts the treble input volume. •The 200M adjusts the preamplifier by tilting the cover •The 200 adjusts the preamplifier by removing the four screws on the cover. - Page 13 Remove the 4 screws to adjust the preamp EQ Adjust the preamplifier EQ by tilting the cover Rear of Preamplifier for 200 Color Model Rear of Preamplifier for 200M Wood Model...
-
Page 14: Rest Frame Attachment
Rest Frame Attachment ➊ ➋ ➌ ➍ ➊ Push the lock of the hinge upward and lock it in the UNLOCK position. ➋ Check the lock and unfold the neck and audio box. ➌ Press the lock downwards and lock it in the LOCK position. ➍... -
Page 15: Rest Frame Detachment
Rest Frame Detachment ➊ ➋ ➌ ➍ ➊ Remove the upper and lower rest frames by pulling them toward the audio box. ➋ Push the lock of the hinge upward and lock it in the UNLOCK position. ➌ Check the lock, and fold the neck and audio box. ➍... -
Page 16: Power On / Play
------ Power on / Play Power On / Off •Press the power knob (1) to turn on the power. •Press and hold the power knob (1) for more than 2 seconds to turn off the power. •When the power turns off, the firmware version is displayed. Playing •The default mode set once the power is turned on is Guitar Mode. -
Page 17: Bluetooth Support
•Pairing is the process of registering Bluetooth devices with each other. •Before pairing, make sure that Bluetooth function is enabled on the Bluetooth device. •Search for B/T device in pairing device and select mogabi. •Check pairing connection on pairing device or guitar(B/T icon) . -
Page 18: Reverb / Recording
Reverb / Recording •The recording level is fixed at a certain level regardless of the Bluetooth playback volume, such as the play volume. •Recording is performed even at volume 0. •A short tone is heard at the beginning and end of the recording, and the tone is not recorded. •A single recording file can record up to 45 minutes. -
Page 19: Multi-Recording
Multi-Recording Multi-Recording • Rotate the Mode Knob (2) to select to Mix Mode. • Press knob (4) and play the backing track. (Recording) • After the performance, press knob (4) to stop recording. • Press knob (3) to select the recorded sound source. •... -
Page 20: Recording Utilization
•Please delete unnecessary recording files or organize them frequently by connecting them to a smartphone, PC, etc. •It is possible to move and copy recorded files stored in an external device back to Mogabi Guitar, but playback may not be supported in some external WAV files. -
Page 21: Silent Playing
Silent Playing Using Earphones •Make sure Guitar mode or Mix mode is set. •Connect earphones and rotate the Volume Knob (1) to set the proper volume and play the guitar. •Even if recording is made in Earphone Mode, the performance is recorded at an appropriate volume. •Connecting earphones or headphones may generate white noises. -
Page 22: Connecting An External Device
• Connect the 3.5 gender (sold separately) and audio cable of the external instrument to the Mic 3.5 terminal and adjust the volume and tone. • Adjust the volume of the external instrument (piano, guitar, etc.) and Mogabi guitar respectively to achieve balance. • Press the Record Knob (4) and play or record an ensemble. -
Page 23: Firmware Upgrade
Firmware Upgrade Continue to upgrade the firmware to improve the functions of Mogabi Guitar. Download the latest firmware from the Mogabi website (www.mogabi.net). Upgrade Procedure 1. Turn off the main body of the guitar 2. Connect a USB cable to a computer or mobile phone, and hold down the Mode Button while connecting the USB-C cable to the main body. -
Page 24: Truss Rod Adjustment
Truss Rod Adjustment Severe Convex Severe Concave Severe Convex Severe Concave • If the neck is bent, it can be compensated by adjusting the truss rod. •The truss rod of the product can be adjusted using a 4mm hexagon wrench. •The bend of the neck should be slightly concave. -
Page 25: Before Requesting Service
• Upon product delivery, the battery capacity remaining shall be 30-40%. •Mogabi Smart Guitar uses a lithium-ion battery that is can be used for at least 1 year, but to prevent excessive use, the warranty period is set to 6 months. Any service after 6 months is provided at a fee. -
Page 26: App
App. You can search for mogabi in the Android and iOS app stores and download it for free. It is a beta version and will be updated continuously. 홈페이지 튜너 연결 설정 Log-in Main screen Tuner Connecting •Editing Making a song •Edit, such as crop or copy... - Page 27 MEMO...
- Page 28 Manual Development ZIM Corporation MOGABI AMT Published 08/2022 Contents of this manual are based on the latest specifications as of the publication date. To download the latest manual, go to www.mogabi.net website and download the manual file from the Download page.
Need help?
Do you have a question about the MSG 580AC-200 and is the answer not in the manual?
Questions and answers