Table of Contents
Advertisement
Quick Links
Advertisement
Table of Contents

Related Manuals for Nice 2GIG EDGE


Summary of Contents for Nice 2GIG EDGE
- Page 1 2GIG EDGE ™ Security & Smart Home System QUICK START GUIDE...
-
Page 2: Table Of Contents
Welcome to the 2GIG EDGE Security Panel . . . . . . . . . . . . . . . . . -
Page 3: Welcome To The 2Gig Edge Security Panel
About this Guide This guide is designed for use by home and business owners of the 2GIG EDGE Security Panel from Nice North America LLC . It is recommended that the 2GIG EDGE Panel and all associated sensors and peripherals be professionally installed by an authorized alarm dealer . For regulatory compliance, professional installation is required . -
Page 4: Panel Led Behavior
Panel LED Behavior The 2GIG EDGE panel has a single LED light on the top right corner . Depending on the panel's alarm status, the multi-colored LED that will flash blue, white or red (see Alarm Status table below) . -
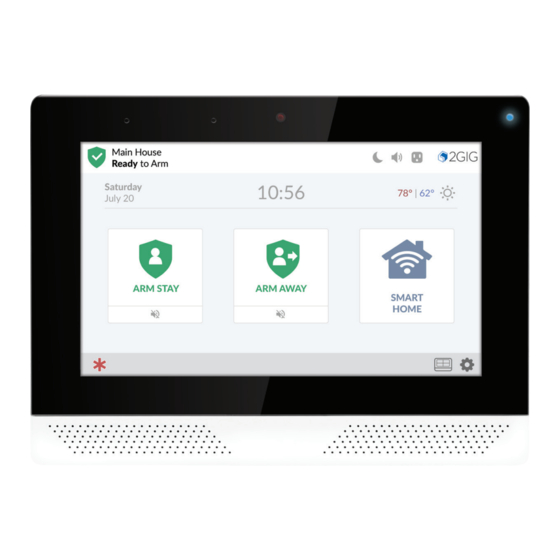
Page 5: Home Screen
Home Screen To wake the touchscreen, tap any area of the screen display . By default, the touchscreen goes into sleep mode after two (2) minutes of inactivity . ... -
Page 6: System Settings
System Settings The Settings Icon is located at the bottom/right of the display . Tap for Settings Menu . Enter the Master code . Choose an option . Activate an Emergency Alarm Notify the Central Station of an emergency event by manually activating the alarm at the Control Panel . -
Page 7: Smart Home Options
Smart Home Options The Smart Home button is located on the main display . When selected, the Smart Home options menu is displayed . Appears only when a camera is available. Tap the Smart Home option . Home Button/Indicator The Home button is located at the bottom/right of most displays . -
Page 8: System Icons
System Icons The status bar that appears on the top of the Home screen and on most system menus reveals a variety of icons providing system information and access to different functions . System Icons Battery Power Status Power Disconnected Battery Charging Screen Off On-Board Camera is active... -
Page 9: Burglary Protection
Apply this mode when people and/or pets will be staying inside . All zones are armed, but interior zones (motion detectors) are disarmed . Ensure the 2GIG EDGE Panel is in the Ready to Arm state . Tap Arm Stay . -
Page 10: Arm The System (Away Mode)
Arm the System (Away Mode) Apply this mode when all people and pets will be leaving the premises . All zones are armed . Ensure the 2GIG EDGE Panel is in the Ready to Arm state . Tap Arm Stay . -
Page 11: Arm The System (Using The Alarm .Com Mobile App)
Arm the System (Using the Alarm .com mobile app) When the system is disarmed, the Disarmed screen ( ) is displayed . To disarm the system with the Alarm .com mobile app: At the Disarmed screen, tap Tap Arm (Stay) or Arm (Away) . The app initiates the Arming ARMED (STAY or AWAY) is Disarmed . -
Page 12: Bypass Sensors
Bypass Sensors When a protected door or window is opened, the Not Ready to Arm message appears and reveals the zone in ORANGE on the Sensors Not Ready list . Before arming the system, place the system into the Ready to Arm state by (1) walking to the sensor and closing it, or (2) bypassing the sensor(s) . Number of bypassed sensors . - Page 13 Bypass Sensors - Settings From Home Screen, tap System Settings ( then tap Bypass Sensors . 4 . If desired, tap Cancel Bypass to cancel . 5 . To continue with sensors bypassed, tap the back button ( At the Bypassed Sensors screen, tap the switch adjacent to the desired sensor to turn Bypass On or Off .
-
Page 14: Disarm The System (Armed Stay Mode)
Disarm the System (Armed Stay Mode) When the system is armed in Armed (Stay) Mode, the Armed (Stay) screen is displayed . Enter user code to disarm the system . Tap DISARM . NOTE: Display shown with Face Recognition disabled . -
Page 15: Disarm The System (Armed Away Mode)
Disarm the System (Armed Away Mode) When the system is armed in Armed (Away) Mode, the Armed (Away) screen is displayed . Tap DISARM . Enter user code to disarm the system . TIP: If a false burglary alarm is activated while the system is armed (due to a protected door or window inadvertently being opened), and it's desired to cancel or silence the alarm, see Cancel/Silence a False Burglary Alarm on page 18 . -
Page 16: Disarm The System (Face Recognition Mode)
Disarm the System (Face Recognition Mode) When the system is armed, the Armed (Stay or Away) screen is displayed . To disarm the system with Face Recognition: 1 . Align the user's face within the frame of the camera . The user's head must turn about 15 degrees right, move to center, and then 15 degrees left . -
Page 17: Disarm The System (Using The Alarm .Com Mobile App)
Disarm the System (Using the Alarm .com mobile app) When the system is armed, the Armed (Stay or Away) ( ) screen is displayed . To disarm the system with the Alarm .com mobile app: Tap the Armed button . Tap Disarm . -
Page 18: Using The Duress Code
Using the Duress Code To transmit a user duress report to the Central Station (for example, being coerced by an unwanted intruder), use the steps below to input the system’s unique Duress Code . The Central Station is notified about the duress situation . The intruder will be unaware that the service provider has been contacted for assistance . -
Page 19: In The Event Of A Burglary Alarm
In the Event of a Burglary Alarm Sensor Type Action Default Time Setting Alarm siren immediately sounds and continues to sound until a User Four (4) minutes . Instant Sensor Code is entered or for the amount of time specified by the Burglary Bell Consult the installer to determine the cutoff time for the system . -
Page 20: Fire And Emergency Protection
3 . Dial 9-1-1 (or the region’s emergency services number) to report the situation to authorities . Always wait to call from a safe location . NOTE: It is important to establish and practice an Escape Plan with all members of the household in the event of a fire . For more in- depth information, see the User Guide for the 2GIG EDGE Panel . -
Page 21: Deactivating An Emergency Alarm
Deactivating an Emergency Alarm The panel appears red at the top of screen during an Emergency Alarm . To deactivate a manual alarm: The active alarm will be displayed . Tap Clear Alarm History to Align a face within the frame of the camera . The head must deactivate the alarm . -
Page 22: Security Codes
Security Codes The system supports a total of 100 unique security codes, which includes the types of security codes detailed below and one (1) Installer Code which is reserved for use by 2GIG alarm dealers and their professional installers . See Change the Master User or Duress Code, next page . Types of Security Codes Description Default Code... -
Page 23: Change The Master User Or Duress Code
Change the Master User or Duress Code The Master User Code provides users with the ability to access the System Settings menu and, depending on the system configuration, provide access to other pin-protected features . The Duress code lets users send a silent duress report to the Central Station . See Using the Duress Code on page 17 . -
Page 24: Edit A User Code
Edit a User Code Once a User has been created, user access to the system or individual areas can be adjusted . At the Enter the user's access code screen, input At the Users screen, tap the pencil icon ( Tap the arrow (>) adjacent to the Access Code . -
Page 25: Face Recognition Setup
Face Recognition Setup At the User's screen, edit Users to include the panel's Face Recognition feature . Tap System Settings ( ) , enter the system’s Master User Code and then tap the Users ( ) icon . Next, continue with these steps: 3 . - Page 26 The holder of the Master User Code can also create user code access schedules for users who only need access to a dwelling during certain hours . For example: repairs, housekeepers and personal assistants . For more in-depth information, refer to the User Guide for the 2GIG EDGE Panel .
-
Page 27: Bluetooth Setup
Bluetooth Setup Setup the Control Panel to connect with a smart phone for Bluetooth Disarming . Tap System Settings ( ), enter the system’s Master User Code, and then tap the Users ( icon . Next, continue with these steps: 2 . - Page 28 7 . Confirm pairing by tapping PAIR DEVICE . 9 . When successfully paired, a pairing 8 . Return to your smart phone to confirm pairing . confirmation is displayed . Tap OK . 10 . The device is paired . Tap the back button ) to return to the previous menus .
-
Page 29: Smart Areas Settings
Smart Areas Settings Smart Areas allow for the creation of up to four independently controllable and manageable areas (For example: Main House, Garage, Room Rental, etc) . Flexible user interface limits control of the Smart Areas at the user code level . NOTE: Smart Areas must be enabled to view the Smart Areas tile on the home screen . - Page 30 Smart Areas Settings (continued) 4 . Tap the arrow (>) adjacent to a Smart 5 . Enter a name for the new Smart Area, 6 . Repeat the naming process for all Areas option . then select SAVE . new Smart Areas .
-
Page 31: View Smart Areas
View and change state of Smart Areas . NOTE: Smart Areas must be enabled to view the Smart Areas tile on the home screen . For more details, refer to the User Guide for the 2GIG EDGE Panel, or consult the alarm dealer to enable Smart Area . -
Page 32: Wireless Network Settings
Wireless Network Settings Connecting to a wireless network: 2 . Tap the Wireless Option . 3 . Choose a Wireless Network name . 1 . Access the Settings menu ( ), then tap the Network option . 4 . Type in the Network Password, then tap 5 . -
Page 33: Set Sensor Chimes
Set Sensor Chimes To set individual chimes for each zone use the sensor chime menu: 1 . At the Home screen, tap the Settings 2 . Enter the Master code to view the 3 . Scroll down, then tap the Sensor Settings options . -
Page 34: System Tests
System Tests To ensure continued protection and proper system operations, it is important to perform a sensor and console test on a weekly basis . Tap the System Tests option . Tap a button to choose the test type Tap the Settings icon ( ), then enter (for example): the Master User Code when prompted . -
Page 35: Limited Warranty
This product should be tested periodically to make sure it is working properly . The product, if used properly, may reduce the risk of burglary, robbery, and other adverse events that have the potential to result in injury or loss of life; however, Nice North America is not an insurer . This product is neither insurance nor a guarantee that such an event will be prevented, and users should protect themselves with proper insurance . -
Page 36: Alarm Dealer Information
Alarm Dealer Information Company Name: User Account Number: Installation Date: 2GIG Technical Service: 800-421-1587 www.2gig.com Niceforyou.com ©2022 Nice North America LLC. 2GIG is a registered trademark of Nice North America LLC. All rights reserved. 10025595 Rev-D...
Need help?
Do you have a question about the 2GIG EDGE and is the answer not in the manual?
Questions and answers