Advertisement
Quick Links
PACKING LIST
1 - SandVac unit
1 - Power Cord
1 - Foot Remote
1 - Pre-Filter/Accumulator
1 - 2½"x 3' Hose with 1½" Hose End
1 - 2½"x 6' Hose with 1½" Hose End
IMPORTANT SERVICE INFORMATION:
SAVE SHIPPING BOX AND FOAM FOR FUTURE
SERVICE. SHIPPING WITHOUT PROPER FOAM
MAY CAUSE DAMAGE TO UNIT
ASSEMBLY INSTRUCTIONS
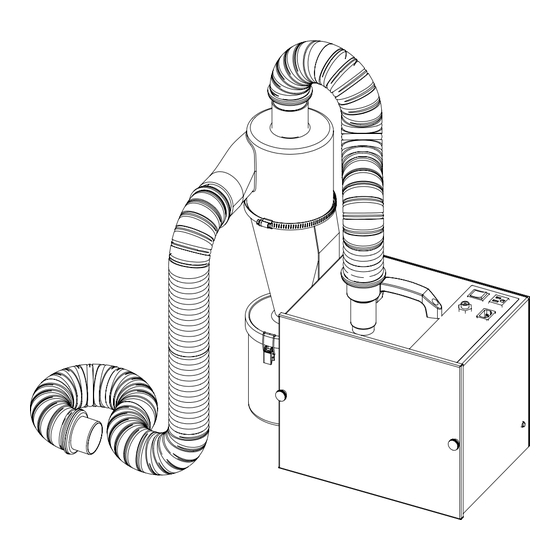
1. Remove the unit and all additional parts from the two boxes. Check against the packing list.
2. Mount the Accumulator angle bracket on the side of the vacuum unit as shown by using the two
screws provided. Assemble the Accumulator to the bracket with the circular clamp provided. Rotate
the Accumulator to best route the hose then tighten the clamp.
3. Assemble the three foot hose, with the 1½" hose end, to the vacuum unit and the other end to the top
of the Accumulator by firmly pushing the hose end into the adapter. Connect the other hose from the
side of the Accumulator to the your workstation. Use the grey hose end to connect to the Vaniman
1½
accessories
For 2½" hose connections, remove the grey hose end and use the remaining white
"
.
hose connector.
4. Plug the removable power cord into the socket on the top of the SandVac then plug the other end into
a standard 110 Volt wall socket. Test the unit by flipping the ON/OFF switch into the ON position, and
the motor should begin to run. Flip the ON/OFF switch into the OFF position.
5. Connect the black remote switch tube to the black remote switch connector on the unit. Test the remote
functionality by keeping the ON/OFF switch in the OFF position, and firmly compressing the included
foot remote.
NOTE: In whichever manner you turn the unit ON (ON/OFF switch or foot remote), you must turn the unit
OFF in the same manner. For example, if you turn the unit ON with the foot remote, you must turn the
unit OFF with the foot remote.
6. If you are using your SandVac with a Vaniman Microabrasive Blaster, you can plug the Blaster's power
supply into the receptacle on top of the unit and the Blaster's light will turn on whenever the SandVac
turns on. If the light does not turn on when the SandVac is on, turn the light switch on the side of the
Blaster to turn the light on.
25799 Jefferson Ave.
Murrieta, CA 92562
1-800-VANIMAN (826-4626)
SANDVAC
www.vaniman.com
sales@vaniman.com
SANDVAC-I-12/21 PAGE 1
120V
Advertisement

Related Manuals for Vaniman SANDVAC 120V

Summary of Contents for Vaniman SANDVAC 120V
- Page 1 3. Assemble the three foot hose, with the 1½” hose end, to the vacuum unit and the other end to the top of the Accumulator by firmly pushing the hose end into the adapter. Connect the other hose from the side of the Accumulator to the your workstation. Use the grey hose end to connect to the Vaniman 1½...
- Page 2 Accumulator and snap the toggle latches down to secure the cup in place. 4. Circuit Protector - The unit is protected by a circuit breaker. Push in to reset. 5. For other maintenance problems or questions consult your dealer or call 1-800-VANIMAN and ask for SERVICE. RECOMMENDED USAGE To evacuate the blasting dust from an abrasive blaster such as aluminum oxide and silica sand.
- Page 3 120V ACCESSORIES & REPLACEMENT PARTS The following items are offered to enhance the usage of your quality Vaniman unit. These items can be order through your supplier using the following part numbers. Please feel free to contact Vaniman Mfg. Co. with questions regarding our products.
- Page 4 Polyguard II - VMC-A398 Downdraft - 96044 Downdraft Pro - 96060 Fishmouth - VMC-A395 Flexhose Kit - 96026 Cut & Clean - 80074 25799 Jefferson Ave. Murrieta, CA 92562 1-800-VANIMAN (826-4626) www.vaniman.com sales@vaniman.com SANDVAC-I-12/21 PAGE 4...
Need help?
Do you have a question about the SANDVAC 120V and is the answer not in the manual?
Questions and answers