Advertisement
Quick Links
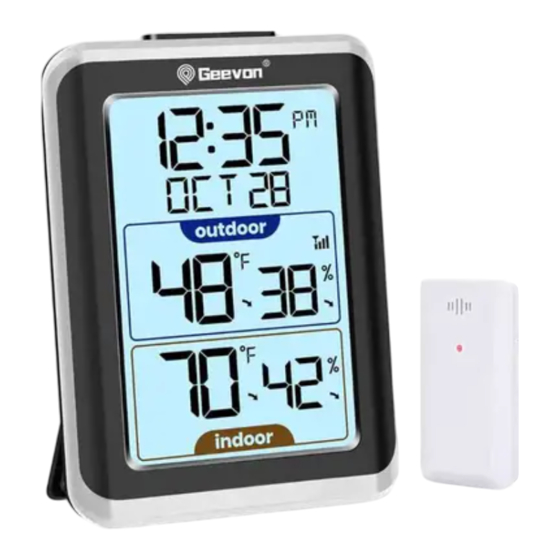
GEEVON Wireless Thermometer
Displays and Controls
Item No.T226150
1.Channel Cycle Symbol
User Manual
2.Channel Selection
Thank you for purchasing T226150 Thermometer.Please take a
3.Low Battery Indicator
moment to read this guide and store it for Future reference.
4.Temperature Trend
5.Outdoor temperature
6.Maximum Temperature and Humidity
7.Outdoor Humidity
8.Indoor Temperature
9.Indoor Humidity
10.Hang Hole
11.Main Unit Battery (2*AAA)
12.Data Transfer Light ( Data is transmitted to the main unit when it flash )
13.Sensor Hang Hole
14.Sensor Battery (2*AAA)
15.Sensor Channel Select Button
Buttons
A:LIGHT Button
B:CH Select Button
C:C/F/Today/48Hr/All-Time Button
D:Max/Min Display Button
Main Functions
1. Indoor Temperature Display:-10℃/14℉~50℃/122℉
2. Outdoor Temperature Display:-40℃/-40℉-~60℃/122℉
3. Indoor/Outdoor Humidity Display: 10%-99%
4. Indoor/Outdoor Temperature Trend
5. Indoor/Outdoor Humidity Trend
6. Low Battery Indicator
7. Backlight
8. 3 Channels for RF Cycle Display
9. Today/48Hr/All-Time Outdoor/Indoor Temperature/Humidity History
10.Temperature Unit ℃/℉ Switch
Advertisement

Subscribe to Our Youtube Channel
Related Manuals for Geevon T226150


Summary of Contents for Geevon T226150
- Page 1 Displays and Controls Item No.T226150 1.Channel Cycle Symbol User Manual 2.Channel Selection Thank you for purchasing T226150 Thermometer.Please take a 3.Low Battery Indicator moment to read this guide and store it for Future reference. 4.Temperature Trend 5.Outdoor temperature 6.Maximum Temperature and Humidity 7.Outdoor Humidity...
- Page 2 2.Press this button to switch the display of today/48hr/all-time history Setting Up Power Supply Base Device Proceed as follows: 1.Remove the battery compartment cover. MAX/MIN Temperature and Humidity 1.In normal mode, press this button to check the max/min temperature 2.Insert the batteries into the battery compartment. Ensure that the battery polarity (+/-) is correct.
Need help?
Do you have a question about the T226150 and is the answer not in the manual?
Questions and answers
Geevon weather station manual model number 226151
The manual for the Geevon weather station model number T226150 provides instructions and information on the following:
- Item number T226150
- Channel cycle symbol
- Channel selection
- Low battery indicator
- Temperature trend
- Outdoor and indoor temperature and humidity display
- Maximum temperature and humidity
- Sensor and main unit battery installation (2*AAA each)
- Data transfer light indication
- Sensor channel select button
- Buttons: LIGHT, CH Select, °C/°F and history toggle, Max/Min display
- Temperature display ranges:
- Indoor: -10℃/14℉ to 50℃/122℉
- Outdoor: -40℃/-40℉ to 60℃/122℉
- Humidity range: 10% to 99% (indoor and outdoor)
- Temperature and humidity trends
- Backlight function
- 3 RF channels for cycling display
- History display for today/48 hours/all-time
- Temperature unit switch (°C/°F)
- Setup instructions for power supply and battery compartment
This manual guides users in installation, operation, and feature usage of the T226150 thermometer.
This answer is automatically generated
need model number 226151
The model number for Geevon is T226150.
This answer is automatically generated
I have the 226151 model and it does not communicate with the sensor. I see the rest button and have used it several times.
To troubleshoot communication issues with the Geevon T226150 sensor, take the following steps:
1. Check Channel Matching: Ensure the channel selected on the display unit matches the channel set on the remote sensor.
2. Reset and Search Signal: Hold the CH button for about 3 seconds to reset values and search for the RF signal.
3. Sensor Placement: Ensure the sensor is within the 100-meter transmission range and not blocked by obstacles.
4. Battery Check: Make sure the remote sensor has 2 AAA batteries installed correctly and they are not depleted.
5. Single Sensor Use: If using only one remote sensor, set it to operate on Channel 1.
This answer is automatically generated