
Related Manuals for RHINO 4x4 EVO 3 RPDE3-VX 200


Summary of Contents for RHINO 4x4 EVO 3 RPDE3-VX 200
- Page 1 w w w . r h i n o 4 x 4 . c o m . a r INSTRUCCIONES DE ARMADO RPDE3-VX 200 INSTALLATION INSTRUCTION MANUAL RPDE3-VX 200 I N D U S T R I A A R G E N T I N A I N D U S T R I A A R G E N T I N A...
- Page 3 Before commencing with the installation it is important that you read and understand these installation instructions, if you need any technical advice please contact your closest Rhino 4x4 Dealer WELCOME TO THE RHINO 4X4 TEAM! ESPAÑOL Gracias por elegir equipar su vehiculo con nuestro producto.
- Page 4 BLOQUE I : PREPARAR SOPORTES DEL CHASIS BLOQUE I : PREPARAR SOPORTES DEL CHASIS BLOCK I: PREPARE CHASSIS'S BRACKETS BLOCK I: PREPARE CHASSIS'S BRACKETS STEP 1 PASO 1 Antes de sacar el paragolpes original del vehículo Before you remove the original bumper, you must asegurarse desconectar componentes...
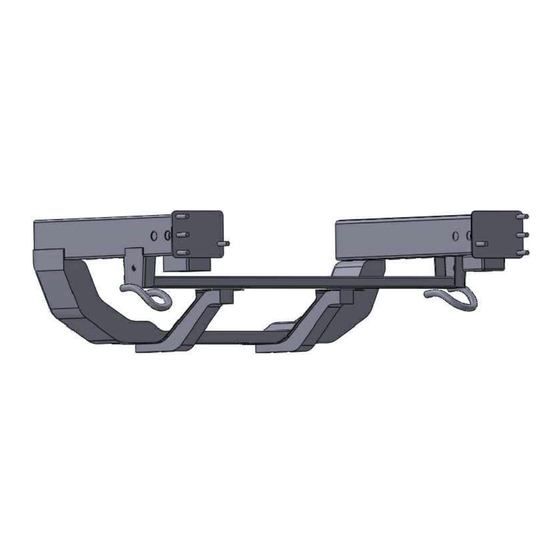
- Page 5 PASO 2: STEP 2: Montar los soportes frontales izquierdo y derecho del Fit the left and rigth Rhino bumper mounting brackets bumper Rhino en las puntas del chasis tal como lo muestra to the chassis legs as per drawing. el dibujo. KIT FIJACION / FASTENING KIT Tuerca / Nut 10 - 1.50 PASO 2 / STEP 2...
- Page 6 STEP 3 PASO 3 Install the bumper support side brackets as per Instalar los soportes de las punteras cómo muestra el drawing. dibujo. KIT FIJACION / FASTENING KIT AR 10-1.5 x 30 Arandela / Washer D10 Tuerca / Nut 10 - 1.50 PASO 3 / STEP 3...
- Page 7 STEP 4 PASO 4 Fit the left and rigth Rhino bumper mounting brackets Montar los soportes frontales izquierdo y derecho del to the chassis legs and place the air aconditioner hose bumper Rhino en las puntas del chasis y conectar la using the provided kit.
- Page 8 PASO 5 STEP 5 Colocar la bandeja portamalacate sobre los soportes frontales Assemble the winch plate to the front brackets as tal como muestra el dibujo. No ajustar los tornillos. per drawing. Do not secure the fasteners. KIT FIJACION / FASTENING KIT EX 12 1.25 x 30 Arandela / Washer D12 Tuerca / Nut 12 - 1.25...
- Page 9 PASO 6 STEP 6 First you must quit the stabilizer bar as shown in Primero debe quitar la barra estabilizadora como lo drawing "1" . Then install the wing's bracket "2" and muestra el dibujo "1" . Luego instale el soporte de replace the stabilizer bar on its original site.
- Page 10 BLOQUE II : ARMADO DEL BUMPER BLOCK II: BUMPER ASSEMBLY STEP 7: FOG LIGHTS ASSEMBLY PASO 7: ARMADO DE LOS FAROS ANTINIEBLA: Mount fog lights to plastic covers. Check that are Montar los faros antiniebla en los covertores plásticos. correctly aligned. Then adjust the foglight and mount Verificar que están correctamente alineados.
- Page 11 PASO 8: STEP 8: Cortar el burlete en dos partes iguales, luego montar en Cut the rubber joint in two identic pieces. Then puntera. Una vez colocado cortar el excedente. Después attach to the wing and cut the excess. Finally mount colocar las punteras como se muestra en el dibujo.
- Page 12 PORTAPATENTE NUMBER PLATE BRACKET An optional number plate bracket must be installed El portapatentes debe ser instalado en la carcasa to the centre insert as per with the fastening kit central, (antes de colocar la misma) según Fig 5, con provided (Be sure that the center is not installed el kit de fijación provisto.
- Page 13 PASO 9 STEP 9 Instalar la carcasa central superior sujetando a las Install the central case, insert it to the bumper wings as punteras del bumper como muestra la figura. Si su per drawing. If your vehicle counts with a sensor, connect it.
- Page 14 STEP 10: PASO 10: Place the low cover and tight the bolts as per Coloque EL LOW COVER en las punteras y ajuste los drawing. Install the grill in the correct place tornillos como muestra el dibujo. Vuelva a instalar la parrilla en el lugar correcto.
- Page 15 PASO 11 STEP 11 Conectar faros led. Posicionar el sensor de temperatura Connect the led fog lights and verify the connector la parrilla.Si tiene la version sensor de provided in the kit. Put the temperature sensor on the estacionamiento, conectelo.Luego instale los chapones grill.
- Page 16 TERMINADO / FINISH...
- Page 17 TORNILLO FRESADO/ AR 8-1.25 X 40 AR 10-1.5 X 30 20u. COUNERSUNK 10-1.5 LLAVE CON TUERCA/ AR 8-1.25 X 30 ARANDELA / WASHER D 10 26u. WRENCH WITH NUT 8-1.25 SOPORTE PARRILLA/ ARANDELA/ WASHER D 8 12u. TUERCA / NUT 10-1.50 34u.
- Page 18 w w w . r h i n o 4 x 4 . c o m . a r MAIN OFFICE: AV. SABATTINI 2053 - CP X5014AUB - CORDOBA - ARGENTINA PHONE NUMBER: +54 0351 4563954 BRANCH OFFICE: AV. COLON 3655 - CP X5003DDH - CORDOBA - ARGENTINA PHONE NUMBER: +54 0351 4880522 "Designed and manufactured in Argentina"...
Need help?
Do you have a question about the EVO 3 RPDE3-VX 200 and is the answer not in the manual?
Questions and answers