Advertisement
Advertisement
Table of Contents

Related Manuals for INNOTECK KITCHEN PRO DS-5343

Summary of Contents for INNOTECK KITCHEN PRO DS-5343
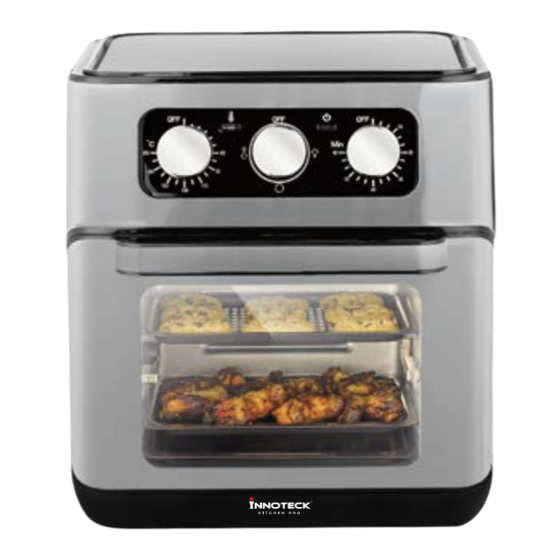
- Page 1 6 IN 1 12 LITRE PREMIUM AIR FRYER OVEN Model:DS-5343 Air Fryer Oven...
-
Page 2: Important Safeguards
IMPORTANT SAFEGUARDS When using electrical appliances, basic safety precautions should be followed as follows: • Read all instructions before first use. • This appliance is designed for household use only. • Do not place the appliance against a wall or against another appliance. Leave at least 5 inches of free space on the back and sides and 5 inches of free space above the appliance. - Page 3 • Do not use the appliance if there is any damage to the plug, cord or other parts. • Check that the voltage indicated on the appliance fits the voltage for your outlet. • Do not connect appliance to an external timer switch. •...
-
Page 4: Parts Description
PARTS DESCRIPTION 1. Air Fryer Oven 2. Non-stick Baking Tray (Drip Tray) 3. Non-stick Air Flow Racks (2 PCS) 4. Rotisserie Fork Set 5. Rotisserie Removal Tool... -
Page 5: Control Panel
CONTROL PANEL (A) (B) (C) 1. Temperature Knob: Turn to desired temperature between 60℃ and 200℃ . 2. Heating Light: The light will illuminate when the unit is heating. 3. Light/Rotisserie Knob: Turn the knob to illuminate the inside light or use the rotisserie function. -
Page 6: Using The Appliance
USING THE APPLIANCE Drip Tray: The drip tray should be placed above the heating element. The drip tray should always be in place when using the unit. Racks (2): The racks should be placed in the unit after the drip tray has been installed. The racks can be used to place food on. - Page 7 USING THE APPLIANCE: AIR FRYING: 1. Place the appliance on a stable, horizontal and even surface. 2. Place the drip tray inside the unit. 3. Plug the unit into a grounded wall socket. 4. Place the ingredients in the rack if desired spritz with cooking oil for a crispier finish. Place the rack back into the unit and remove the handle.
- Page 8 2.Slide the red tab on the left hand side of the unit to the right unlocked position, then place the rotisserie onto the rails inside the unit. The rotisserie should be placed as far back as it will go. 3.The tab can be released at this point and will return to the left hand position. The rotisserie will now be locked in place.
- Page 9 CLEANING • Remove the plug from the wall outlet and let the appliance cool down for at least 30 minutes. • Clean the appliance after every use. Do not clean the basket or accessories and the inside of the appliance with any metal kitchen utensils or abrasive cleaning materials, as this may damage the coating on them.
- Page 10 STORAGE 1. Unplug the cord. 2. Make sure all parts are clean and dry.
-
Page 11: Cooking Chart
COOKING CHART This table will help you select the basic settings for your ingredients and what to do during the cooking time. NOTE: Settings are indications only. Since ingredients difer in origin, size, shape and brand, we cannot guarantee the best setting for your ingredients. SUGGESTED ADDITIONAL TEMP (℃) -
Page 12: Troubleshooting
TROUBLESHOOTING Problem Possible cause Solution The appliance is not plugged in. Plug power cord into wall socket. The oven does You have not turned on the not work. Set the temperature and time as appliance by setting the cooking instructed. time and temperature. - Page 13 6 IN 1 12 LITRE PREMIUM AIR FRYER OVEN DS-5343 6 IN 1 12 LITRE PREMIUM AIR FRYER OVEN...
- Page 15 Customer Service: service@innoteck.co.uk DST Holding Ltd, Unit 20B,Calderdale Business Park, Club Lane, Halifax, West Yorkshire, HX28 DB.
Need help?
Do you have a question about the KITCHEN PRO DS-5343 and is the answer not in the manual?
Questions and answers