
Related Manuals for Morphy Richards Select 600


Summary of Contents for Morphy Richards Select 600
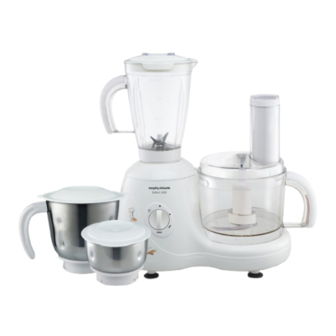
- Page 1 Food processor Select 600 Please read and keep these instructions . 1 5 (MAX) . 1 0 . 0 50 LOCK getting the best from your new food processor... www.morphyrichards.co.uk www.morphyrichardsindia.com...
-
Page 2: Important Safeguards
10. Do not operate any appliance with a damaged power cord or plug, or after an appliance has malfunctioned,or has been dropped or damaged in any way. Contact Morphy Richards service center for advice on examination, repair or electrical/ mechanical adjustment. - Page 3 20. Should the power cord of the appliance need replacing, do not attempt this repair your self,as special tools are required. Contact Morphy Richards center for advice on service or repair. 21. Never feed the food by hand. Always use the food pusher. Never put your fingers into the feeder tube.
- Page 4 Processor body 19. Spatula Speed selector knob 20. Grinding jar Processor spindle 21. Grinding jar gasket for lid Reset button for OLP 22. Grinding jar lid Safety cover 23. Liquidiser jar Processor bowl 24. Liquidiser jar lid Processor bowl handle 25.
-
Page 5: Processing Table
Processing Table: Description of Quantity Speed blade Coconut Grates coconut for vegetables & sweets. Bowl cap shredder Reversible slicer Slicing of onions, cucumbers, radishes, Bowl cap & shredder blade carrots, potatoes for salads & cooking. Shreds carrots for halwa, potatoes, cucumbers for raita, radish &... - Page 6 Processing Table: Description of Quantity Speed Attachment Citrus juicer Extracts juice from citrus fruits like sweet Bowl cap lime. Centrifugal juicer Extracts juice from non-citrus fruits like 700-750 apples, pineapples etc. and vegetables like carrots. Liquidizer Performs blending and liquidizing 1.2 litre operations like lassi, milk shakes, purees, butter milk &...
-
Page 7: Kneading Operation
Kneading Operation: Fig. 1 STEPS Ensure that the processor is unplugged from the power supply. 2. Insert the safety cover into the processor body, aligning marking ( I ) on the safety cover with ( I ) marking on the processor body. 3. -
Page 8: Chopping Operation
Chopping Operation: Fig. 1 (Onions, cabbage, leafy vegetables, mincingmeat, mashed potato, tomato puree) STEPS 1. Follow the first 4 steps of kneading operation to fit the processor bowl. 2. Insert the chopping blade onto the processing spindle. Fig. 2 3. Cut peeled onions (or any other vegetables to be chopped) into 11\2 inch size pieces. -
Page 9: Pureeing Operation
Pureeing Operation: Fig. 1 (Tomato etc.) STEPS 1. Follow the first 4 steps of kneading operation to fit the processor bowl. 2. Insert the chopping blade onto the processing spindle. 3. Cut pieces of boiled tomato. Fig. 2 4. Fill in the pieces of tomato in the processor bowl. 5. -
Page 10: Mincing Operation
Mincing Operation: Fig. 1 (Meat for Khema, Kabab etc.) STEPS 1. Follow the first 4 steps of kneading operation to fit the processor bowl. 2. Insert the chopping blade onto the processing spindle. 3. Cut pieces of raw\ cooked meat into about 1 inch size. Fig. -
Page 11: Slicing Operation
Slicing Operation: Fig. 1 (Cucumber, carrot, potato, radish, onion, raw banana, tomato, etc.) STEPS 1. Follow the first 4 steps of kneading operation to fit the processor bowl. 2. Take the reversible slicer & shredder blade & keep the slicer side of the Fig. - Page 12 Shredding Operation: Fig. 1 (Cucumber, Carrot, Radish, Potato, Cabbage, Cheese, etc.) STEPS 1. Follow the first 4 steps of kneading operation to fit the processor bowl. 2. Take the reversible slicer & shredder blade & keep shredder side of the Fig.
- Page 13 French fries Operation: Fig. 1 (Potatao) STEPS 1. Follow the first 4 steps of kneading operation to fit the processor bowl. 2. Insert the blade holder stem into the central hole of the french fries Fig. 2 blade & turn clockwise to lock. 3.
- Page 14 Whisking Operation: Fig. 1 Whisking Eggs, Cream, Mayonnaise, Butter Milk, etc. STEPS 1. Follow the first 4 steps of kneading operation to fit the processor bowl. 2. Place whisking disc over the processor spindle. 3. Pour the ingredients into the processor bowl. Fig.
-
Page 15: Citrus Juicer
Citrus Juicer: Fig. 1 Extract juice from Sweet lime STEPS 1. Ensure that the processor is unplugged from the power supply. 2. Insert the safety cover into the processor body, aligning marking ( I ) on the safety cover with ( I ) marking on the processor body. Fig. -
Page 16: Centrifugal Juicer
Centrifugal Juicer: Fig. 1 Extract juice from Apples, Pineapples and Carrots STEPS 1. Ensure that the processor is unplugged from the power supply. 2. Insert the safety cover into the processor body, aligning marking ( I ) on the safety cover with ( I ) marking on the processor body. ( Fig.1). 3. - Page 17 Dry / Wet Grinding: Fig. 1 Idli batter (soaked rice & black gram) Spices, Pulses, Ground nut, Red Chilli, Sugar, Green coconut chutney, tomato puree, gravy, etc. STEPS 1. Ensure that the processor is unplugged from the power supply. 2. Remove the safety cover from the processor body by turning it in clockwise direction.
- Page 18 Liquidizing / Blending / Mixing: Fig. 1 (Mango / Strawberry (fruits) milk shakes, Lassi, Butter milk, Cocktails, Cold Coffee etc.) STEPS 1. Ensure that the processor is unplugged from the power supply. Fig. 2 2. Remove the safety cover from the processor body by turning it in clockwise direction.
-
Page 19: Chutney Grinder
Chutney Grinder: Fig. 1 (Small quantities of spices, groundnut, red / green chilies, sugar, green coconut chutney, tomato puree, gravy etc.) STEPS 1. Ensure that the processor is unplugged from the power supply. 2. Remove the safety cover from the processor body by turning it in Fig. - Page 20 Coconut Shredder: Fig. 1 (Shredding of coconut) STEPS 1. Follow the first 4 steps of kneading operation to fit the processor bowl. 2. Insert the blade holder stem into the central hole of the coconut shredder Fig. 2 blade & turn clockwise to lock. 3.
-
Page 21: Technical Data
Reset the OLP as described in dry / wet grinding function. If it still does not operate, contact the nearest morphy richards service center. The safety cover is not Fit the safety cover property in its place. fitted properly in its place. - Page 22 Morphy Richards products are intended for household use only Morphy Richards has a policy of continuous improvement in product quality and design. The Company, therefore, reserves the right to change the Morphy Richards Ltd, Mexborough, specification of its models at any time.
Need help?
Do you have a question about the Select 600 and is the answer not in the manual?
Questions and answers