Advertisement
Available languages
Available languages
Quick Links
Guangdong Transtek Medical Electronics Co., Ltd.
Zone A, No.105, Dongli Road, Torch Development
District, 528437 Zhongshan, Guangdong, China
User Manual
Arm Blood Pressure Monitor
Model: TMB-2288-C
REF: BP3-C2
Please read the user manual carefully and thoroughly so as to ensure the
safe usage of this product, keep the manual well for further reference in
case you have problems.
Version:A/0
Advertisement
Chapters

Related Manuals for Checkme TMB-2288-C


Summary of Contents for Checkme TMB-2288-C
- Page 1 Version:A/0 User Manual Arm Blood Pressure Monitor Model: TMB-2288-C REF: BP3-C2 Please read the user manual carefully and thoroughly so as to ensure the Guangdong Transtek Medical Electronics Co., Ltd. safe usage of this product, keep the manual well for further reference in Zone A, No.105, Dongli Road, Torch Development...
-
Page 2: Table Of Contents
CATALOGUE Contents Table of Contents INTRODUCTION ........................ 2 General Description Indications for Use User Manual ................English 1-36 Measurement Principle Receiving and Inspecting your Monitor Manuel de l'utilisateur............Français 37-72 Safety Information Display and Symbols Name of Each Part ... -
Page 3: Introduction
INTRODUCTION General Description Safety Information Thank you for selecting Checkme arm type blood pressure monitor The symbols below might be in the user manual, labeling or other (BP3-C2). The monitor features blood pressure measurement, pulse rate component. They are the requirement of standard and using. - Page 4 INTRODUCTION INTRODUCTION Precaution Warning * This device is intended for indoor, home use and is not intended for self-use in public areas. * Do not apply the cuff on an arm that has an intravenous drip or a blood transfusion attached. * This device is portable, but it is not intended for use during patient transport.
- Page 5 INTRODUCTION INTRODUCTION Display and Symbols SYMBOL EXPLANATION Warning Messages Refer to page for more information. Voice broadcast The function of voice broadcast is turned off. Data pending to transmit symbol Displays when the data transmission failed. The measurements are saved on the device and will be sent when a successful connection is achieved.
-
Page 6: User Manual
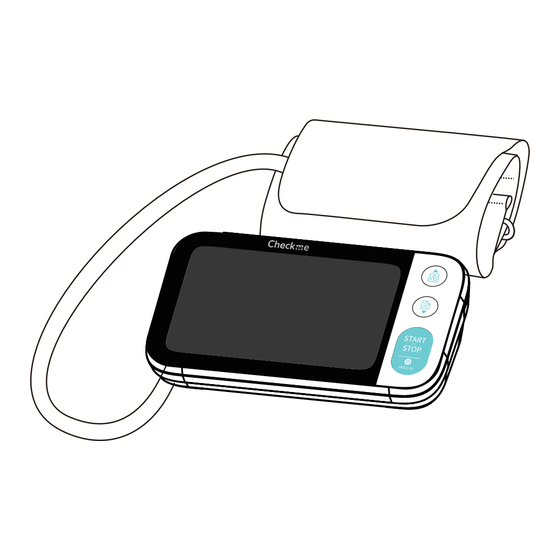
BEFORE YOU START INTRODUCTION Choice of Power Supply Name of Each Part Battery powered mode: CUFF 6VDC 4×AA batteries AC adaptor powered mode: AC adapter AIR HOSE (AC Adaptor is not included. Please use [User/Forward] the AC adapter which is authorized by button the manufacturer!) Type-C cable... -
Page 7: Pair A Smart Device With The Monitor
BEFORE YOU START BEFORE YOU START Pair a smart device with the monitor 2. The paired device will automatically connect to the App next time. If you need to pair with another smart device, please repeat steps 1- 4 above. You are the intended operator of this blood pressure monitor. -
Page 8: Setting The Date, Time And Voice
BEFORE YOU START BEFORE YOU START Setting the Date, Time and Voice 3. Press the “START/STOP” button to confirm the date format, then the It is important to set the date and time before using your blood pressure [Month] will flash. Repeat the same steps to set the [Month] and [Day]. monitor for the first time, so that a correct time stamp can be assigned to (If the voice is on, it will broadcast “Set the date.”) each record that is stored in the memory. -
Page 9: Setting A User Id
BEFORE YOU START BEFORE YOU START Setting a user ID 6. After confirming the [Minute], it will enter the voice setting. Press the “USER” or “MEM” button to change the voice volume. There are 3 user ID available. The user , each with 250 (If the voice is on, it will broadcast “Set the voice for you.”) memory spaces, are designed for 2 different people to save the measured... -
Page 10: Measurement
MEASUREMENT MEASUREMENT Applying the cuff Start a measurement Only use a cuff that has been approved by the manufacturer for this device model. Before use, please confirm if it fits your arm circumference. You can use your monitor without pairing to a smart device. To pair your Remove all jewelry, such as watches monitor with a smart device refer to the foregoing chapters. - Page 11 MEASUREMENT MEASUREMENT Note 4. About the irregular heartbeat and excessive body motion during the Any time, to stop the measurement, press the “START/STOP” button. If you don’t pair with the device or don’t keep the app ON, the Bluetooth measurement. symbol will flash during the measurement.
- Page 12 DATA MANAGEMENT DATA MANAGEMENT Recall the Records 1. When the monitor is off, press the “MEM” button, the LCD will display the total groups of the memory records, with the user ID blinking. Press the “USER” or “MEM” button to switch the user ID between user .
- Page 13 DATA MANAGEMENT DATA MANAGEMENT Delete the Records B: Delete all records (Example shown below for User 1) Delete the records by following the steps below. 1. Enter the memory recall mode as described in the previous section A: Delete one record (Example shown below for User 1) "Recall the records".
-
Page 14: Data Management
DATA MANAGEMENT INFORMATION FOR USER Tips for Measurement 4. Once deleted, your readings cannot be restored. The LCD will display “---” like the following picture. Measurements may be inaccurate if taken in the following circumstances. Press the “START/STOP” button to turn off the monitor, otherwise it will power off automatically within 1 minute. -
Page 15: About Blood Pressure
ABOUT BLOOD PRESSURE INFORMATION FOR USER What are systolic pressure and diastolic pressure? Maintenance When ventricles contract and pump blood out of the heart, the blood In order to get the best performance, please follow the instructions pressure reaches its maximum value in the cycle, which is called systolic below. -
Page 16: Irregular Heartbeat Detector
ABOUT BLOOD PRESSURE ABOUT BLOOD PRESSURE Why does my blood pressure fluctuate throughout the day? Blood Level Optimal Normal High-normal Mild Moderate Severe Pressure (mmHg) 1. Individual blood pressure varies multiple <120 120-129 130-139 140-159 160-179 ≥180 times everyday. It is also affected by the <80 80-84 85-89... -
Page 17: Troubleshooting
TROUBLESHOOTING SPECIFICATIONS If any abnormality arises during use, please check the following points: External dimensions Approx.178 mm × 101 mm × 42.89 mm Digital LCD V.A.124 mm × 76 mm Display mode PROBLEM SYMPTOM CHECK THIS REMEDY Approx.343 g (Excluding the batteries and cuff) Weight Batteries are depleted. -
Page 18: Authorized Component
EMC GUIDANCE AUTHORIZED COMPONENT EMC Guidance Authorized Component The ME EQUIPMENT or ME SYSTEM is suitable for home healthcare environments. Please use the authorized adapter (Optional!). Warning: Don’t be near the active HF surgical equipment and the RF shielded room of an ME system for magnetic resonance imaging, where the intensity of EM disturbances is high. - Page 19 EMC GUIDANCE EMC GUIDANCE Table 2 Table 3 Guidance and manufacturer’s declaration – electromagnetic Immunity Guidance and manufacturer’s declaration - electromagnetic Immunity IEC 60601-1-2 Immunity Test Compliance level Compliance Radiated RF Test Band Service Modulation Distance Maximum Test level 60601-1-2 level (MHz) IEC61000-4-3...
-
Page 20: Ised Id (Ic Id)
ISED ID (IC ID) Table des matières ISED ID (IC ID) INTRODUCTION.......................38 Description générale Indications d'utilisation HVIN: TMB-2288-C Principe de prise de mesure FVIN: A01 Réception et inspection du moniteur IC: 12725A-TMB2273BT Informations relatives à la sécurité... -
Page 21: Introduction
Description générale Informations relatives à la sécurité Nous vous remercions d'avoir choisi le tensiomètre Checkme pour le bras Il se peut que les symboles figurant ci-dessous se trouvent dans le manuel (BP3-C2). Ce tensiomètre permet de mesurer la pression artérielle, le pouls de l'utilisateur, sur l'étiquette ou dans d'autres éléments. - Page 22 INTRODUCTION INTRODUCTION Précautions Avertissement * Cet appareil est conçu pour être utilisé à l'intérieur, à domicile, et ne doit pas être utilisé dans des lieux publics. * Il ne faut pas mettre le brassard sur un bras où se trouve une perfusion intraveineuse ou une transfusion * Cet appareil est portable, mais ne peut pas être utilisé...
-
Page 23: Affichage Et Symboles
INTRODUCTION INTRODUCTION Affichage et symboles SYMBOLE EXPLICATION Messages d'avertissement Veuillez vous reporter à la page pour de plus amples informations. Diffusion vocale La fonction de diffusion vocale est désactivée. Symbole de données en attente de transmission S'affiche en cas d'échec de la transmission des données. Les mesures sont sauvegardées sur l'appareil et seront transmises une fois la connexion établie. -
Page 24: Nom De Chaque Pièce
AVANT DE COMMENCER INTRODUCTION Choix de l'alimentation électrique Nom de chaque pièce Mode d'alimentation par batterie : BRASSARD Piles 6 VCC 4×AA Mode alimenté par l'adaptateur CA : Adaptateur secteur TUYAU D'AIR (L'adaptateur CA n'est pas inclus. Veuillez Bouton utiliser l'adaptateur CA approuvé par le [Utilisateur/Avant] fabricant). -
Page 25: Associer Un Appareil Intelligent Au Moniteur
AVANT DE COMMENCER AVANT DE COMMENCER Associer un appareil intelligent au moniteur 2. L'appareil jumelé se connectera automatiquement à l'application la prochaine fois. Si vous devez jumeler un autre appareil intelligent, répétez les étapes 1 à 4 ci-dessus. 3. L'appareil entrera automatiquement dans les réglages après l'installation de la Vous êtes l'utilisateur prévu de ce tensiomètre. -
Page 26: Réglage De La Date, De L'heure Et De La Voix
AVANT DE COMMENCER AVANT DE COMMENCER Réglage de la date, de l'heure et de la voix 3. Appuyez sur la touche « DEMARRER/ARRETER » pour confirmer le format de la date, puis le [Month] clignote. Répétez les mêmes étapes Le réglage de la date et de l'heure est important avant d'utiliser votre tensiomètre pour la première fois, afin qu'un horodatage correct puisse être pour régler le [Month] et le [Day]. -
Page 27: Réglage De L'identifiant De L'utilisateur
AVANT DE COMMENCER AVANT DE COMMENCER Réglage de l'identifiant de l'utilisateur 6. Une fois que vous avez confirmé la [Minute], vous entrez dans le réglage de la voix. Appuyez sur la touche « UTILISATEUR » ou 3 identifiants utilisateurs sont disponibles. L'utilisateur «... -
Page 28: Mesure
MESURE MESURE Mettre le brassard Démarrer une mesure N'utilisez qu'un brassard approuvé par le fabricant pour ce modèle d'appareil. Veuillez vérifier avant l'utilisation si le brassard est adapté à Sachez bien que vous pouvez utiliser votre moniteur sans l'apparier à un la circonférence de votre bras. - Page 29 MESURE MESURE Remarque Pour interrompre la mesure à tout moment, appuyez sur la touche 4. En ce qui concerne l'irrégularité du rythme cardiaque et les « DEMARRER/ARRETER ». mouvements excessifs du corps pendant la mesure. Si vous ne parvenez pas à apparier avec l'appareil ou si vous ne gardez pas Lors d'une mesure, si un rythme cardiaque irrégulier est détecté, le l'application en marche, le symbole Bluetooth clignotera pendant la mesure.
- Page 30 GESTION DES DONNÉES GESTION DES DONNÉES Récupérer les enregistrements 1. Lorsque le moniteur est éteint, appuyez sur la touche « MEMOIRE », l'écran LCD affiche le nombre total de groupes d'enregistrements en mémoire, avec l'identifiant utilisateur qui clignote. 2. Appuyez sur la touche « UTILISATEUR » ou « MEMOIRE » pour passer de l'identifiant utilisateur .
- Page 31 GESTION DES DONNÉES GESTION DES DONNÉES Effacer les enregistrements B: Effacer tous les enregistrements (Exemple illustré ci-dessous pour l'utilisateur 1) Supprimez les enregistrements en suivant les étapes suivantes. 1. Entrez dans le mode de rappel de la mémoire comme décrit dans la A: Effacer un enregistrement (Exemple illustré...
-
Page 32: Gestion Des Données
INFORMATIONS POUR GESTION DES DONNÉES L'UTILISATEUR Conseils pour les mesures 4. Après avoir été supprimées, les mesures ne peuvent pas être restaurées. L'écran LCD affiche « --- » comme indiqué sur l'image Il est possible d'obtenir des mesures inexactes si elles sont suivante. -
Page 33: Entretien
INFORMATIONS POUR À PROPOS DE LA L'UTILISATEUR PRESSION ARRITELLE Que signifient la pression systolique et la pression Entretien diastolique ? Veuillez suivre les instructions ci-dessous afin d'obtenir les La pression artérielle atteint sa valeur maximale dans le cycle lorsque les meilleures performances. -
Page 34: Détecteur De Rythme Cardiaque Irrégulier
À PROPOS DE LA À PROPOS DE LA PRESSION ARRITELLE PRESSION ARRITELLE Pourquoi ma pression artérielle fluctue-t-elle au cours de la journée ? Niveau Optimale Normal Haut-normal Léger Modéré Sévère Tension artérielle (mmHg) 1. La pression artérielle de chaque individu <120 120-129 130-139... -
Page 35: Dépannage
DÉPANNAGE SPÉCIFICATIONS En cas de problème lors de l'utilisation de l'appareil, vérifiez les points Dimensions extérieures Environ 178 mm × 101 mm × 42,89 mm suivants : LCD numérique V.A.124 mm × 76 mm Mode d'affichage PROBLÈME SYMPTÔME À VÉRIFIER SOLUTION Environ 343 g (sans les piles et le brassard) Poids... -
Page 36: Composant Autorisé
DIRECTIVES CEM COMPOSANT AUTORISÉ Directives CEM Composant Autorisé Les appareils ME EQUIPMENT ou ME SYSTEM conviennent aux environnements de soins Veuillez utiliser l'adaptateur autorisé (en option !). à domicile. Avertissement: Il ne faut pas s'approcher de l'équipement chirurgical HF actif et de la salle blindée RF d'un système ME pour l'imagerie par résonance magnétique, où... - Page 37 DIRECTIVES CEM DIRECTIVES CEM Tableau 2 Tableau 3 Orientation et déclaration du fabricant – immunité électromagnétique Orientation et déclaration du fabricant – immunité électromagnétique IEC 60601-1-2 Test d'immunité Niveau de conformité RF rayonnée Fréquence Bande Service Modulation Puissance Distance IEC 60601-1-2 Niveau de Niveau de test Niveau de test...
-
Page 38: Ised Id (Ic Id)
ISED ID (IC ID) ISED ID (IC ID) HVIN: TMB-2288-C FVIN: A01 IC: 12725A-TMB2273BT Cet appareil contient un (des) émetteur(s)/récepteur(s) exempté(s) de licence qui est (sont) conforme(s) aux exigences de la Loi sur l'accès à l'information.Innovation, Sciences et Développement économique Canada.
Need help?
Do you have a question about the TMB-2288-C and is the answer not in the manual?
Questions and answers