Table of Contents
Advertisement
Available languages
Available languages
Quick Links
Advertisement
Chapters
Table of Contents

Related Manuals for PEUGEOT Arles PB-MF521


Summary of Contents for PEUGEOT Arles PB-MF521
- Page 1 Arlés Milk frother P B - m F 5 2 1 ´ o w n e r s m a n u a l...
-
Page 2: Table Of Contents
Contents Index Safety instructions · · · · · · · · · · · · · · · · · · · · · · · · · 3 Product overview · · · · · · · · · · · · · · · · · · · · · · · · · · 7 Assembly ·... -
Page 3: Safety Instructions
Safety instructions IMPORTANT: Please read the enclosed safety instructions provided separately before proceeding. 1. For countertop use only: operate the appliance on a stable, non-combustible, level surface. 2. For household use only: not for commercial use. Use the appliance only for its intended purpose. - Page 4 damaged in any way. 9. Manage power cord: do not let it hang over edges, touch hot surfaces, or come into contact with hot burners or ovens. 10. Avoid heat sources: do not place the appliance on or near hot gas or electric burners, or in a heated oven.
- Page 5 18. Do not leave unattended when in use. 19. Not for use by children or persons with reduced capacity: close supervision is required when used near children or individuals with reduced capacity. 20. Use recommended accessories only: the use of accessories not recommended by the manufacturer may result in fire, electric shock, or injury.
- Page 6 Color Black...
-
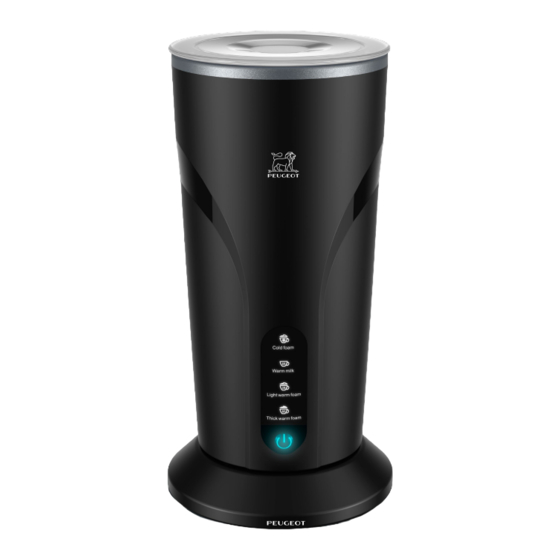
Page 7: Product Overview
Producto overview 1. Lid 2. Frothing paddle 3. Pitcher 4. Base 5. Fill line indicators (Interior) 6. Control panel 7. Power cord... -
Page 8: Assembly
Assembly 1. Remove the lid from the pitcher. 2. Attach the frothing paddle: Position the square end of the frothing paddle over the shaft at the bottom of the pitcher. Rotate the frothing paddle until it aligns with the shaft, then push it down until secure. 3. - Page 9 NOTICE: DO NOT attempt to froth if the liquid level is be- low the MIN fill line as indicated on the inside of the pitcher. WARNING: DO NOT remove the lid while the frothing pa- ddle is in operation to avoid the risk of electric shock, personal injury, and/or property damage.
-
Page 10: Intended Use
Intended use 1. Press switching key to toggle between all settings. The light that corresponds to the se- lected program blinks. 1. The light will stay illuminated, and the pro- gram will start after a few seconds. 2. To stop the program at any time, press the Switching key. - Page 11 How to do froth Use the coldest, freshest milk or milk The colder the liquid, the better. alternative possible before frothing. When frothing, millions of tiny air bubbles are introduced into the liquid. The quicker the heating process, the better the foam quality, and it reduces the risk of scalding.
-
Page 12: Cleaning
Cleaning Clean your milk frother after every use to ensure the best flavour and prevent milk from baking onto the inside of the pitcher. Unplug and cool: always unplug the milk frother and let it cool to room temperature before cleaning. - Page 13 Frothing paddle Remove from the pitcher before cleaning. Dishwasher safe. Base With a barely damp cloth, wipe away visible particles from the base as needed. Allow it to dry thoroughly before placing the pitcher. Power cord Using a barely damp cloth, wipe away visible particles from the power cord as needed.
-
Page 14: Warranty
In the case of misuse, the warranty will not apply. If you encounter any issues with your product or have questions, please don’t hesitate to reach out to Peugeot Smart Living’s Technical Support Service via our website: www.peugeot-smartliving.com... - Page 15 Spirit of Ingenuity w w w. p eug e ot -s mart li vi ng. com Th e Pe u geot l og o is a t rad emark of Eta b li s s em ents Pe ugeot Frères SA . Us e d u n d e r license.
- Page 16 Arlés Espumador de leche P B - m F 5 2 1 m a n u a l d e u s u a r i o...
- Page 17 Contenidos Índice Instrucciones de seguridad · · · · · · · · · · · · · · · · · 3 Descripción del producto · · · · · · · · · · · · · · · · · · · · 7 Ensamblaje ·...
-
Page 18: Instrucciones De Seguridad
Instrucciones de seguridad IMPORTANTE: Por favor, lea las instrucciones de seguridad adjuntas proporcionadas por separado antes de proceder. 1. Solo para uso en la encimera: opere el electrodoméstico en una superficie estable, no combustible y nivelada. 2. Solo para uso doméstico: no para uso comercial. - Page 19 8. Inspeccione regularmente el electrodoméstico: no lo opere si el cable de alimentación o el enchufe están dañados o si el electrodoméstico presenta fallas, caídas o está dañado de alguna manera. 9. Maneje el cable de alimentación con cuidado: no deje que cuelgue sobre bordes, toque superficies calientes o entre en contacto con quemadores u hornos calientes.
- Page 20 electrodoméstico con líquidos calientes. 16. Para desconectar: presione , asegúrese de que la unidad esté apagada y luego desenchufe de la base. Para desconectar de forma segura, agarre el enchufe y retírelo del enchufe; nunca tire del cable de alimentación. 17.
- Page 21 Por favor, lea cuidadosamente y revise completamente este manual y consérvelo para futuras consultas. No seguir las instrucciones de seguridad puede provocar lesiones graves o daños. Especificaciones Potencia nominal 500W Voltaje nominal 220-240V~ 50/60Hz Dimensiones 105x105x207mm Color Negro...
-
Page 22: Descripción Del Producto
Descripción del producto 1. Tapa 2. Batidor de espuma 3. Jarra 4. Base 5. Indicadores de nivel de llenado (interior) 6. Panel de control 7. Cable de alimentación... -
Page 23: Ensamblaje
Ensamblaje 1. Retire la tapa de la jarra. 2. Coloque el batidor de espuma: Coloque el extremo cuadrado del batidor de espuma sobre el eje en la parte inferior de la jarra. Gire el batidor de espuma hasta que se alinee con el eje, luego empújelo hacia abajo hasta que esté... - Page 24 AVISO: NO intente hacer espuma si el nivel de líquido está por debajo de la línea de llenado MÍN como se indica en el interior de la jarra. ADVERTENCIA: NO quite la tapa mientras el batidor de espuma está en funcionamiento para evitar el riesgo de descarga eléctrica, lesiones personales y/o daños materiales.
-
Page 25: Uso Previsto
Uso previsto 1. Presione tecla de conmutación para alternar entre todos los ajustes. La luz que corresponde al programa seleccionado parpadeará. 1. La luz permanecerá iluminada y el programa comenzará después de unos segundos. 2. Para detener el programa en cualquier mo- mento, presione la tecla de conmutación. - Page 26 Consejo Cómo hacer espuma Use la leche o la alternativa de leche más Cuanto más frío sea el líquido, mejor. fría posible antes de batir. Cuando se hace espuma, se introducen millones de burbujas de aire en el líquido. Cuanto más rápido sea el proceso de calentamiento, mejor será...
-
Page 27: Limpieza
Limpieza Limpie su espumador de leche después de cada uso para garantizar el mejor sabor y evitar que la leche se pegue en el interior de la jarra. Desenchufe y enfríe: siempre desenchufe el espumador de leche y déjelo enfriar a temperatura ambiente antes de limpiarlo. - Page 28 Batidor de espuma Retire de la jarra antes de limpiar. Apto para lavavajillas. Base Con un paño apenas húmedo, limpie las partículas visibles de la base según necesario. Deje seque completamente antes de colocar la jarra. Cable de alimentación Usando paño apenas húmedo,...
-
Page 29: Garantía
En caso de mal uso, la garantía no se aplicará. Si en algún momento detecta algún problema con su producto o tiene alguna duda, no dude en ponerse en contacto con el Servicio de Asistencia Técnica Peugeot Smart Living en nuestra web: www.peugeot-smartliving.com... - Page 30 Spirit of Ingenuity w w w. p eug e ot -s mart li vi ng. com Th e Pe u geot l og o is a t rad emark of Eta b li s s em ents Pe ugeot Frères SA . Us e d u n d e r license.
Need help?
Do you have a question about the Arles PB-MF521 and is the answer not in the manual?
Questions and answers