Advertisement
FFV-E1
Single Electronic
Flush Valve
Installation
Guide
MELBOURNE
SYDNEY
Britex Place Mirra Crt
16 Northumberland Drv
Bundoora VIC 3083
Taren Point NSW 2229
t (03) 9466 9000
t (02) 9531 2100
e vic@britex.com.au
e nsw@britex.com.au
FFV-E1 Installation Guide | QID 3.22 | Rev 4 | 2 April 2024
TITLE:
Drawing:
PERTH
BRISBANE
Unit 1/8 Principal Link
19 Manilla St
Malaga WA 6090
East Brisbane QLD 4169
t (08) 9249 5464
t (07) 3363 2400
UNLESS OTHERWISE SPECIFIED:
e wa@britex.com.au
e qld@britex.com.au
DIMENSIONS ARE IN MILLIMETERS
XX-XX
ADELAIDE
SD-XX
The Britex Group
SA State Office
t 1300 764 744
DO NOT SCAL
e sa@britex.com.au
Advertisement
Table of Contents

Related Manuals for Britex FFV-E1

Summary of Contents for Britex FFV-E1
- Page 1 (07) 3363 2400 t 1300 764 744 UNLESS OTHERWISE SPECIFIED: DO NOT SCAL e vic@britex.com.au e nsw@britex.com.au e wa@britex.com.au e qld@britex.com.au e sa@britex.com.au DIMENSIONS ARE IN MILLIMETERS FFV-E1 Installation Guide | QID 3.22 | Rev 4 | 2 April 2024...
- Page 2 Preparation and Completion Notes Safety Precautions Britex FFV-E1 Electronic Flush Valve and its components are for indoor use only. Install the FFV-E1 Electronic Flush Valve and its’ components only in a dry environment, with an ambient temperature between 5 and 40°C. When performing any work on the FFV-E1 Electronic Flush Valve or it’s connected components, switch off the power and disconnect the transformer...
-
Page 3: Installation Instructions
10. Install the individual actuator buttons or button and face plate as per button installation instructions. 11. For in-ceiling installation make provisions for a ceiling access panel to be able to service the flush valve. Australia’s Finest Stainless | britex.com. FFV-E1 Installation Guide | QID 3.22 | Rev 4 | 2 April 2024... - Page 4 The squeaking should stop after a few flushes. Note: If the flush valve is activated more than 6 times within one minute it will stop flushing for 45 seconds. Australia’s Finest Stainless | britex.com. FFV-E1 Installation Guide | QID 3.22 | Rev 4 | 2 April 2024...
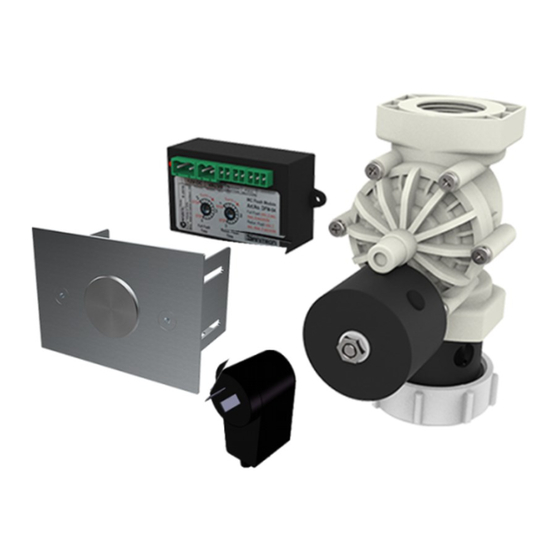
- Page 5 Power Point 1" Flush Valve Recommended Flushing Mechanisim Britex FFV-E1-P Flush Pipe 40mm DWV (not supplied) Actuator Button Mounted to Stud Or Noggin Australia’s Finest Stainless | britex.com. FFV-E1 Installation Guide | QID 3.22 | Rev 4 | 2 April 2024...
- Page 6 Hex Nipple (Not Supplied) Recommended Trap Blucher Australia P/No # 525.090.110S REVISION FLI2 Installation Australia’s Finest Stainless | britex.com. Britex Metal Products Co. Pty Ltd. britex.com.au info@britex.com.au 09/02/18 FFV-E1 Installation Guide | QID 3.22 | Rev 4 | 2 April 2024...
- Page 7 Recommended Flushing Device Settings If the unit is paired with the FFV-E1, the setting should be set up according to the setting above only on the Full Flush setting to achieve the correct discharge volumes Australia’s Finest Stainless | britex.com.
- Page 8 10), local regulations and simultaneous demand requirements. To ensure proper sizing of the pipe work for the valve it is recommended to engage a qualified hydraulic designer. Australia’s Finest Stainless | britex.com. FFV-E1 Installation Guide | QID 3.22 | Rev 4 | 2 April 2024...
-
Page 9: Troubleshooting
Extend flush time see installation steps Not enough flush volume 7-9. Spare Parts ARTICLE NO. DESCRIPTION TR-5A Transformer DFM-04 Dual flush module SV-9 Electronic flush valve complete Australia’s Finest Stainless | britex.com. FFV-E1 Installation Guide | QID 3.22 | Rev 4 | 2 April 2024... - Page 10 Leave the lever in the open position. 1. Remove nut from solenoid lid. 2. Remove lid and coil form solenoid. Australia’s Finest Stainless | britex.com. FFV-E1 Installation Guide | QID 3.22 | Rev 4 | 2 April 2024...
- Page 11 1. Remove and replace the old diaphragm. Note: When replacing the diaphragm make sure that the lug matches up with the cut out in the housing Australia’s Finest Stainless | britex.com. FFV-E1 Installation Guide | QID 3.22 | Rev 4 | 2 April 2024...
- Page 12 2. Activate the system several times to confirm proper functioning and check for leaks. Australia’s Finest Stainless | britex.com. FFV-E1 Installation Guide | QID 3.22 | Rev 4 | 2 April 2024...
-
Page 13: Care And Maintenance
BRITEX at no charge, provided that the terms of the manufacturer’s warranty are followed. This warranty is the only warranty given by BRITEX, and we expressly disclaim all other warranties, including but not limited to implied warranties of merchantability and fitness for a particular purpose. - Page 14 Notes Australia’s Finest Stainless | britex.com. FFV-E1 Installation Guide | QID 3.22 | Rev 4 | 2 April 2024...
- Page 15 Notes Australia’s Finest Stainless | britex.com. FFV-E1 Installation Guide | QID 3.22 | Rev 4 | 2 April 2024...
- Page 16 (03) 9466 9000 t (02) 9531 2100 t (08) 9249 5464 t (07) 3363 2400 t 1300 764 744 e vic@britex.com.au e nsw@britex.com.au e wa@britex.com.au e qld@britex.com.au e sa@britex.com.au FFV-E1 Installation Guide | QID 3.22 | Rev 4 | 2 April 2024...
Need help?
Do you have a question about the FFV-E1 and is the answer not in the manual?
Questions and answers