
Related Manuals for Sunsky TS-FT003

Summary of Contents for Sunsky TS-FT003
- Page 1 Ultrasonic Liquid Level Meter User Manual TS-FT003 transmitter TS-FT005 transmitter No solar ---------- Includes ---------- panels solar panels...
-
Page 2: Table Of Contents
Table of Contents Table of Contents........................Receiver Dimension Diagram / Transmitter Dimension Diagram......Full Display Diagram......................... Product Specifications......................Packaging Contents / Default Settings / Button Indicator Diagram......Main Features / Power Supply Methods................Installation Instruction / Installation Steps................. 9~12 Backlight Settings........................Time Settings.......................... -
Page 3: Receiver Dimension Diagram / Transmitter Dimension Diagram
Receiver Dimension Diagram ------------- 84mm ------------- 135mm 16mm 10mm Transmitter Dimension Diagram -------------------- 22mm --------------- 66mm 109mm 145mm 68mm ------------------------- 38mm... -
Page 4: Full Display Diagram
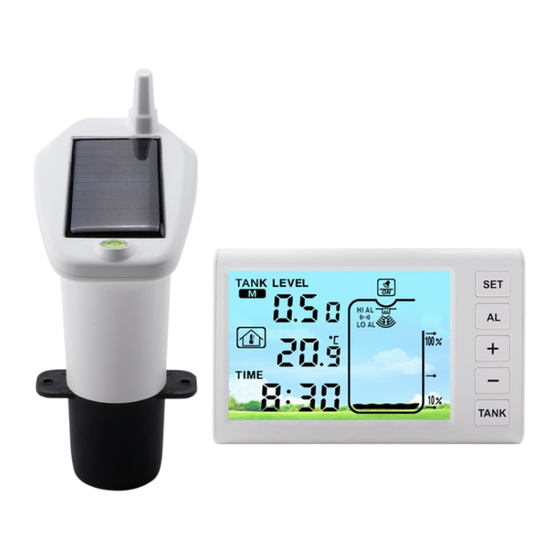
Full Display Diagram 16 17 1. Numeric Display Area 10. Alarm Clock On 2. Water Tank Temperature & Level Icons 11. Alarm Clock Mode 3. Water Level Unit 12. Time Display 4. Water Tank Temperature Unit (℃/℉) 13. Indoor Temperature Display 5. -
Page 5: Product Specifications
Alarm Duration: 120 seconds Battery Usage: Receiver: USB to Type-C Wire / 3*AAA TS-FT003 Transmitter: 6*AAA 1.2V NiMH 900mAh TS-FT005 Transmitter: 6*AAA Note: Transmitter, and Receiver communicate wirelessly at 433MHz with a transmission distance of up to 100m in an open area, through wall distance is 30m. -
Page 6: Packaging Contents / Default Settings / Button Indicator Diagram
Packaging Contents ▶ Receiver*1 ▶ USB to Type-C Wire*1 ▶ Transmitter*1 ▶ User Manual*1 ▶ Installation Screws*2 Default Settings on Startup ▶ Time: 0�00~23�59 (Default: 0�00) ▶ Temperature Unit: ºC/ºF (Default: ºC) ▶ 12HR/24HR Format: (Default: 24HR) ▶ Alarm Time: 0�00~23�59 (Default: 0�00, Off) ▶... -
Page 7: Main Features / Power Supply Methods
Main Features ▶Display Backlight On/Off Function ▶Alarm On Indicator " " ▶Time Function in 12H/24H format ▶Transmitter Low Battery Reminder " " ▶Buzzer On/Off " (Default display on startup: 0�00 24 hours) " ▶Alarm Function (Default on startup: Off) ▶Data Signal Indicator " "... - Page 8 TS-FT003 transmitter: 6*AAA nickel-metal hydride (6*1.2V) rechargeable batteries, Battery included in shipment.(as shown in Figure ②) solar panel 6*AAA Battery included in shipment Figure ② Note:The solar panel provides auxiliary power and has a charging function for rechargeable batteries. Please use NiMH rechargeable batteries (which can reduce the frequency of battery replacement and save on battery usage costs to some extent).
-
Page 9: Installation Instruction / Installation Steps
Installation Instruction Diagram Transmission distance: Up to 30m through buildings, up to 100m in open space. Installation Steps ⑴. Power on the receiver. After the full display on the screen for 3 seconds, a "BI" sound will be emitted, and "1.00" with a flashing empty tank will be displayed (as shown in Figure ④). Figure ④... - Page 10 Press the "SET" key again to set the air gap value, initially displaying "0.50" (as shown in Figure ⑤), with a setting range of 0.5~5m/1.64ft~16.4ft. It is recommended to set the air gap value to be ≥0.5m for optimal monitoring status. ------------ ------------ Air Gap Height...
- Page 11 ⑵. After completing the above-mentioned steps for the receiver, power on the transmitter. Upon powering on, the transmitter will send the first signal, and subsequent signal transmissions will occur every 30 seconds or 180 seconds. φ≥���mm � Transmitter Installation Diagram �...
- Page 12 Level Figure ⑨ Examples of Incorrect Installation a. The transmitter is not installed in a horizontal position. b. The transmitter is too close to the walls of the water tank. c. There are solid objects in the water tank. d. The bottom of the transmitter is submerged in water (or another liquid ). Note: Under normal operating conditions, the transmitter is designed to effectively protect against splashing rainwater from any direction.
-
Page 13: Backlight Settings
Backlight Setting When the receiver is powered by batteries, a short press on any key will turn on the backlight for 15 seconds. If there is no other key operation, the backlight will automatically turn off. In normal mode, to keep the backlight constantly on, long-press the "+" key for 3 seconds. -
Page 14: Time Settings
Time Setting In normal mode, long-press the "SET" key to set the time. The corresponding setting item will blink during the setting process. The setting sequence is as follows: 24/12-hour format setting → hours → minutes → water tank liquid level unit selection → exit. When setting the 24/12-hour format, press the "+"... -
Page 15: Alarm Clock Settings
When selecting the water tank liquid level unit, press the "+" or "-" key to choose between meters (M) or feet (FEET) as the unit for the water tank liquid level (as shown in Figure ⑬). Unit (Meters) Display Unit (Feet) Display Figure ⑬... - Page 16 When setting the alarm clock hour or minute, press the "+" or "-" key to increase or decrease the value. Long-pressing the "+" or "-" key allows for a rapid increase or decrease in the value (as shown in Figure ⑮). Alarm Clock Minute Setting Alarm Clock Hour Settin Figure ⑮...
- Page 17 The alarm clock will ring for 2 minutes. During the alarm, press any key to stop the alarm, or it will automatically stop after 2 minutes. When the alarm is on ( visible icon), and off ( invisible icon) when the alarm is off (as shown in Figure ⑰). Alarm On Figure ⑰...
-
Page 18: Turn On Or Off The Buzzer
When Alarm sound is on, the alarm time 2 minutes. When alarming, press any key to stop the alarm, or the alarm will also stop automatically after 2 minutes. The " " icon is visible when the alarm is on, and the" "... -
Page 19: Switching Between Water Tank Level And Temperature Display
Switching Between Water Tank Level and Water Tank Temperature Display In normal mode, press the "TANK" key once to switch between water tank level display and water tank temperature display (as shown in Figure Water Tank Temperature Display Water Tank Level Display Note: Receiver temperature measurement range: 0℃~50℃... -
Page 20: Temperature Unit Switching / How To Reacquire Signal
Temperature Unit Switch In normal mode, press the "-" key once to switch between Celsius (℃) and Fahrenheit (℉) temperature units (as shown in Figure Celsius (℃) Fahrenheit (℉) Figure How to Reconnect the Signal When the transmission signal is lost, the corresponding icon " "...
Need help?
Do you have a question about the TS-FT003 and is the answer not in the manual?
Questions and answers
MITEN SAAN PINNANMITTAUKSEN NÄYTÖLLE ??
To get the surface measurement displayed on the Sunsky TS-FT003, set the air gap value correctly. The air gap is the distance from the transmitter's bottom sensor to the highest water surface in the tank.
1. Ensure the air gap value is at least 0.5m for optimal monitoring.
2. Use the "+" key to increase the value (short press for single increments, long press for continuous increase).
3. Use the "-" key to decrease the value (short press for single decrements, long press for continuous decrease).
4. If no operation occurs for 15 seconds in depth setting mode, it will switch to normal display mode.
5. If "EEr" appears on the receiver, reset the setup by holding the "SET" and "AL" keys for 3 seconds.
This setup ensures accurate surface measurement display.
This answer is automatically generated
Wie rufe ich den Einstellmodus für die Wassertanktiefe auf? How I can enter the water tank depth setting mode?