Table of Contents
Advertisement
Quick Links
Advertisement
Table of Contents

Related Manuals for Thermoline TD-1200

Summary of Contents for Thermoline TD-1200
- Page 1 Large Capacity Drying Oven User Manual & Setup Guide TD-1200 TD-2400 STAR X...
-
Page 2: Table Of Contents
TABLE OF CONTENTS GENERAL INFORMATION Symbols Product Specifications Operating Environment Electrical Connections SETUP Unpacking Location Shelves Exhaust Cleaning OPERATION Start Up Star X User Guide Start X Setup General Controls Reset Safety Thermostat TROUBLESHOOTING Problems Service Support Warranty... - Page 3 Symbols Large Capacity Drying Oven User Manual By Thermoline Warning sign: signi es a general warning, and indicates a risk to people speci ed by the supplementary sign that if not avoided, may result in death or serious injury. General Warning Sign Warning;...
-
Page 4: General Information
By Thermoline This user manual is intended for Thermoline's large capacity drying oven range. We recommend that you read this user manual the whole way through before you start using the cabinet. Consider this manual as a part of the cabinet and an integral part of its function. -
Page 5: Product Specifications
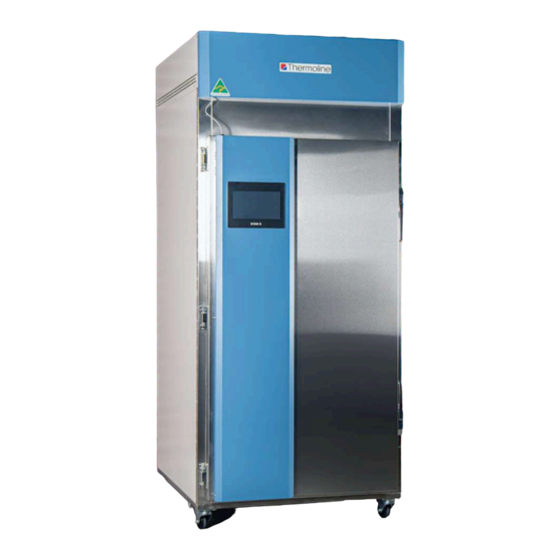
Large Capacity Drying Oven User Manual Product Specifications By Thermoline Dimensions External TD-1200 TD-2400 WxDxH (mm) 895x1235x2305 1785x1235x2305 Internal WxDxH (mm) 760x995x1590 1650x995x1590 2 x 760mm openings TD-1200/ TD-2400 Clearance Front (mm) Back (mm) Sides (mm) - Page 6 Product Specifications TD-1200 TD-2400 Technical Specifications Temperature Range Ambient +10°C to 150°C Temperature Uniformity +/-2°C to 100°C Doors Shelf Positions 100mm spacing between levels Electrical 15A / 3 Phase + N + E / 415V (20A 5 pin 3 phase outlet required)
-
Page 7: Operating Environment
Operating Environment Large Capacity Drying Oven User Manual By Thermoline Large Capacity Drying Oven Operating Environment The large capacity drying oven should be stored inside at all times away from direct sunlight or direct heat sources. Failure to adhere to this could cause signi cant drops in cabinet performance and damage to items stored inside. Extreme Operating Environment: •... -
Page 8: Electrical Connections
The oven comes with an approximately 3-metre mains power TD-1200 20A / 3 Phase + N + E / 415V lead and a ve-pin, three-phase plug, which you can use to connect to the power source. - Page 9 Operating Environment Warnings Do not store items on top of the cabinet, as this will also affect ventilation. CAUTION: When installing more than one cabinet in the same location, ensure that they are positioned in such a way that warm air exhausted from one cabinet, is not drawn directly into the other cabinet.
-
Page 10: Setup
• Please don't dispose of the packaging until the oven is inspected. If damage is present upon opening your package, notify your supplier or Thermoline Scienti c without delay at +61 2 9604 3911 or email service@thermoline.com.au. Fig 3 . Safe moving of cabinet. - Page 11 Ensure when placing the large capacity drying oven into place that the castors can be accessed so they can be locked (Fig 3) and unlocked (Fig 2). Please contact your supplier or Thermoline should there be any damage to the castors. Fig 3. Castor Locked...
-
Page 12: Location
• The large capacity drying oven requires ventilation. Thermoline suggests 100mm on the sides and back, which also aids with accessibility (Fig 3). 300mm at Fig 3. the top to ensure the inlet and outlet vents are not obstructed. -
Page 13: Shelves
The TD-1200 and TD-2400 come equipped with shelf runners spaced at 100mm centres. There is a total of 13 levels for each door.. This allows for a total of 26 open wire shelves or up to 78 trays on the TD-2400 and half this for the TD-1200. Each level can hold three trays per door (Fig 1), with one open wire shelf for each level per door (Fig 2). -
Page 14: Exhaust
Inlet and Exhaust The large capacity drying ovens feature inlet and exhaust ports on top of the cabinet. Two of each in the case of the TD-1200 and four of each with the TD-2400. The inlet regulates the amount of fresh (dry air) that enters the cabinet, and the outlet regulates the amount of exhaust air that can exit the cabinet. -
Page 15: Cleaning
All cabinets have electrical components. Power should be turned off prior to cleaning. These items should not be subjected to any levels of moisture. Door Gasket The door gasket should be cleaned regularly with a mild soap solution. If a gasket is to be replaced, please contact Thermoline Scienti c. Regular inspection is recommended. Stainless Steel Stainless steel is, under most conditions, extremely resistant to corrosion. -
Page 16: Start Up
Start Up Procedure Large Capacity Drying Oven User Manual By Thermoline Start Up Procedure Start-Up process for Oven: • Before proceeding, please ensure that all internal and external packaging has been removed from the cabinet and that all tape, plastic bags and foam pieces have been removed. - Page 17 Press the Thermoline logo, as shown below, to access the passcode. After entering the passcode, press anywhere above the Thermoline logo to continue to the main screen and then close the User Access window. Use the QR Code to see the video of this step.
-
Page 18: Star X User Guide
By Thermoline The temperature controller on the Large Capacity Drying Oven is a STAR X touchscreen. The Thermoline STAR X has been designed and con gured to provide ease of use and a suitable level of security. The STAR X has a unique identi er that allows traceability back to the instrument. - Page 19 STAR X User Guide Alarms The STAR X is equipped with various alarms. The instructions below will run through each alarm and its primary function. Temperature Deviation Alarm: If the actual temperature goes higher than the SOV or PSV by more than 5°C, the heaters will turn off until the temperature returns to a suitable range.
- Page 20 STAR X User Guide USB Downloading To download the logged data from the STAR X controller, simply insert a USB memory stick and the data is downloaded automatically. Do not remove the USB stick until all the data has been downloaded. The following messages appear on the screen when data is downloading and when it is safe to remove the USB memory stick.
- Page 21 No additional passcode is needed to access the functions on the first two rows. Access to the bottom row options is passcode protected. To access, simply touch anywhere on the Thermoline logo in the bottom right corner, and the User Access window will appear.
- Page 22 STAR X User Guide Contact Details Screen If you need to contact Thermoline for any reason, our contact details are available by pressing the Contact Details Screen button on the settings page. Alarm/Events Screen The Alarm/Events Screen is accessed via the settings menu and is protected by the Passcode.
- Page 23 STAR X User Guide Trend Screen There are two types of trend screens available. A graph or a data table. They show a daily live trend of the performance of the cabinet. Press the settings button (cog) to select the required date to view historical trends. Use the Chart Time Scale to view the trend in more detail.
- Page 24 STAR X User Guide Data Menu Screen The STAR X also features the Trend Screen in a table format. NOTE: Use the User Number ‘01’ and the Passcode ‘1111’ to access this screen. On the data menu screen you can use the settings button (cog) to change the month shown on the table. You can also choose to see all data by selecting (Current).
- Page 25 To change the Time and Date, simply touch the parameter that needs to be changed and enter the Thermoline cabinets that use the STAR X controller can be current or required time and date. connected via a LAN connection to clone the screen so they can be viewed at a remote location.
- Page 26 NOTE: It is advised that all calibrations be made by a trained require to adjust. service technician. The Thermoline touchscreen has been tted with a simple one- point calibration adjustment. Access to the Calibration Screen is passcode protected. To access, simply touch the Thermoline logo, and the User Access window will appear.
- Page 27 NOTE: Use the User Code ‘01’ and the passcode ‘1111’ to access this screen. access this screen. The Thermoline STAR X touchscreen has been designed for The STAR X has a 250 segment Programmer. The 250 quick and easy adjustments to the cabinet's temperature and...
- Page 28 STAR X Setup Setting Up the Cycle Program Setup Hours: The operator enters the required length of time for the segment in Hours. This value is ignored if the segment either Jump To or End. Minutes: The operator enters the required length of time for the segment in Minutes.
- Page 29 STAR X Setup Setting Up the Program The most important thing to remember is that the segments are Each of the columns is an always ramping. By that, it means that the time entered in the editable segment that can segment is the time it takes to reach the setpoint.
- Page 30 STAR X Setup Linking the Programs If you find that 10 segments are not enough to complete the temperature program that you require, you can link from one program to the next. As long as you haven't used an end segment and the final segment in the program is a Time segment (it would also work with a Jump To with a finite number of repetitions), the program will automatically transition into the next program.
- Page 31 STAR X Setup Repeating the Program Ending the Program If you wish to repeat the program without going to another, use To end the programs, access the drop-down menu and select the Jump To feature in the same drop-down menu. End.
- Page 32 STAR X Setup Starting/Stopping the Program Once you have set the temperature program to your desired To start on a specific program, access the Program Set-Up parameters and values, you can then activate the program and screen and change the number in the Start Program Number start it.
-
Page 33: General Controls
General Controls Large Capacity Drying Oven User Manual By Thermoline BMS Output The large capacity drying oven is fitted with a 3-pin socket to allow for connection to a building monitoring system or phone dialler. A plug is also supplied separately to connect the socket to your system. -
Page 34: Reset Safety Thermostat
Thermoline cabinet. This could be a failure of the air circulating fans or the suggests investigating the cause prior to resetting. -
Page 35: Troubleshooting
There is a Philips head screw in the bottom that, once loosened, will allow you to move the strike forwards or backwards. A grooved surface enables the screw to remain in position once tightened. Thermoline suggests making only very small changes to the strike location (one groove at a time) while making adjustments. - Page 36 Serial Number and other related information with you. The serial number is on a silver sticker, usually located near the power IEC socket. Contact Thermoline service on +61 2 9604 3911 or email at service@thermoline.com.au...
-
Page 37: Warranty
Thermoline Scienti c Equipment Pty Ltd ABN 80 000 859 129 (‘Thermoline’) Thermoline warrants to the original purchaser that this product will perform to its product specification for a period of 2 years from date of purchase, provided that the installation of the product has been carried out in accordance with the latest version of the manufacturer’s instructions and further provided that the use of the product complies with that specified in the relevant specification. - Page 38 Doc ID: TM-069-V2...
Need help?
Do you have a question about the TD-1200 and is the answer not in the manual?
Questions and answers