Table of Contents
Advertisement
Quick Links
Advertisement
Table of Contents

Related Manuals for AOJ Medical BUZUD AOJ-30C


Summary of Contents for AOJ Medical BUZUD AOJ-30C
- Page 1 Blood Pressure Monitor User Manual Model: AOJ-30C...
-
Page 3: Table Of Contents
Table of Contents 1. Unpacking Inspection...............1 2. Packing List..................1 3. Safety Precautions................2 4. Product Composition................ 3 5. Intended Use / Instructions for Use..........3 6. Contraindication.................3 7. Product Parts..................4 8. Preparation..................5 9. Function Setting ................6 10. -
Page 4: Unpacking Inspection
Thank you for purchasing this Arm Blood Pressure Monitor. The monitor can be used and store measurement results for two users. It uses the oscillometric method of blood pressure measurement. This means this monitor detects your blood movement through your brachial artery and converts the movements into a digital reading. -
Page 5: Safety Precautions
3. Safety Precautions The warnings and illustrations shown in the manual are intended to enable you to use the product safely and correctly, thus preventing harm to you and others, specific meanings of which are shown as follows: Legend, mark and meaning Warning information, refer to the attached document BF-type anti –shock degree for the application... -
Page 6: Product Composition
Manufacturer Date of manufacture Serial number Lot number EU authorized representative 4. Product Composition This product is composed of the main body and cuff. 5. Intended Use / Instructions for Use The Arm Blood Pressure Monitor is intended to measure the systolic pressure and diastolic pressure, as well as the pulse rate of adult person via non-invasive oscillometric technique at medical facilities or at home. -
Page 7: Product Parts
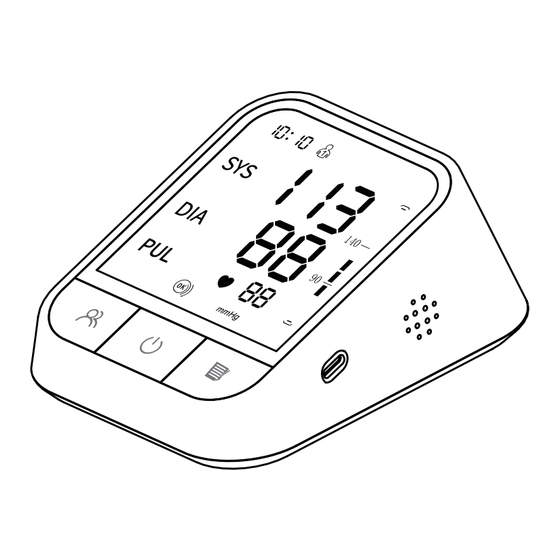
7. Product Parts (1) Main body Display User Selection Date/Time Setting Button Speaker Start/Stop Button (voice version only) Memory Button Power Input of Type C interface (2) Display screen �� �� �. Date and Time �. Systolic Blood Pressure Icon �. -
Page 8: Preparation
8. Preparation (1) Install the battery 1) Open the battery cover according to the method shown in the figure. 2) Place 4 AAA batteries in the battery compartment, and pay attention to the electrode indication of the batteries. Install the battery as indicated in the picture right under this sentence. -
Page 9: Function Setting
9. Function Setting (1) User mode In standby mode, press the " " button to enter the user group selection interface. Then press the " " button again to switch and select user groups. Press the " " key (2) Year/month/date setting In standby mode, press "... - Page 10 (3) Voice on/off setting (for voice version only, optional function) 1)After the time setting is finished, it will automatically enter the voice setting (the screen will display "SP"). Press " " button to turn on or turn off the sound, "ON" means turn on the sound, "OFF"...
- Page 11 Thank you. Wish you a good health. ②If your blood pressure is not in normal range: Measuring result is abnormal. Your blood pressure is high/low. Could not measure your pulse at this time. ③Measuring error: Error,(Mistake), please measure again ④Other operation: Average Blood Pressure Last time your blood pressure was xxx, your pulse was xx Low battery, please replace the battery...
-
Page 12: How To Take Proper Measurements
Press the " " key mmHg mode kPa mode 10. How to Take Proper Measurements (1) Preparation before measurement --Take off the clothes on the arm. --Always measure in the same arm (generally the left arm). --Remain still and keep quiet during measurement. --Relax as much as possible and do not talk during measurement. - Page 13 (2) Applying the arm cuff 1)Connect the arm cuff to your monitor by inserting the air plug into the air jack securely. Air Plug Cuff Air Jack Air Tube 2)Place your hand through the cuff loop. Pull the cuff until it reaches your upper left arm.
- Page 14 0.79-1.18 inches (2 to 3 cm) Bottom edge • Make sure that the air tube is positioned on the inside of your arm and wrap the cuff securely, so it can not move around your arm. Note: Repeated measurement will result in blood congestion in the arm, which will affect the measurement result.
- Page 15 • Sit in a comfortable chair with your back and arm supported. • Keep your feet flat and your legs uncrossed. • The cuff should be placed on your arm at the same level as your heart, with the arm resting comfortably on a table.
- Page 16 Note: Consult your doctor if unexpected readings are obtained. (5) Memory function 1 ) This monitor stores 99 sets of memories of two users. After each measurement, the monitor will automatically store the measurement data. When the memory is full, the old measurement data will be overfilled with the new one.
-
Page 17: Contraindications, Precautions, Warnings And Prompt Instructions
shakes the arm during the measurement, which may cause incorrect measurement results. Please measure again. 11. Contraindications, Precautions, Warnings and Prompt Instructions • No maintenance or servicing when using. • The patient is an intended operator, and all the functions can be safely used. - Page 18 this equipment could result. • When the ambient temperature is less than 5°C, please take the device to the place where the ambient temperature is between 5°C~40°C at least 1 hour; When the ambient temperature is higher than 40°C, please take the device to the place where the ambient temperature is between 5°C~40°C at least 2 hours.
- Page 19 • Consult with your physician before using this monitor if you have common arrhythmias such as atrial or ventricular premature beats or atrial fibrillation; arterial sclerosis; poor perfusion; diabetes; pregnancy; pre-eclampsia or renal disease. NOTE that any of these conditions in addition to patient motion, trembling, or shivering may affect the measurement reading.
- Page 20 • ONLY inflate the arm cuff when it is applied on your upper arm. • Remove the arm cuff if it does not start deflating during a measurement. • DO NOT use this monitor for any purpose other than measuring blood pressure. •...
-
Page 21: Common Q & A On Blood Pressure
emissions or decreased electromagnetic immunity of this equipment and result in improper operation. 12. Common Q & A on Blood Pressure Q1: Why is the blood pressure value obtained at home lower than that obtained at the hospital? • The blood pressure difference between home and hospital measurements is about 20 mmHg - 30 mmHg (2.7 kPa - 4.0 kPa). - Page 22 causing the blood pressure value to be much higher than it is. Therefore, re-adjust and tighten the cuff further. • The patient is not sitting correctly during the measurement. Slouching, tilting, bending, and sitting cross-legged are not encouraged while taking blood pressure measurements due to increased abdominal pressure or the arm position being below the heart.
-
Page 23: Abnormal Phenomena And Handling
13. Abnormal Phenomena and Handling * When the measurement is abnormal, the following symbols will appear. Please use the correct method for measure- ment. LCD display information Remark Er U The inflation can not reach 30 mmHg in 12 seconds. Er H The inflation reaches 295mmHg, it deflates automatically after 20ms. - Page 24 * Troubleshooting Anomaly Possible Faulty Solution Failure to Whether the power is Replace the batteries or power on insufficient insert the Type-C charging cable for power supply Whether the positive Install the batteries and negative poles of correctly the battery are installed reversely Whether the air tube Insert the air tube plug...
-
Page 25: Cleaning And Disinfection
14. Cleaning and Disinfection 14.1 Cleaning 1) Remove the batteries before cleaning. 2) The body of monitor can be cleaned with a clean soft cloth. 3) The body can be wiped with a clean soft cloth stained with a small amount of neutral detergent or water. Do not use any corrosive cleaning agent. - Page 26 It is suggested to disinfect the monitor before and after use each time. Each time of disinfection shall be completed within 1min. The number of repeated disinfection each time shall not exceed 2 times. 14.3 Disposal Dispose of your monitor, other components and optional accessories according to applicable local regulations.
-
Page 27: Upkeep And Maintenance
15. Upkeep and Maintenance water or neutral detergent - Always keep the surface of monitor clean and tidy, helpful to prolong the service life of Blood Pressure Monitor. - If the host is dirty, please wipe with a dry soft cloth. If the dirt cannot be eliminated easily, wipe with a soft cloth stained with water or neutral detergent, and then dry with a dry cloth. - Page 28 protection limit Pressure value SYS: 57~255 mmHg; DIA: 25~195 mmHg; Measuring range Pulse rate 40~199 bpm Accuracy Pressure value ±3 mmHg Pulse rate ±5% Low battery 4.2V±0.1V: low battery; <4.0V±0.1V: item will be turned off Anti Electronic Internal Power Supply Shock Type Auto power-off 1 minute without operation...
-
Page 29: Appendix 1 Emc Information
condition beyond the Operating designated Humidity 15%~90%RH environment temperature and condition humidity range, it Atmospheric 70kPa~106kPa will not be used condition properly Transportation and Avoid strong impact, direct impact, exposure or Storage rain during transportation. The packaged Blood Environment Pressure Monitor shall be stored indoors at the temperature of -20°C~55°C and the relative humidity of 10%~93% ,atmospheric Condition: 70kPa~106kPa. - Page 30 The Arm Blood Pressure Monitor is suitable for use in all establishments, including domestic establishments and those directly connected to the RF emissions Class B public low-voltage power supply CISPR 11 network that supplies buildings used for domestic purposes. Harmonic emissions N.A.
- Page 31 Voltage dips, Not applicable Not applicable short interruptions and voltage variations on power supply input lines IEC 61000-4-11 Power frequency 30A/m, 50/60Hz 30A/m, 50/60Hz Magnetic field IEC 61000-4-8 Conducted RF Not applicable Not applicable IEC61000-4-6 Radiated RF 10 V/m 10 V/m IEC61000-4-3 80 MHz - 2,7 GHz 80 MHz - 2,7 GHz...
- Page 32 Pulse Band modula tion 217 Hz Pulse 800/90 modula tion TETRA 18 Hz 800, iDEN 820, CDMA 850, Band 5 1720 Pulse 1800; modula 0 – CDMA tion 1845 1900; 217 Hz 1900; DECT; 1970 Band 1, 3, 4, 25; UMTS 2450 Blueto...
- Page 33 Guidance and manufacturer’s declaration - electromagnetic Immunity Radiated RF Test Moduation IEC 60601-1-2 Compliance IEC61000-4-39 Frequency Test Level level (A/m) (Test (A/m) specifications 30 kHz ENCLOSURE 134.2 kHz Pulse PORT modulation IMMUNITY to 2.1 kHz proximity 13.56 kHz Pulse magnetic modulation fields) 50 kHz...
- Page 34 Complies with IMDA Standards DB107824 Roffe International Holdings Pte Ltd 585 North Bridge Road #01-02 Raffles Hospital, Singapore 188770 Tel: +65 6518 9959 E-mail: customercare@buzud.com Website: https://buzud.com Share Info GmbH Address: Heerdter Lohweg 83, 40549 Düsseldorf, GERMANY...
- Page 36 Manual version: A0 Software version: V1.0 Revision date: 2021-09 AOJ-WI-30C-0007...
Need help?
Do you have a question about the BUZUD AOJ-30C and is the answer not in the manual?
Questions and answers