Acer Aspire 9500 User Manual
Acer aspire 9500: users guide
Hide thumbs
Also See for Aspire 9500:
- Service manual (129 pages) ,
- User manual (105 pages) ,
- User manual (102 pages)
Table of Contents
Advertisement
Advertisement
Table of Contents

Related Manuals for Acer Aspire 9500


Summary of Contents for Acer Aspire 9500
- Page 1 Aspire 9500 Series User's Guide...
- Page 2 Changes may be made periodically to the information in this publication without obligation to notify any person of such revisions or changes. Such changes will be incorporated in new editions of this manual or supplementary documents and publications. This company makes...
-
Page 3: Disposal Instructions
Disposal instructions Do not throw this electronic device into the trash when discarding. To minimize pollution and ensure utmost protection of the global environment, please recycle. For electronic products containing an LCD/CRT monitor or display: Lamp(s) inside this product contain mercury and must be recycled or disposed of according to local, state or federal laws. -
Page 4: First Things First
First things first We would like to thank you for making the Aspire series of notebook PC your choice for meeting your mobile computing needs. Your guides To help you use your Aspire, we have designed a set of guides: First off, the Just for Starters... -
Page 5: Taking Care Of Your Computer
• Do not connect the adapter to any other device. • Do not step on the power cord or place heavy objects on top of it. Carefully route the power cord and any cables away from foot traffic. • When unplugging the power cord, do not pull on the cord itself but pull on the plug. -
Page 6: Taking Care Of Your Battery Pack
Commission, to operate this computer. Operation conditions This device complies with Part 15 of the FCC Rules. Operation is subject to the following two conditions: (1) This device may not cause harmful interference, and (2) This device must accept any interference received, including interference that may cause undesired operation. -
Page 7: Table Of Contents
Disposal instructions First things first Your guides Basic care and tips for using your computer Turning your computer on and off Taking care of your computer Taking care of your AC adapter Taking care of your battery pack Cleaning and servicing... - Page 8 Program guide Find program TV settings Using TeleText functions Make DVDs Authoring CD/DVDs Taking your notebook PC with you Disconnecting from the desktop Moving around Preparing the computer What to bring to meetings Taking the computer home Preparing the computer...
- Page 9 Universal Serial Bus (USB) IEEE 1394 port PC Card slot ExpressCard Installing memory Connecting your TV and AV-in cables Acer Arcade TV set-up wizard (Windows XP Home and Professional) BIOS utility Boot sequence Enable disk-to-disk recovery Password Using software Playing DVD movies...
- Page 10 General European Union (EU) The FCC RF safety requirement Canada — Low-power license-exempt radio communication devices (RSS-210) Federal Communications Comission Declaration of Conformity Declaration of Conformity for CE Marking Index...
-
Page 12: Acer Empowering Technology
Acer Empowering Technology Acer's innovative Empowering Technology makes it easy for you to access frequently used functions and manage your new Acer notebook. It features eight handy utilities: • Acer eDataSecurity Management protects data with passwords and advanced encryption algorithms. -
Page 13: Acer Edatasecurity Management
The Acer eDataSecurity Management setup wizard will prompt you for a supervisor password and default file-specific password. This file-specific password will be used to encrypt files by default, or you can choose to enter your own file-specific password when encrypting a file. -
Page 14: Acer Elock Management
If you do not set a password, Acer eLock Management will reset back to the initial status with all locks removed. Note: If you lose your password, there is no method to reset it except by reformatting your notebook or taking your notebook to an Acer Customer Service Center. -
Page 15: Acer Eperformance Management
Acer ePerformance Management Acer ePerformance Management is a system optimization tool that boosts the performance of your Acer notebook. It provides you with the following options to enhance overall system performance: • Memory optimization — release unused memory and check usage. -
Page 16: Acer Erecovery Management
Acer eRecovery Management Acer eRecovery Management is a powerful utility that does away with the need for recovery disks provided by the manufacturer. The Acer eRecovery Management utility occupies space in a hidden partition on your system's HDD. User-created backups are stored on D:\ drive. Acer eRecovery Management provides you with: •... -
Page 17: Acer Esettings Management
To access this utility, either click on the "Acer eNet Management" icon on your notebook, or start the program from the Start menu. You also have the option to set Acer eNet Management to start automatically when you boot up your PC. - Page 18 Acer eNet Management can save network settings for a location to a profile, and automatically apply the appropriate profile when you move from one location to another. Settings stored include network connection settings (IP and DNS settings, wireless AP details, etc.), as well as default printer settings.
-
Page 19: Acer Epower Management
Choose which power options best fit your needs, then click OK. The new profile will appear on the main screen. Battery status For real-time battery life estimates based on current usage, refer to the panel on the lower left-hand side of the window. -
Page 20: Acer Epresentation Management
• Set alarms. • Re-load factory defaults. • Select what actions will be taken when the cover is closed, and set passwords for accessing the system after Hibernation or Standby. • View information about Acer ePower Management. Acer ePresentation Management Acer ePresentation Management lets you select from two of the most common projector resolutions: XGA and SVGA. -
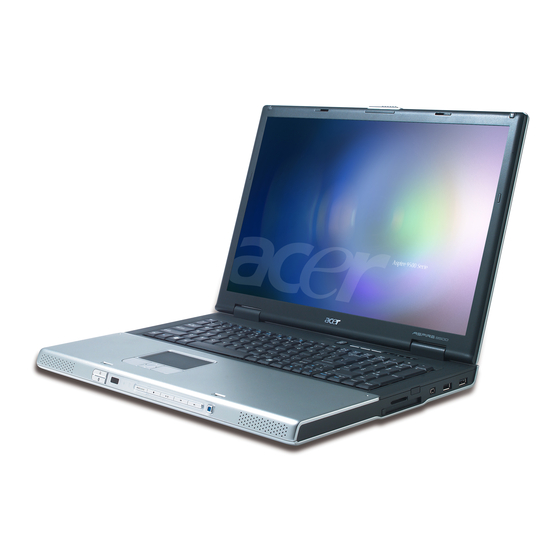
Page 21: An Aspire Tour
An Aspire tour After setting up your computer as illustrated in the Just for Starters... poster, let us show you around your new Aspire computer. Front view Item Description Display screen Also called Liquid-Crystal Display (LCD), displays computer output. Status... -
Page 22: Closed Front View
Internal microphones for stereo sound recording. Touchpad Touch-sensitive pointing device which functions like a computer mouse. Click buttons The left and right buttons function like the left and (left, center right mouse buttons; the center button serves as a 4-way and right) scroll button. -
Page 23: Left View
(e.g., audio CD player, stereo walkman). Microphone jack Accepts input from external microphones. Slot-load Internal optical drive; accepts CDs or DVDs. optical drive Slot-load optical Ejects the optical disk from the drive. drive eject button LED indicator Lights up when the optical drive is active. -
Page 24: Right View
5-in-1 card Accepts Memory Stick, Memory Stick Pro, reader MultiMediaCard (MMC), Secure Digital (SD), and xD-Picture Card. Note: Only one card can operate at any given time. Infrared port Interfaces with infrared devices (e.g., infrared printer and IR-aware computer). IEEE 1394 Connects to IEEE 1394 devices. -
Page 25: Rear View
Rear view Icon Item Description Ventilation slots Enable the computer to stay cool, even after prolonged use. DC-in jack Connects to an AC adapter. External display Connects to a display device (VGA) port (e.g., external monitor, LCD projector). S-video/TV-out port Connects to a television or display device with S-video input. -
Page 26: Base View
Base view Item Description Cooling fan Helps keep the computer cool. Note: Do not cover or obstruct the opening of the fan. Memory Houses the computer's main memory. compartment Battery lock Locks the battery in place. latch Battery release Releases the battery for removal. -
Page 27: Specifications
400 MHz FSB ) or higher ® Intel 915PM/915GM Express chipset System memory 256/512 MB of DDR2 533 MHz memory, upgradeable to 2 GB using two soDIMM modules Display and 17" WXGA Acer CrystalBrite colour TFT LCD, graphics 1440 x 900 pixel resolution or 17"... - Page 28 Bluetooth LED-button Media console with Arcade, stop, play/pause, rewind, and fast forward buttons, and 5-way media controls Remote control for Acer Arcade applications or MCE OS Audio Audio system with two built-in speakers SPDIF support for digital speakers Intel high-definition audio and MS-Sound compatible...
- Page 29 Non-operating: 20% to 80% System Mobile PC 2001 compliance ACPI 2.2b DMI 2.0 ® Wi-Fi Warranty One-year International Travelers Warranty (ITW) Note: The specifications listed above are for reference only. The exact configuration of your PC depends on the model purchased.
-
Page 30: Indicators
Indicators The computer has three easy-to-read status indicators on the upper-right above the keyboard, and four on the front panel. The power, battery and wireless communication status indicators are visible even when the LCD display is closed. Icon Function Description Caps Lock Lights up when Caps Lock is activated. -
Page 31: Easy-Launch Buttons
> to run the Acer Empowering Technology. Please see "Acer Empowering Technology" on page 1. The mail and Web browser buttons are pre-set to email and Internet programs, but can be reset by users. To set the Web browser, mail and programmable buttons, run the Acer Launch Manager. -
Page 32: Touchpad
Tapping on the touchpad is the same as clicking the left button. • Use the 4-way scroll (3) button to scroll up or down and move left or right a page. This button mimics your cursor pressing on the right scroll bar of Windows applications. - Page 33 Note: When using the touchpad, keep it — and your fingers — dry and clean. The touchpad is sensitive to finger movement; hence, the lighter the touch, the better the response. Tapping harder will not increase the touchpad's responsiveness.
-
Page 34: Using The Keyboard
Using the keyboard The keyboard has full-sized keys and an embedded numeric keypad, separate cursor, lock, Windows, function and special keys. Lock keys The keyboard has three lock keys which you can toggle on and off. Lock key Description Caps Lock When Caps Lock is on, all alphabetic characters typed are in uppercase. -
Page 35: Windows Keys
The computer employs hotkeys or key combinations to access most of the computer's controls like screen brightness, volume output and the BIOS utility. To activate hotkeys, press and hold the <Fn> key before pressing the other key in the hotkey combination. - Page 36 (if connected) and both. <Fn> + <F6> Screen blank Turns the display screen backlight off to save power. Press any key to return. <Fn> + <F7> Touchpad Turns the internal touchpad on and off. toggle <Fn>...
-
Page 37: Special Keys
Special keys You can locate the Euro symbol and the US dollar sign at the upper-center of your keyboard. The Euro symbol Open a text editor or word processor. To type the < > symbol, hold <Alt Gr> and then press the <5> key at the upper-center of the keyboard. -
Page 38: Ejecting The Optical (Cd Or Dvd) Drive Tray
Wrap the computer security lock cable around an immovable object such as a table or handle of a locked drawer. Insert the lock into the notch and turn the key to secure the lock. Some keyless models are also available. -
Page 39: Audio
The computer comes with 16-bit high-fidelity AC'97 stereo audio, and dual stereo speakers. Adjusting the volume Adjusting the volume on the computer is as easy as pressing some buttons. See "Hotkeys" on page 24 for more information on adjusting the speaker volume. -
Page 40: Using The System Utilities
To enable the dual monitor feature of your notebook, first ensure that the second monitor is connected, then, select Start, Control Panel, Display and click on Settings. Select the secondary monitor (2) icon in the display box and then click the check box Extend my Windows desktop onto this monitor. Finally, click Apply to confirm the new settings and click OK to complete the process. -
Page 41: Launch Manager
Note: Please ensure that the resolution setting of your second monitor is set to the manufacturer's recommended value. Launch Manager Launch Manager allows you to set the four easy-launch buttons located above the keyboard. "Easy-launch buttons" on page 20 for the location of the easy- launch buttons. -
Page 42: Norton Antivirus
How do I check for viruses? A Full System Scan scans all files on your computer. To perform a system scan: Start Norton AntiVirus. Double click on the Norton AntiVirus Icon on the desktop or click on the Start menu in the Windows taskbar, highlight Programs, and select Norton AntiVirus. -
Page 43: Microphone Features
You can access these functions from the taskbar. To access the microphones functions: Double click the HD Audio Manager icon located on the taskbar. Then select the Microphone tab on the main menu. Acoustic echo cancellation Acoustic echo cancellation technology is used to improve performance of Voice over Internet Protocol (VoIP) applications . -
Page 44: Frequently Asked Questions
Frequently asked questions The following is a list of possible situations that may arise during the use of your computer. Easy solutions are provided for each one. I pressed the power button, but the computer does not start or boot up. - Page 45 The keyboard does not respond. Try attaching an external keyboard to a USB port on the computer. If it works, contact your dealer or an authorized service center as the internal keyboard cable may be loose.
- Page 46 C: drive. (Your C: drive will be reformatted and all data will be erased.) It is important to back up all data files before using this option. Before performing a restore operation, please check the BIOS settings.
-
Page 47: Requesting Service
To start the recovery process: Restart the system. While the Acer logo is showing, press <Alt> + <F10> at the same time to enter the recovery process. Refer to the on-screen instructions to perform system recovery. Important! This feature occupies 2 to 3 GB in a hidden partition on your hard disk. -
Page 48: Acer Arcade (For Selected Models)
Acer Arcade is an integrated player for music, photos, TV, DVD movies and videos. It can be operated using your pointing device or remote control. To watch or listen, click or select a content button (e.g., Music, Video, etc.) on the Arcade home page. -
Page 49: Arcade Hotkeys
Brightness down; decreases the screen brightness InstantOn Arcade mode With some Aspire models, it is possible to use Acer Arcade to watch TV, listen to music, and view photos without first switching on your PC. To do this, push the Arcade button located on the front panel of your notebook. -
Page 50: 48-Button Remote Control
For InstantOn Arcade mode, push the Arcade button to start Acer Arcade. Pushing it again at any time will return you to the Arcade main page. Push the Power button to shut down the system. -
Page 51: Remote Functions
Teletext shortcut functions* 0-9 buttons Input TV channel numbers Last Ch Return to previous channel Previous Skip back one music track, DVD chapter, or photo CH + / - Change channels up and down Rewind Rewind through media Pause Pause audio, video, slide shows, live or recorded TV... -
Page 52: Mini Remote Control
Your Aspire notebook comes with a handy mini remote control for convenient operation of Acer Arcade. The buttons provide standard playback functionality. The images below show how the buttons on the remote contol function in the different Arcade modes. Arcade main page... -
Page 53: Finding And Playing Content
(with thumbnails) and organized into folders. To browse a folder, click to open it. To go back up to the folder above it, click the Up one level button. If there is more content than will fit on a page, use the buttons at the lower right to scroll through the pages. -
Page 54: Arcade Controls
Navigation controls To return to the Arcade home page, click the Home button in the upper left corner of the window. To go up one folder level while searching for content, click Up one level. To return to the previous screen, click the red arrow. The buttons in the upper right (minimize, maximize, close) have standard PC behaviors. -
Page 55: Virtual Keyboard
TV, video; and music will continue playing in a small window located in the bottom left-hand corner of the screen. You can press the stop button on the remote or click the onscreen stop icon to stop the playback at anytime. -
Page 56: Cinema
• Angle The disk currently playing will be shown in the area above the list of drives. This page is also displayed when you press the Stop button during a movie. The buttons on the left side allow you to resume the movie from the point it was stopped, restart the movie from the beginning, jump to the DVD menu, eject the disk, or go to the "DVD Settings"... -
Page 57: Album
You can also view a single picture by clicking on it. This opens the picture full-screen. You can then use the onscreen player controls to zoom in and out, and to pan in four directions. Editing Pictures Choose "Edit,"... -
Page 58: Video
Click Capture Device on the video page and then select the source you are using for your video input. There is a choice between S-video and Composite. To capture a video clip, you then need to click the red record button in the onscreen controls. -
Page 59: Editing Video
To rip music from an audio CD, after you have inserted the CD, click Rip CD. In the page that opens, select the songs you would like to rip (or click Select or Clear All), then click Start Ripping. -
Page 60: Tv (For Selected Models)
Arcade allows you to watch TV from your computer. Click the TV button on the home page to show the TV main page. The Live TV option plays TV on screen. Press Escape at any time to return to Arcade. -
Page 61: Recorded Tv
Recorded TV The "Recorded TV" page shows recorded TV files. A thumbnail image shows the first frame of each file. To play a recorded TV file, click it. The video will play full-screen. To return to the TV page, click Stop. -
Page 62: Using Teletext Functions
Signal settings Click on Capture Device to select between an analog or digital input for your TV signal. Select TV Source to choose the source of the signal. The Region option allows you to select the country or region where your cable provider is located. -
Page 63: Make Dvds
Acer Arcade provides an easy and complete solution for recording data, audio, photos or videos. You can burn and share any combination of data, music, photos or videos onto a CD or DVD — direct from Make DVD mode or some of the other Acer Arcade media modes. -
Page 64: Taking Your Notebook Pc With You
To bring the computer out of Sleep mode, open the display; then press and release the power button. If you are taking the computer to a client's office or a different building, you may choose to shut down the computer: Click on Start, Turn Off Computer, then click on Turn Off (Windows XP). -
Page 65: What To Bring To Meetings
If your meeting is relatively short, you probably do not need to bring anything with you other than your computer. If your meeting will be longer, or if your battery is not fully charged, you may want to bring the AC adapter with you to plug in your computer in the meeting room. -
Page 66: Special Considerations
Minimize the effects of temperature changes by keeping the computer with you. • If you need to stop for an extended period of time and cannot carry the computer with you, leave the computer in the trunk of the car to avoid exposing the computer to excessive heat. -
Page 67: Special Considerations
Always take the computer as carry-on luggage. • If possible, have the computer inspected by hand. Airport security X-ray machines are safe, but do not put the computer through a metal detector. • Avoid exposing floppy disks to hand-held metal detectors. -
Page 68: Securing Your Computer
Wrap a computer security lock cable around an immovable object such as a table or handle of a locked drawer. Insert the lock into the notch and turn the key to secure the lock. Some keyless models are also available. -
Page 69: Setting Passwords
If you enter the password incorrectly, a warning message appears. Try again and press <Enter>. • When the User Password is set and the password on boot parameter is enabled, a prompt appears at boot-up. • Type the User Password and press <Enter> to use the computer. If you enter the password incorrectly, a warning message appears. -
Page 70: Expanding Through Options
Plugging this modem into a digital phone line will damage the modem. To use the fax/data modem port, connect a phone cable from the modem port to a telephone jack. Warning! Please make sure that the cable you use is appropriate... -
Page 71: Built-In Network Feature
The built-in network feature allows you to connect your computer to an Ethernet-based network. To use the network feature, connect an Ethernet cable from the Ethernet (RJ-45) port on the chassis of the computer to a network jack or hub on your network. Fast Infrared (FIR) -
Page 72: Universal Serial Bus (Usb)
Universal Serial Bus (USB) The USB 2.0 port is a high-speed serial bus which allows you to connect USB peripherals without taking up precious system resources. IEEE 1394 port The computer's IEEE 1394 port allows you to connect to an IEEE 1394- compatible device like a video camera or digital camera. -
Page 73: Pc Card Slot
PC Card slot The Type II PC Card slot of the computer accepts PC Cards that enhance the usability and expandability of the computer. These cards should have a PC Card logo on them. PC Cards (formerly PCMCIA) are add-on cards for portable computers, giving you expansion possibilities long afforded by desktop PCs. -
Page 74: Expresscard
ExpressCard The ExpressCard is the newest version of the PC Card. It is a smaller and faster interface that further enhances the usability and expandability of your computer. ExpressCards support a vast number of expansion options, including flash memory card adapters, TV-tuners, Bluetooth connectivity and IEEE 1394B adapters. -
Page 75: Installing Memory
Turn off the computer, unplug the AC adapter (if connected) and remove the battery pack. Then turn the computer over to access its base. Remove the screws from the memory cover; then lift up and remove the memory cover. (a) Insert the memory module diagonally into the slot, then (b) gently press it down until it clicks into place. -
Page 76: Connecting Your Tv And Av-In Cables
Connecting your TV and AV-in cables Follow the instructions below to set up the TV function of your Acer Aspire notebook. PAL/SECAM and NTSC systems Plug the PAL/SECAM cable’s RF plug into your notebook’s RF jack. Connect the other end to your TV antenna cable, using the NTSC converter if necessary. - Page 77 Extend the antenna to improve the quality of the reception. Note: The antenna is only compatible with DVB-T digital TV systems. A magnet located on the base of the antenna unit also allows you to fix it firmly onto a metal surface for better stability and reception.
- Page 78 AV-in cable The AV-in cable can be used to connect your notebook to a VHS player or camcorder for viewing, capturing and recording video clips. Plug the single end of the cable into the AV-input port of your notebook. Connect the other ends to the S-video or composite audio/video jacks on your VHS player, camcorder or other compatible device.
-
Page 79: Bios Utility
To enable disk-to-disk recovery (hard disk recovery), activate the BIOS utility, then select Main from the categories listed at the top of the screen. Find D2D Recovery at the bottom of the screen and use the <F5> and <F6> keys to set this value to Enabled. -
Page 80: Power Management
System activity refers to any activity involving one or more of the following devices: keyboard, mouse, hard disk, peripherals connected to the computer, and video memory. If no activity is detected for a period of time (called an inactivity timeout), the computer stops some or all of these devices in order to conserve energy. - Page 81 This chapter will guide you through each process. Note: This feature is only available on certain models. For systems that do not have a built-in optical disk burner, plug in an external USB or IEEE 1394-compatible optical disk burner before entering...
-
Page 82: Create Backup
(D:\). Please refer to the Create backup section. Create factory default image CD When the System CD and Recovery CD are not available, you can create them by using this feature. Boot to Windows XP. -
Page 83: Re-Install Bundled Software Without Cd
Change password Acer eRecovery Management and Acer disk-to-disk recovery are protected by a password that can be changed by the user. Follow the steps below to change the password in Acer eRecovery Management. Boot to Windows XP. - Page 84 Note: If the system crashes, and will not boot to Windows, you can run Acer disk-to-disk recovery to restore the factory default image under DOS mode.
-
Page 85: Troubleshooting
This notebook PC incorporates an advanced design that delivers onscreen error message reports to help you solve problems. If the system reports an error message or an error symptom occurs, see "Error messages" below. If the problem cannot be resolved, contact your dealer. See "Requesting service"... - Page 86 If you still encounter problems after going through the corrective measures, please contact your dealer or an authorized service center for assistance. Some problems may be solved using the BIOS utility.
-
Page 87: Regulations And Safety Notices
ENERGY STAR guidelines for energy efficiency. FCC notice This device has been tested and found to comply with the limits for a Class B digital device pursuant to Part 15 of the FCC rules. These limits are designed to provide reasonable protection against harmful interference in a residential installation. -
Page 88: Modem Notices
If possible, they will notify you in advance. But, if advance notice is not practical, you will be notified as soon as possible. You will also be informed of your right to file a complaint with the FCC. -
Page 89: Notice For Australia
If this equipment should fail to operate properly, disconnect the equipment from the phone line to determine if it is causing the problem. If the problem is with the equipment, discontinue use and contact your dealer or vendor. -
Page 90: Notice For New Zealand
It indicates no endorsement of the product by Telecom, nor does it provide any sort of warranty. Above all, it provides no assurance that any item will work correctly in all respects with another item of Telepermitted equipment of a different make or model, nor does it imply that any product is compatible with all of Telecom's network services. -
Page 91: Important Safety Instructions
Use of pulse dialing, when this equipment is connected to the same line as other equipment, may give rise to bell tinkle or noise and may also cause a false answer condition. Should such problems occur, the user should NOT contact the telecom Fault Service. - Page 92 Never push objects of any kind into this product through cabinet slots as they may touch dangerous voltage points or short-out parts that could result in a fire or electric shock. Never spill liquid of any kind onto or into the product.
-
Page 93: Laser Compliance Statement
Laser compliance statement The CD or DVD drive used with this computer is a laser product. The CD or DVD drive's classification label (shown below) is located on the drive. CLASS 1 LASER PRODUCT CAUTION: INVISIBLE LASER RADIATION WHEN OPEN. AVOID EXPOSURE TO BEAM. -
Page 94: Radio Device Regulatory Notice
General This product complies with the radio frequency and safety standards of any country or region in which it has been approved for wireless use. Depending on configurations, this product may or may not contain wireless radio devices (such as wireless LAN and/or Bluetooth modules). Below information is for products with such devices. -
Page 95: The Fcc Rf Safety Requirement
The radiated output power of the wireless LAN Mini PCI Card and Bluetooth card is far below the FCC radio frequency exposure limits. Nevertheless, the notebook PC series shall be used in such a manner that the potential for human contact during normal operation is minimized as follows: Users are requested to follow the RF safety instructions on wireless option devices that are included in the user's manual of each RF option device. -
Page 96: Canada — Low-Power License-Exempt Radio Communication Devices (Rss-210)
This device is restricted to indoor use due to its operation in the 5.15 to 5.25 GHz frequency range. FCC requires this product to be used indoors for the frequency range 5.15 to 5.25 GHz to reduce the potential for harmful interference to co-channel Mobile Satellite systems. -
Page 97: Federal Communications Comission Declaration Of Conformity
Federal Communications Comission Declaration of Conformity This device complies with Part 15 of the FCC Rules. Operation is subject to the following two conditions: (1) This device may not cause harmful interference, and (2) This device must accept any interference received, including interference that may cause undesired operation. -
Page 98: Declaration Of Conformity For Ce Marking
The product specified above was tested conforming to the applicable Rules under the most accurate measurement standards possible, and all the necessary steps have been taken and are in force to assure that production units of the same product will continue to comply with these requirements. -
Page 99: Index
Windows keys disconnecting features indicators LEDs keyboards left view moving around on indicator security media access setting up a home office on indicator taking home memory traveling internationally installing traveling on local trips messages troubleshooting error turning off modem... - Page 100 CD or DVD volume FCC notice adjusting general instructions modem notices Windows keys...
Need help?
Do you have a question about the Aspire 9500 and is the answer not in the manual?
Questions and answers