Table of Contents
Advertisement
Quick Links
Advertisement
Table of Contents

Related Manuals for GFS Booth Connect

Summary of Contents for GFS Booth Connect
- Page 1 ® Booth Connect Installation Manual Document Number: 1066232 rev 0 Publication date 07/12/2024 Read and keep this manual for future reference. All personnel operating the equipment described in this manual should review and understand all instructions before use.
-
Page 2: Table Of Contents
If applicable: Install the Air Heater Post-Filter Sensors ............. 15 Wire the Temperature Probe ......................16 Wire the Flame Safeguard to the Booth Connect Unit ..............17 If applicable: Connect to the Fireye Flame Safeguard .............. 17 If applicable: Connect to the Honeywell Flame Safeguard ............18 If applicable: Connect to the Siemens Flame Safeguard ............ -
Page 3: Introduction
• Email: parts@globalfinishing.com Target audience This document is intended for use by trained, experienced paint booth installers and maintenance technicians. If you have questions about the installation procedure described in this manual, contact GFS as described above. Global Finishing Solutions... -
Page 4: Conventions Used In This Manual
Introduction Conventions used in this manual This section describes how information is presented, organized, and referenced within this manual. Safety notices This manual uses the following standards to identify conditions related to safety hazards and equipment damage. Table 1. Safety notices Symbol Description Indicates an imminent hazard that will result in death. -
Page 5: General Safety
WARNING The roofs of GFS equipment are not designed or intended to be walked upon or to support weight of any kind. As designed and manufactured, equipment roofs do not meet the minimum requirements of a safe walking and/or working surface under OSHA 1910.22. - Page 6 Operate this equipment in accordance with the guidelines set forth in this manual. It is impossible to list all potential hazards of this equipment. Instruct all personnel involved with this equipment in the safe conduct and operation of the system. GFS recommends that only qualified personnel operate and maintain this equipment.
-
Page 7: Product Safety
Product safety Product safety For booth safety information, refer to the documentation that accompanied your equipment. NOTICE The values shown on the screens are for illustrative purposes only and are not intended to be correct or accurate representations of times and temperatures. Global Finishing Solutions 1066232 rev 0... -
Page 8: Booth Connect Description
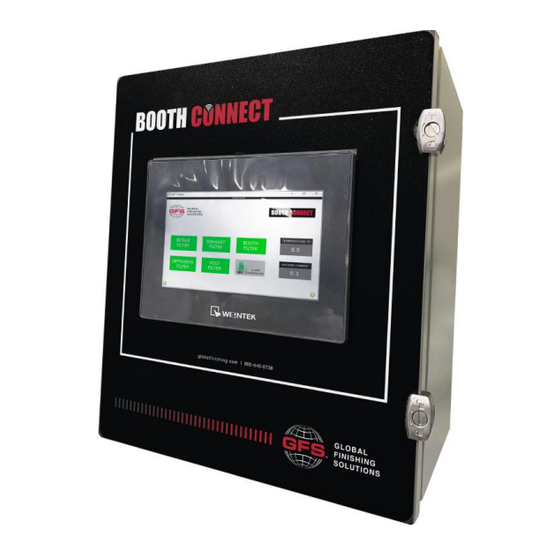
Booth Connect description Booth Connect description GFS' Booth Connect unit provides remote monitoring and real-time alerts for any type of paint booth. Paint shops can use Booth Connect to monitor booth production and cycles, power usage, and track filter loading via a remotely accessible dashboard. -
Page 9: Required Materials
• Impact wrenches and socket set • Screwdrivers, including: • Phillips-head screwdriver • Pen screwdriver • Tek screws • Tools required for anchoring Booth Connect unit to the side of the booth • Wire stripper Global Finishing Solutions 1066232 rev 0... -
Page 10: Installation Procedure
Strut channel is not provided by GFS. NOTE Position the Booth Connect unit so that its top is between 70 and 74 inches from the floor. The booth monitoring unit must be at least 36 inches (914 mm) from any booth opening. NOTE Do not mount the unit inside the booth enclosure. -
Page 11: Place The Sensors For Booth Connect
Attach the sensor to the tubing. Secure the booth pressure sensor to the cabin wall with screws. Run the opposite end of the tubing back to the Booth Connect unit and insert it through the bottom of the unit. Connect the tubing to the green fitting at the end of the manifold. The manifold has three lines coming off the top that connect to Pressure Sensor-1, Pressure Sensor-2, and Pressure Sensor-3. -
Page 12: Install The Intake Plenum Sensor
Installation procedure Install the Intake Plenum Sensor NOTE This procedure only applies to pressurized paint booths. Place the sensor on the inside of the paint booth's intake plenum before the intake filter bank. This sensor works with the booth pressure sensor mounted inside the booth to measure the pressure drop through the intake filters. -
Page 13: If Applicable: Install The Exhaust Pit Sensor
Attach the sensor to the tubing. Secure the intake plenum sensor to the inside of the plenum with screws. Run the opposite ends of the tubing back to the Booth Connect unit and insert it through the bottom of the unit. -
Page 14: Install The Air Heater Pre-Filter Sensors
Attach the sensor to the tubing. Secure the sensor to the inside of the plenum with screws. Run the opposite end of the tubing back to the Booth Connect unit and insert it through the bottom of the unit. For the component pressure sensor labeled Pressure Sensor-3, Floor | Exhaust connect the tubes to the red fitting. -
Page 15: If Applicable: Install The Air Heater Post-Filter Sensors
Installation procedure Run the opposite ends of the tubing back to the Booth Connect unit and insert it through the bottom of the unit. For the pressure sensor labeled Pressure Sensor-4, Pre-Filter connect the air entry end of the tube to the green fitting and air exit end the tube to the red fitting. -
Page 16: Wire The Temperature Probe
Run wire through the hole and mount the temperature probe inside the paint booth. Run the opposite end of the wire back to the Booth Connect unit and insert it through the left-most hole at the bottom of the unit. -
Page 17: Wire The Flame Safeguard To The Booth Connect Unit
On one end of a shielded cable, use a wire stripper to remove the insulation and separate the black and white wires. Connect the black wire to alarm and the white wire to neutral. Run the opposite end of the wire back to the Booth Connect unit and insert it through the hole on bottom of the unit. -
Page 18: If Applicable: Connect To The Honeywell Flame Safeguard
Connect the black wire to wire 3 (alarm) and the white wire to L2 (neutral). Run the opposite end of the wire back to the Booth Connect unit and insert it through the hole on bottom of the unit. -
Page 19: Wire The Current Transformer (Ct)
Drill a 1/4-inch hole through the booth wall panel at the location you want to mount the CT. Run wire through the hole and mount the temperature probe inside the paint booth. Run the opposite end of the wire back to the Booth Connect unit and insert it through the bottom of the unit. -
Page 20: Turn On The Booth Connect Hmi
10. At wire K, repeat the process above to insert the white wire. Turn on the Booth Connect HMI Plug the unit into a wall outlet using the 120V. Press the power button to turn on the HMI. -
Page 21: If Applicable: Mount The Antenna And Connect The Cellular Modem
Installation procedure If applicable: Mount the Antenna and Connect the Cellular Modem If Booth Connect uses a cellular modem for its internet connect, an antenna will be included inside the box when it is shipped. NOTE The SIM card used to form the cellular connection is installed by GFS. -
Page 22: Take Static Pressure Measurements
NOTE GFS recommends that clean filters are installed in the booth to ensure accurate measurements. At the control panel, turn on the paint booth. Capture the initial static drop reading and calculate it against the test data of the filter.
Need help?
Do you have a question about the Booth Connect and is the answer not in the manual?
Questions and answers