Table of Contents
Advertisement
Available languages
Available languages
Quick Links
USA office: Fontana
AUS office: Truganina
DEU office: FDS GmbH, Neuer Höltigbaum 36, 22143 Hamburg, Deutschland
GBR office: FDS Corporation Limited,Unit 4, Blackacre Road, Great Blakenham,Ipswich, Ip6 0FL,United Kingdom
If you're having difficulty, our friendly
customer team is always here to help.
ITA office: Milano
POL office: Gdańsk
FRA office: Saint Vigor d'Ymonville
USA:cs.us@costway.com
POL:sklep@costway.com
AUS:cs.au@costway.com
DEU:cs.de@costway.com
GBR:cs.uk@costway.com
FRA:cs.fr@costway.com
I T A :cs.i t @costway.com
ESP:cs.es@costway.com
Dehumidifier
Gewerbe Luftentfeuchter
Déshumidificateur
Deshumidificador
Deumidificatore
Osuszacz powietrza
ES10327
THIS INSTRUCTION BOOKLET CONTAINS IMPORTANT SAFETY INFORMATION.
PLEASE READ AND KEEP FOR FUTURE REFERENCE.
Advertisement
Table of Contents

Related Manuals for Costway ES10327


Summary of Contents for Costway ES10327
- Page 1 THIS INSTRUCTION BOOKLET CONTAINS IMPORTANT SAFETY INFORMATION. USA:cs.us@costway.com POL:sklep@costway.com If you're having difficulty, our friendly AUS:cs.au@costway.com DEU:cs.de@costway.com PLEASE READ AND KEEP FOR FUTURE REFERENCE. customer team is always here to help. GBR:cs.uk@costway.com FRA:cs.fr@costway.com I T A :cs.i t @costway.com ESP:cs.es@costway.com...
- Page 2 Before You Start Avant de Commencer Please read all instructions carefully. Veuillez lire attentivement toutes les instructions. Retain instructions for future reference. Conservez les instructions pour vous y référer ultérieurement. Separate and count all parts and hardware. Vérifiez toutes les pièces et les accessoires. Read through each step carefully and follow the proper order.
-
Page 3: Electrical Diagram
ELECTRICAL DIAGRAM Prima di Iniziare Si prega di leggere attentamente tutte le istruzioni. Conservare le istruzioni per riferimento futuro. 220-240V / 50Hz Separare e contare tutte le parti e gli accessori. Blue Leggere attentamente ogni passo e seguire l'ordine corretto. Brown Blue Si consiglia, ove possibile, di assemblare tutti gli articoli vicino alla zona in cui... -
Page 4: Before You Begin
● THE FOLLOWINGS SHOULD ALWAYS BE OBSERVED FOR 1. BEFORE YOU BEGIN SAFETY ● This appliance can be used by children aged from 8 years and 1.1 PRODUCT DESCRIPTION above and persons with reduced physical, sensory or mental capabilities or lack of experience and knowledge if they have been This dehumidifier removes moisture of room, which is commonly given supervision or instruction concerning use of the appliance in used in basement, warehouse, villa and many so on. -
Page 5: For Your Safety
● Do not climb or sit on the unit. 2. FOR YOUR SAFETY ● Do not insert fingers or other objects into the air outlet. Your safety is the most important thing we concerned! ● Do not touch the air inlet or the aluminum fins of the unit. ●... - Page 6 2.2.4 Checking for presence of refrigerant Any person who is involved with working on or The area shall be checked with an appropriate refrigerant breaking into a refrigerant circuit should hold a current valid certificate from an detector prior to and during work, to ensure the technician is industry-accredited assessment authority, which aware of potentially flammable atmospheres.
- Page 7 2.2.8 Checks to the refrigeration equipment If the fault cannot be corrected immediately but it is necessary to Where electrical components are being changed, they shall be continue operation, an adequate temporary solution shall be fit for the purpose and to the correct specification. At all times used.
-
Page 8: Specifications
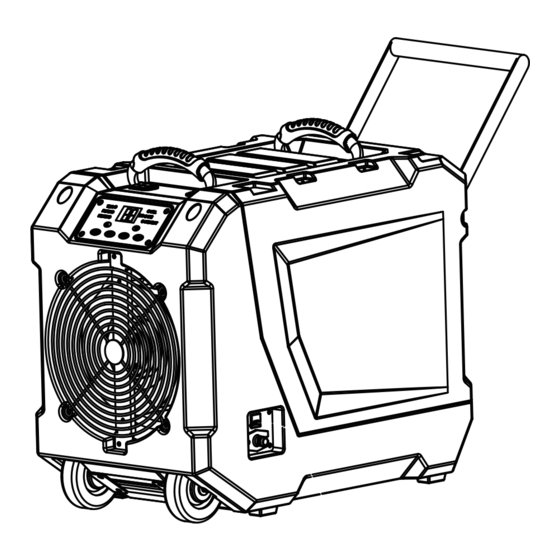
3. SPECIFICATIONS 5. DRAWINGS Model ES10327 Power Source AC 220-240V / 50Hz Top cap Capacity 65 L / Day(30°C, 80% RH) Efficiency 2.97 L / kWh Input Current 3.93 Amps Control panel Rated Power Input 905 Watts Max Current Input 4.80Amps (35°C 90%RH)... -
Page 9: Operation
Add Button: Press the Add button to increase humidity 6. OPERATION data or increase timing data. When setting the humidity data, press the button for one time to increase 5%RH, you can set the humidity range from 20%-90% RH, and 5% RH for one step. -
Page 10: Installation
Display Screen: When the machine is 7. INSTALLATION running, default display data is environment humidity. Press for 5 seconds can switch to ambient temperature. The Install the machine in a basement, crawlspace, or living space on a ambient humidity will automatically level surface in a location that has: displayed back after 5 seconds. -
Page 11: Troubleshooting Guide
8. AUTO DRAINAGE & MAINTENANCE 9. TROUBLE SHOOTING GUIDE Please disconnect the power supply before cleaning Trouble Possible Cause Solution or conducting maintenance. Error Code: E1 Air inlet temperature Replace it Auto Drainage: and humidity sensor Connect water hose (≤13.12ft/4m length) to the water drainage hole by failure quick connector, the machine will automatically drain by water pump Error Code: E2... -
Page 12: Packing List
10. PACKING LIST ELEKTRISCHES DIAGRAMM Host machine 220-240V / 50Hz Blau Braun Blau GE/GN Gelb COMP. YE/GN T5A/250V Schwarz SICHERUNG Schwarz Schwarz HAUPTPLATINE Instruction manual Blau Ventilatormotor SPULE WASSER Schwarz Pumpe Schwarz ANZEIGE L GND Umgebungssensor Abtausensor Wasserstand Drain pipe... -
Page 13: Bevor Sie Anfangen
● Aus Sicherheitsgründen sollten die folgenden Punkte stets beachtet 1. BEVOR SIE ANFANGEN werden ● Dieses Gerät kann von Kindern ab 8 Jahren und darüber sowie von Personen mit eingeschränkten körperlichen, sensorischen oder 1.1 PRODUKTBESCHREIBUNG geistigen Fähigkeiten oder mangelnder Erfahrung und Wissen Dieser Luftentfeuchter entfernt Feuchtigkeit aus Räumen, die verwendet werden, sofern sie beaufsichtigt oder in die sichere Verwendung des Geräts eingewiesen wurden und die damit... -
Page 14: Zu Ihrer Sicherheit
● Stellen Sie keine Gegenstände auf das Gerät. 2. ZU IHRER SICHERHEIT ● Steigen Sie nicht auf das Gerät und setzen Sie sich nicht darauf. ● Stecken Sie keine Finger oder andere Gegenstände in den Ihre Sicherheit ist das Wichtigste, was uns am Herzen liegt! Luftauslass. - Page 15 2.2.4 Prüfung auf Vorhandensein von Kältemittel Jede Person, die an Arbeiten an einem Kältemittelkreislauf oder einem Einbruch in einen Der Bereich muss vor und während der Arbeit mit einem Kältemittelkreislauf beteiligt ist, sollte über ein geeigneten Kältemitteldetektor überprüft werden, um aktuell gültiges Zertifikat einer von der Industrie sicherzustellen, dass der Techniker sich potenziell ACHTUNG...
- Page 16 2.2.8 Kontrollen der Kühlgeräte Kann der Fehler nicht sofort behoben werden, ist aber eine Wenn elektrische Komponenten ausgetauscht werden, Weiterführung des Betriebs erforderlich, muss eine adäquate müssen diese für den Zweck geeignet sein und der korrekten Übergangslösung eingesetzt werden. Spezifikation entsprechen. Die Wartungs- und Dies muss dem Eigentümer der Ausrüstung gemeldet werden, Servicerichtlinien des Herstellers müssen jederzeit befolgt damit alle Parteien darüber informiert werden.
-
Page 17: Spezifikationen
3. SPEZIFIKATIONEN 5. ZEICHNUNGEN Modell ES10327 Energiequelle AC 220–240 V/50 Hz Obere Kappe Kapazität 65 L/Tag (30°C, 80 % rF) Effizienz 2,97 L/kWh Eingangsstrom 3,93 Ampere Bedienfeld Nennleistungsaufnahme 905 Watt Maximaler Stromeingang 4,80 Ampere (35°C, 90 % rF) Luftauslass Maximale Leistungsaufnahme 1080 Watt (35°C, 90 % rF) -
Page 18: Betrieb
Wenn die Maschine läuft, drücken Sie darauf, um die Abschaltzeit 6. BETRIEB einzustellen. Der Zeiteinstellungsbereich liegt zwischen 0 und 24 Stunden. Wenn Sie die Timing-Daten auf „00“ einstellen, wird die Timing-Funktion abgebrochen und die Timing-Anzeige erlischt. Add-Taste: Drücken Sie die Add-Taste, um die Feuchtigkeitsdaten oder die Zeitdaten zu erhöhen. - Page 19 Anzeigebildschirm: Wenn die Maschine 7. INSTALLATION läuft, wird als Standardanzeige die Umgebungsfeuchtigkeit angezeigt. Drücken 5 Sekunden lang, um auf Installieren Sie die Maschine in einem Keller, Kriechkeller oder Umgebungstemperatur umzuschalten. Die Wohnraum auf einer ebenen Fläche an einem Ort mit: Umgebungsfeuchtigkeit wird nach 5 1.
-
Page 20: Anleitung Zur Fehlerbehebung
9. ANLEITUNG ZUR FEHLERBEHEBUNG 8. AUTOMATISCHE ENTWÄSSERUNG UND WARTUNG Bitte trennen Sie die Stromversorgung, bevor Sie Problem Mögliche Ursache Lösung Reinigungs- oder Wartungsarbeiten durchführen. Fehlercode: E1 Fehler am Ersetzen Sie es Lufteinlasstemperatur- Automatische Entwässerung: und Feuchtigkeitssensor Schließen Sie den Wasserschlauch (≤ 4 m Länge) mit einem Schnellanschluss an die Wasserablauföffnung an. -
Page 21: Diagramme Électrique
10. PACKLISTE DIAGRAMME ÉLECTRIQUE Host-Maschine 220-240V / 50Hz Bleu Marron Bleu YE/GN Jaune COMP. YE/GN T5A/250V Noir FUSIBLE Noir Noir CARTE PRINCIPALE Bedienungsanleitung Bleu Moteur de Ventilateur BOBINE Noir Pompe Noir AFFICHAGE L GND Capteur Capteur de Niveau d'Eau d'Ambiance Dégivrage Abflussrohr... -
Page 22: Avant De Commencer
● LES POINTS SUIVANTS DOIVENT TOUJOURS ÊTRE 1. AVANT DE COMMENCER RESPECTÉS POUR DES RAISONS DE SÉCURITÉ ● Cet appareil peut être utilisé par des enfants âgés de 8 ans et plus et par des personnes dont les capacités physiques, sensorielles ou 1.1 DESCRIPTION DU PRODUIT mentales sont réduites ou qui manquent d'expérience et de Ce déshumidificateur élimine l'humidité... -
Page 23: Pour Votre Sécurité
● Ne grimpez pas et ne vous asseyez pas sur l'appareil. 2. POUR VOTRE SÉCURITÉ ● N'insérez pas vos doigts ou d'autres objets dans la sortie d'air. ● Ne touchez pas l'entrée d'air ou les ailettes en aluminium de Votre sécurité est la chose la plus importante qui nous préoccupe ! l'appareil. - Page 24 2.2.4 Vérification de la présence de réfrigérant Toute personne amenée à travailler sur un circuit La zone doit être contrôlée à l'aide d'un détecteur de réfrigérant de réfrigérant ou à s'y introduire doit être titulaire d'un certificat en cours de validité délivré par un approprié...
- Page 25 2.2.8 Contrôles de l'équipement frigorifique Si le défaut ne peut être corrigé immédiatement mais qu'il est Lorsque des composants électriques sont remplacés, ils doivent nécessaire de poursuivre l'exploitation, une solution temporaire être adaptés à l'usage prévu et répondre aux spécifications adéquate doit être utilisée.
-
Page 26: Spécifications
3. SPÉCIFICATIONS 5. SCHÉMAS Modèle ES10327 Source d'alimentation AC 220-240V/50Hz Capuchon supérieur Capacité 65 L/Jour (30°C, 80% HR) Efficacité 2,97 L/kWh Courant d'entrée 3,93 Ampères Panneau de Puissance d'entrée nominale 905 Watts commande Courant d'entrée maximal 4,80 Ampères (35°C 90% HR) Sortie d'air Puissance d'entrée maximale... - Page 27 marche, appuyez sur ce bouton pour régler l'heure d'arrêt. La plage de 6. FONCTIONNEMENT réglage de l'heure est comprise entre 0 et 24 heures. Si vous réglez les données de temporisation sur « 00 », la fonction de temporisation sera annulée et l'indicateur de temporisation s'éteindra. Bouton d'Ajout : Appuyez sur le bouton d'ajout pour augmenter les données d'humidité...
- Page 28 Écran d'Affichage : Lorsque l'appareil 7. INSTALLATION est en marche, les données affichées par défaut sont l'humidité ambiante. Appuyez Installez l'appareil dans un sous-sol, un vide sanitaire ou un espace pendant 5 secondes pour de vie, sur une surface plane, à un endroit qui a : passer à...
-
Page 29: Guide De Dépannage
8. DRAINAGE AUTOMATIQUE & ENTRETIEN 9. GUIDE DE DÉPANNAGE Veuillez débrancher l'alimentation électrique avant de Problème Cause Possible Solution procéder au nettoyage ou à l'entretien. Défaut du capteur de Code d'erreur : Remplacez-le température et Drainage Automatique : d'humidité de l'entrée Connectez le tuyau d'eau (≤4m de longueur) à... -
Page 30: Liste D'emballage
10. LISTE D'EMBALLAGE ESQUEMA DE LA ELECTRICIDAD Machine hôte 220-240V / 50Hz Azul Marrón Azul YE/GN Amarillo COMP. YE/GN T5A/250V Negro FUSIBLE Negro Negro PANEL PRINCIPAL Manuel d'instructions Azul Motor del Ventilador BOBINA AGUA Negro Bomba Negro PANTALLA L GND Sensor de Ambiente Sensor de Nivel de Agua... -
Page 31: Antes De Empezar
● POR RAZONES DE SEGURIDAD, DEBEN OBSERVARSE 1. ANTES DE EMPEZAR SIEMPRE LAS SIGUIENTES INDICACIONES ● Este aparato puede ser utilizado por niños a partir de 8 años y por personas con capacidades físicas, sensoriales o mentales 1.1 DESCRIPCIÓN DEL PRODUCTO reducidas o con falta de experiencia y conocimientos si han Este deshumidificador elimina la humedad de la habitación, que se recibido supervisión o instrucciones sobre el uso del aparato de... -
Page 32: Por Su Seguridad
● No coloque objetos sobre la unidad. 2. POR SU SEGURIDAD ● No se suba ni se siente sobre la unidad. ● No introduzca los dedos ni otros objetos en la salida de aire. ¡Su seguridad es lo más importante para nosotros! ●... - Page 33 2.2.4 Comprobación de la presencia de Toda persona que trabaje o intervenga en un refrigerante circuito de refrigerante debe estar en posesión de un certificado válido de una autoridad de Se comprobará la zona con un detector de refrigerante evaluación acreditada por la industria, que adecuado antes y durante el trabajo, para garantizar que el ADVERTENCIA autorice su competencia para manipular...
- Page 34 2.2.8 Comprobación del equipo de refrigeración Si el fallo no puede corregirse inmediatamente pero es Cuando se cambien componentes eléctricos, éstos deberán ser necesario continuar el funcionamiento, se utilizará una solución adecuados para el fin previsto y cumplir las especificaciones temporal adecuada.
-
Page 35: Especificaciones
3. ESPECIFICACIONES 5. DIAGRAMA Modelo ES10327 Fuente de Energía CA 220-240 V / 50 Hz Tapón superior Capacidad 65 L/ Día (30°C, 80% HR) Eficiencia 2,97 L / kWh Corriente de Entrada 3,93 Amperios Panel de control Potencia Nominal de Entrada 905 Vatios Entrada de Corriente Máxima... -
Page 36: Operación
El intervalo de ajuste de la temporización es de 0 a 24 horas. Si ajusta 6. OPERACIÓN los datos de temporización como "00", se cancelará la función de temporización, el indicador de temporización se apagará. Botón de Añadir: Pulse el botón Añadir para aumentar los datos de humedad o aumentar los datos de tempori- zación. -
Page 37: Instalación
Pantalla de Visualización: Cuando la 7. INSTALACIÓN máquina está funcionando, los datos de visualización por defecto son la humedad Instale la máquina en un sótano, entrepiso o espacio habitable ambiente. Pulse durante 5 sobre una superficie nivelada en un lugar que tenga: segundos para cambiar a temperatura ambiente. -
Page 38: Guía De Resolución De Problemas
8. AUTODRENAJE & MANTENIMIENTO 9. GUÍA DE RESOLUCIÓN DE PROBLEMAS Por favor, desconecte la fuente de alimentación antes Problema Causa Posible Solución de limpiar o realizar tareas de mantenimiento. Fallo del sensor de Código de Error: Sustitúyalo. temperatura y humedad Drenaje Automático: de entrada de aire Conecte la manguera de agua (≤... -
Page 39: Schema Elettrico
10. LISTA DE PAQUETE SCHEMA ELETTRICO Máquina principal 220-240V / 50Hz Marrone YE/GN Giallo COMP. YE/GN T5A/250V Nero FUSIBILE Nero Nero SCHEDA PRINCIPALE Manual de instrucciones Motore del Ventilatore BOBINA ACQUA Nero Pompa Nero DISPLAY L GND Sensore Ambiente Sensore di Livello dell'Acqua Sbrinamento Tubo de drenaje... -
Page 40: Prima Di Iniziare
● PER SICUREZZA È NECESSARIO OSSERVARE SEMPRE LE 1.PRIMA DI INIZIARE SEGUENTI INDICAZIONI ● Questo apparecchio può essere utilizzato da bambini a partire dagli 8 anni di età e da persone con ridotte capacità fisiche, 1.1 DESCRIZIONE DEL PRODOTTO sensoriali o mentali o con mancanza di esperienza e conoscenza, -Questo deumidificatore rimuove l'umidità... -
Page 41: Per La Vostra Sicurezza
● Non salire o sedersi sull'unità. 2. PER LA VOSTRA SICUREZZA ● Non inserire le dita o altri oggetti nell'uscita dell'aria. ● Non toccare l'ingresso dell'aria o le alette di alluminio dell'unità. La vostra sicurezza è la cosa più importante per noi! ●... - Page 42 2.2.4 Verifica della presenza di refrigerante Chiunque sia coinvolto nel lavoro o nell'intrusione L'area deve essere controllata con un rilevatore di refrigerante in un circuito refrigerante deve essere in possesso di un certificato valido rilasciato da appropriato prima e durante il lavoro, per garantire che il tecnico un'autorità...
- Page 43 2.2.8 Controllo delle apparecchiature di Se il guasto non può essere eliminato immediatamente, ma il refrigerazione funzionamento deve continuare, si deve applicare una soluzione temporanea adeguata. In caso di sostituzione di componenti elettrici, questi devono Il guasto deve essere segnalato al proprietario essere idonei allo scopo e conformi alle specifiche.
- Page 44 3. SPECIFICHE 5. DISEGNI Modello ES10327 Fonte di Energia AC 220-240V / 50Hz Calotta superiore Capacità 65 L / Giorno (30°C, 80%RH) Efficienza 2,97 L / kWh Corrente d'Ingresso 3,93 Ampere Pannello di Potenza Nominale in Ingresso 905 Watt controllo Corrente Massima in Ingresso 4,80 Ampere (35°C, 90%RH)
-
Page 45: Operazione
premerlo per impostare l'ora di spegnimento. L'intervallo di 6. OPERAZIONE impostazione dei tempi va da 0 a 24 ore. Se i dati di temporizzazione sono impostati su "00", la funzione di temporizzazione viene annullata e l'indicatore di temporizzazione si spegne. Pulsante Aggiunto: Premere il pulsante Aggiunto per aumentare i dati di umidità... -
Page 46: Installazione
Schermo di Display: Quando la macchina 7. INSTALLAZIONE è in funzione, i dati visualizzati di default sono quelli relativi all'umidità ambientale. Premendo il tasto per 5 secondi si Installare la macchina in uno scantinato, in un'intercapedine o in può passare alla temperatura ambiente. uno spazio abitativo su una superficie piana in una posizione che L'umidità... -
Page 47: Guida Alla Risoluzione Dei Problemi
8. DRENAGGIO AUTOMATICO & MANUTENZIONE 9. GUIDA ALLA RISOLUZIONE DEI PROBLEMI Prima di procedere alla pulizia o alla manutenzione, Problema Probabile Causa Soluzione scollegare l'alimentazione. Codice di Errore: Guasto al sensore di Sostituirlo Drenaggio Automatico: temperatura e umidità Collegare il tubo dell'acqua (lunghezza ≤4m) al foro di drenaggio dell'aria in ingresso dell'acqua tramite un connettore rapido, la macchina si svuoterà... -
Page 48: Schemat Połączeń Elektrycznych
SCHEMAT POŁĄCZEŃ ELEKTRYCZNYCH 10. ELENCO DEGLI IMBALLAGGI Macchina principale 220-240V / 50Hz Niebieski Brązowy Niebieski Żółtozielony Żółty SPRĘŻ. Ż/Z 5A/250V Czarny BEZPIECZNIK Czarny Czarny BEZPIECZNIK Manuale di istruzioni Niebieski Silnik went. WYŚW. OTOCZ. PĘTLA WODA Czarny Pompa Czarny WYŚWIETLACZ L UZ Czujnik Czujnik Czujnik... -
Page 49: Zanim Zaczniesz
● DLA WŁASNEGO BEZPIECZEŃSTWA ZAWSZE 1. ZANIM ZACZNIESZ PRZESTRZEGAJ PONIŻSZYCH WSKAZÓWEK. ● Osoby o ograniczonych zdolnościach fizycznych, sensorycznych lub umysłowych, osoby bez doświadczenia i wiedzy o urządzeniu 1.1.OPIS PRODUKTU oraz dzieci powyżej 8 lat mogą używać go wyłącznie pod Nasz osuszacz powietrza pozwala skutecznie redukować poziom nadzorem, lub też... -
Page 50: Zasady Bezpieczeństwa
● Przed wyjęciem wtyczki z gniazdka najpierw wyłącz urządzenie. 2. ZASADY BEZPIECZEŃSTWA ● Nie wyjmuj wtyczki z gniazdka ciągnąc za przewód zasilający. ● Nie podłączaj urządzenia do przedłużaczy, adapterów i Twoje bezpieczeństwo jest dla nas najważniejsze! przejściówek. ● Nie kładź na urządzeniu żadnych przedmiotów. Przed przystąpieniem do użytkowania urządzenia ●... - Page 51 2.2.4 Sprawdzenie obecności czynnika chłod- Każda osoba dokonująca napraw lub przerwania niczego ciągłości pętli czynnika chłodniczego musi posiadać ważne uprawnienia wydane przez Przed rozpoczęciem prac i w ich trakcie należy sprawdzać odpowiednią instytucję, potwierdzające jej OSTRZEŻENIE obecność czynnika chłodniczego przy użyciu odpowiedniego kompetencje w pracy z czynnikami chłodniczymi.
- Page 52 2.2.8 Kontrola elementów chłodzących W przypadku wystąpienia usterki wpływającej na W przypadku wymiany elementów chłodzących należy bezpieczeństwo nie wolno podłączać do obwodu źródła upewnić się, że części zamienne są odpowiednie do tego celu zasilania, dopóki usterka nie zostanie usunięta. Jeśli usterka nie i odpowiadają...
-
Page 53: Budowa Urządzenia
3. SPECYFIKACJA 5. BUDOWA URZĄDZENIA Model ES10327 Zasilanie AC 220-240V / 50Hz Pokrywa Wydajność dobowa (przy 30°C, 80% WW) 65 L / 24h Wydajność elektryczna 2,97 L / kWh Natężenie na wejściu 3,93 A Panel Moc nominalna na wejściu 905 W sterowania Natężenie maksymalne na wejściu... -
Page 54: Obsługa Urządzenia
Przycisk Plus: Naciskaj przycisk, aby zwiększyć wartość 6.OBSŁUGA URZĄDZENIA docelowej wilgotności lub wydłużyć czas włącze- nia/wyłączenia. W trybie programowania docelowej wilgotności każde naciśnięcie przycisku zwiększa wartość o 5%, w zakresie od 20% do 90%. W trybie programowa- nia timera każde naciśnięcie wydłuża czas opóźnienia o 1 godzinę... -
Page 55: Instalacja Urządzenia
Wyświetlacz: Podczas działania 7.INSTALACJA URZĄDZENIA urządzenia wyświetlacz wskazuje aktualną wilgotność otoczenia. Po naciśnięciu i przytrzymaniu przez 5 Ustawiaj urządzenie na płaskiej, poziomej, stabilnej powierzchni, w sekund przycisku wyświetlacz miejscu, gdzie: wskaże aktualną temperaturę otoczenia, 1.Dostępne jest gniazdko sieci elektrycznej 22-240V. a po upływie 5 sekund powróci do wskazania wilgotności. -
Page 56: Rozwiązywanie Problemów
9.ROZWIĄZYWANIE PROBLEMÓW 8.AUTOMATYCZNY SPUST WODY I KONSERWACJA Problem Możliwa przyczyna Rozwiązanie Przed przystąpieniem do czyszczenia lub konserwacji urządzenia odłącz je od sieci elektrycznej. Komunikat błędu Awaria czujnika Wymień czujnik. Automatyczny spust wody: temperatury i Podłącz wąż (maksymalnie 4 m długości) do otworu odpływowego, wilgotności otoczenia. -
Page 57: Zawartość Opakowania
10.ZAWARTOŚĆ OPAKOWANIA Return / Damage Claim Instructions DO NOT discard the box / original packaging. In case a return is required, the item must be returned in original box. Without this Osuszacz powietrza your return will not be accepted. Take a photo of the box markings. A photo of the markings (text) on the side of the box is required in case a part is needed for replacement. - Page 58 Instructions De Retour / Réclamation De Dommages Istruzioni Per La Restituzione / Reclamo Per Danni NE PAS jeter la boîte/l'emballage d'origine. NON scartare la scatola / confezione originale. Dans le cas où un retour est requis, l'article doit être retourné dans sa boîte Nel caso in cui sia richiesto un reso, l'articolo deve essere restituito nella scatola d'origine.
Need help?
Do you have a question about the ES10327 and is the answer not in the manual?
Questions and answers