Table of Contents
Advertisement
Quick Links
English version
Introduction
• Do not expose the Sweex ADSL 2/2+ Modem/Router Annex A to extreme temperatures. Do not place the device in direct
sunlight or in the direct vicinity of heating elements.
• Do not use the Sweex ADSL 2/2+ Modem/Router Annex A in extremely dusty or moist surroundings.
• Protect the device against powerful shocks or jolts – they may damage the internal electronics.
• Never attempt to open the device yourself – it will cause the warranty to lapse.
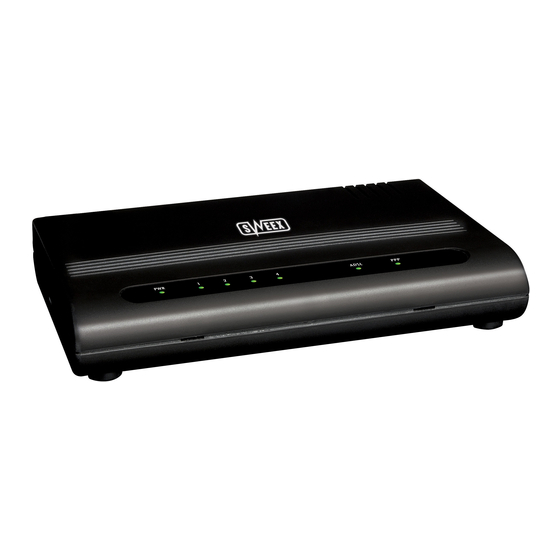
Front or top view of the modem
LED indicators
Status
PWR
Lit
1-4
Lit
1-4
Blinking
ADSL
Lit
ADSL
Regular blinking
ADSL
Lit and blinking fast
PPP
Lit
MO201 / MO201UK Sweex ADSL 2/2+ Modem/Router Annex A
Meaning
Indicates that the modem is switched on.
Indicates that a computer is connected to the relevant port.
Indicates activity between the relevant computer and the modem.
The connection with the ADSL line is ok.
The modem is busy setting up a proper connection or no ADSL is connected to the RJ11
port.
Indicates activity between the computer(s) and the Internet.
Indicates the use of a PPP connection.
Advertisement
Table of Contents

Related Manuals for SWEEX MO201 - QUICK_START_GUIDE

Summary of Contents for SWEEX MO201 - QUICK_START_GUIDE
- Page 1 MO201 / MO201UK Sweex ADSL 2/2+ Modem/Router Annex A Introduction • Do not expose the Sweex ADSL 2/2+ Modem/Router Annex A to extreme temperatures. Do not place the device in direct sunlight or in the direct vicinity of heating elements.
-
Page 2: Side View
ADSL line is ok. 3. Switch on the computer and connect it to the rear of the modem using a network cable (UTP RJ45). You can select any of the ports 1, 2, 3 and 4. The corresponding LED at the front of the modem will be lit. In the event the LED fails to light up, check whether the network cable is properly... - Page 3 Windows Vista In the bottom left of your screen, go to “Start” (Start) “Control Panel” (Control Panel). Click on “View network status and tasks” (View network status and tasks). Left in the column, click on “Manage network connections” (Manage network connections).
- Page 4 English version Right-click “LAN Connection” (LAN Connection) and select “Properties” (Properties). The following screen appears: Now select “Internet Protocol Version 4 (TCP/IPv4)” and click “Properties” (Properties).
-
Page 5: Windows Xp
Select the options “Obtain an IP address automatically” (Obtain an IP address automatically) and “Obtain DNS server address automatically” (Obtain DNS server address automatically). Confirm the settings by clicking “OK”. The network settings have now been configured correctly for Vista. The correct settings for the Internet browser will be discussed later in this manual. -
Page 6: Windows 2000
Select the options “Obtain an IP address automatically“ (Obtain an IP address automatically) and “Obtain DNS server address automatically” (Obtain DNS server address automatically). Confirm the settings by clicking “OK” (OK). The network settings for Windows XP have now been configured correctly. The correct settings for the Internet browser will be discussed later in this manual. -
Page 7: Windows 98Se
Select the options “Obtain an IP address automatically” (Obtain an IP address automatically) and “Obtain DNS server address automatically” (Obtain DNS server address automatically). Click “OK” (OK) twice. The network settings for Windows 2000 have now been configured correctly. The correct settings for the Internet browser will be discussed later in this manual. - Page 8 Under the tab “IP Address” (IP Address), select the option “Obtain an IP address automatically” (Obtain an IP address automatically). Under the tab “Gateway”, the list of “Installed gateways” (Installed gateways) must be empty. If so required, select each gateway and click “Remove”...
- Page 9 Internet browser settings for Windows 98SE, 2000 and XP 1. In order to properly access the modem, the browser settings must be correct. This is easy to check by starting up Internet Explorer and selecting “Tools” (Tools) from the menu bar and then selecting the option “Internet Options” (Internet Options).
- Page 10 This screen displays the current Internet connection and a variety of system information. Setting the Internet Provider (ISP) In order to facilitate the installation process, the Sweex ADSL 2/2+ Modem/Router Annex A disposes of a pre-programmed list of provider settings. To this end, go to the “Setup Wizard”. The following screen appears:...
- Page 11 English version complete the settings. Then click “Next”. After this, some Internet providers require a user name and password to be filled out. Check this with the list of providers further down in this manual or with the details you received from your Internet provider. Alternatively, contact your Internet provider.
-
Page 12: Lan Settings
5. Click on “Add”, then on “Save All” to activate the settings. In some instances, or when a game console is used, you may opt to place a computer or game console entirely outside the firewall. This can be done in the so-called “demilitarized zone” (“DMZ”). This option can be found in the main screen of the port settings (“Port Forwarding” under “Advanced”.) Note however, you no longer take advantage of the protection offered by the firewall of the router. - Page 13 In order to store the settings click “Apply” and then “Save All”. Subsequently, in the next window, click “Apply” once more. Upgrading the firmware of the modem (Update firmware) In order to provide the modem with updates, the so-called ‘firmware’ needs updating. You can do so by going to the menu, then “Tools” and selecting “Update firmware”.
-
Page 14: Warranty
("GPL") or GNU Lesser General Public License ("LGPL"). Most users do not need the GPL source codes at all. It is only required during programming in order to alter the code. The GPL source codes are listed on our website.
Need help?
Do you have a question about the MO201 - QUICK_START_GUIDE and is the answer not in the manual?
Questions and answers