Advertisement
Advertisement
Table of Contents

Related Manuals for Ronix 4400

Summary of Contents for Ronix 4400
- Page 1 ELECTRIC LAWN MOWER 4400...
-
Page 2: Technical Specification
TECHNICAL SPECIFICATION 4400 Model Power 1600W Voltage 220-240V Frequency 50Hz Product dimension 127×48×99CM(Length×width×height) Body Material Blade dimension 380mm Blade material 45# Steel Length of cable VDE bulb in PLUG Cutting width 380mm Number of positions 5 Height position 20-65mm Dust bag size... -
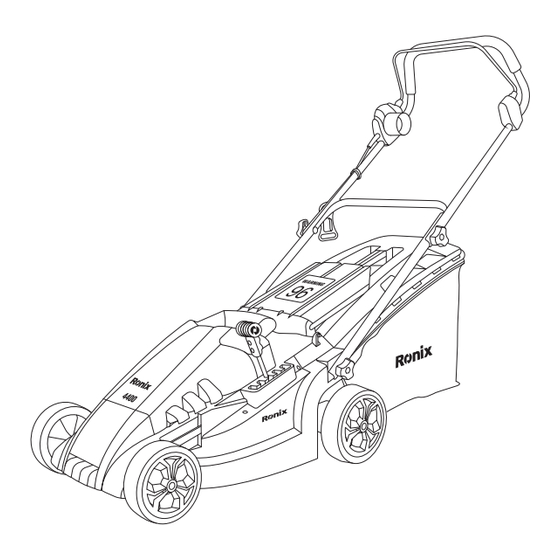
Page 3: Part List
PART LIST Switch Upper handle Knobs A Lower handle Cable holder Grass Collection Height Adjustment Lever Knobs B Wheel NOISE DATA Declared guaranteed sound power level: 93dB (A) The sound intensity level for operator may exceed 85dB(A) and ear protection measures are necessary. SAFETY INSTRUCTIONS GENERAL SAFETY INSTRUCTIONS WARNING! -
Page 4: Work Area
WORK AREA - Keep the work area clean and well lit. Cluttered and dark areas invite accidents. - Do not operate power tools in explosive atmospheres, such as in the presence of flammable liquids, gases or dust. Power tools create sparks, which may ignite the dust or fumes. - Page 5 before plugging in. Carrying power tools with your finger on the switch or plugging in power tools that have the switch on invites accidents. - Remove any adjusting key or wrench before turning the power tool on. A wrench or a key left attached to a rotating part of the power tool may result in personal injury.
- Page 6 - Use the power tool, accessories and tool bits etc., in accordance with these instructions and in the manner intended for particular type of power tool, taking into account the working conditions and the work to be performed. Use of the power tool for operations different from intended could result in a hazardous situation.
- Page 7 pulling the appliance towards to you. Do not operate the appliance on excessively steep slopes. Stop the rotating parts if appliance has to be tilted for transportation. Do not operate the cutting means when crossing surfaces other than grass, and when transporting the appliance to and from the working area. Never operate the appliance with defective guards or shields, or without safety devices, for example deflectors and/or catchers in place.
- Page 8 Denotes risk of personal injury, loss of life, or damage to the tool in case of non-observance Use eye protection Use ear protection Conforms to all regulatory standards in the country in the EU where the products is purchased Wear sturdy, non-slip footwear Read the user manual Use protective gloves Do not expose to rain...
- Page 9 Beware of sharp blades. Blades continue to rotate after the motor is switched off Remove plug from mains before maintenance or if cord is damaged Keep supply flexible cord away from cutting means V-ASSEMBLY INSTRUCTIONS PREPARATION (SEE FIG 1): - Put the cable hook on upper handle. (fig.1a) - Connect upper and lower handles with supplied screws and knobs A.(fig.1b) - Put the washer over the axles, and fit wheels like picture shows,...
- Page 10 CUTTING HEIGHT ADJUSTMENT (PIC.2) NOTE: To obtain the desired cutting height, the front and rear axles are repositioned on the underside of the mower housing. WARNING! Disconnect the mower from the power supply and ensure the blade has stopped coasting before adjusting the height. - To raise the blade height, grasp the height adjustment lever and move it toward the back of mower.
-
Page 11: Connect To Power Supply
VI-OPERATING CONNECT TO POWER SUPPLY WARNING! Before connecting to the mains supply, always check the switch is in off position. Connect the plug into the RCD protected power supply. STARTING CAUTION! Do not start the mower if it is standing in long grass. Press the safety button (A) of the switch assembly and then pull the switch lever (B) against the bar. -
Page 12: To Replace The Blade
- Turn left and move towards position 4 - Repeat the above procedures as required. WARNING! Do not work towards the cable. BLADE MAINTENANCE(FIG.5) - Regularly remove grass and dirt from the blade. - At the beginning of the gardening season, carefully examine the condition of the blade. - Page 13 - Replace the blade - Securely tighten the blade nut. MAINTANCE - Keep all nuts, bolts and screws tight to be sure the lawn mower is in a safe working condition. - Check the catcher frequently for wear or deterioration. - Replace worn or damaged parts for safety.
Need help?
Do you have a question about the 4400 and is the answer not in the manual?
Questions and answers