Table of Contents
Advertisement
Available languages
Available languages
Quick Links
Advertisement
Chapters
Table of Contents

Related Manuals for Cristec BAT-MON-3.5-3


Summary of Contents for Cristec BAT-MON-3.5-3
- Page 1 Manuel utilisateur du contrôleur de batteries BAT-MON-3.5-3 User manual battery monitor BAT-MON-3.5-3 S.A.S. CRISTEC 31 rue Marcel Paul - Z.I. Kerdroniou Est 29000 QUIMPER - FRANCE E-mail: info@cristec.fr https://www.cristec.fr BAT-MON-3.5-3-E...
- Page 2 Manuel d'utilisation en Français Operating Manual in English...
-
Page 3: Table Of Contents
Table des matières PRECAUTIONS – GARANTIE ......................3 PRECAUTIONS (MISE EN GARDE) – DISPOSITIONS RELATIVES A LA SECURITE ....3 GARANTIE .............................. 5 PRESENTATION GENERALE ......................6 PRINCIPE DE FONCTIONNEMENT ..................... 6 FOURNITURE ............................6 INSTALLATION ............................. 7 ECRAN ..............................7 SHUNT .............................. -
Page 4: Precautions - Garantie
à l'utilisation de l'appareil. Ce document est la propriété de CRISTEC ; toutes les informations contenues dans ce document s'appliquent à l’appareil qui l'accompagne. La société se réserve le droit d'en modifier les spécifications sans préavis. - Page 5 Dispositions vis à vis des poussières, du ruissellement et chutes d'eau L'emplacement du contrôleur de batteries doit être choisi pour éviter toute pénétration d’humidité, de liquide, de sel ou de poussières. Ces incidents peuvent générer une dégradation irréversible du matériel. Le contrôleur de batterie ne convient pas pour une installation en extérieur.
-
Page 6: Garantie
Notre garantie ne peut en aucun cas donner lieu à une indemnité. CRISTEC ne peut être tenu pour responsable des dommages dus à... -
Page 7: Presentation Generale
PRESENTATION GENERALE RINCIPE DE FONCTIONNEMENT Le contrôleur de batteries BAT-MON-3.5-3 vous permet de surveiller votre parc de batteries ainsi que le débit de sources d’énergie à courant continu telles que des panneaux solaires. Le contrôleur de batteries ne peut être utilisé... -
Page 8: Installation
INSTALLATION CRAN Installer l’écran dans un endroit protégé, sec et bien visible, afin qu’il puisse être lu à tout moment. Les dimensions de découpe, pour intégration, sont 88 x 88 mm, la profondeur minimale requise est de 40 mm. Au dos de l’écran, un connecteur 3 points permet d’alimenter l’écran et de relier la ligne de communication avec le ou les shunts (fil LIN). -
Page 9: Raccordement Electrique
ACCORDEMENT ELECTRIQUE Les câbles employés doivent être isolés, flexibles et résistants au feu. Ils doivent être multi-conducteurs et de section minimale 1mm². Figure 1 : Installation typique pour contrôler la capacité d’une batterie avec un shunt en position #1 (mode Batterie) Note : Voir l’annexe pour les exemples d’installations dans les cas où... - Page 10 La page Réseau LIN s’ouvre automatiquement quand un nouveau shunt est détecté (cette page est également accessible dans le menu - voir section 4.2). Pour paramétrer un nouveau shunt, suivez les 3 étapes indiquées ci-après: Etape 1 : Si plus d’un shunt est utilisé, déconnecter les alimentations de tous les shunts. Connecter l’alimentation du shunt principal à...
-
Page 11: Menu
MENU (PIN) ROTECTION DU MENU PAR MOT DE PASSE Pour accéder au menu, appuyer sur depuis l’écran principal. Un code PIN va être requis (1234 par défaut). La configuration des shunts du réseau LIN est indiquée dans le menu paramétrage avec leur numéro de série (SN) et leur identifiant (ID) : 1 : Paramétrage contrôleur (voir section 4.2) -
Page 12: Relai
Relai 4.2.1 En fonction du champ “Contrôle Relai”, le contact sec du relai peut être utilisé pour : • Déclencher le démarrage d’un groupe électrogène en fonction de la capacité (SoC) ; ou • Contrôler une source en marche et arrêt en fonction d’une plage de travail en tension. Note : Il est possible de tester le relai en appuyant sur Test Manuel. -
Page 13: Shunt - Mode Batterie
– M HUNT ATTERIE Pour un fonctionnement optimal du contrôleur de la batterie, les données suivantes doivent être renseignées lors de la première connexion: Paramètre Commentaire Sélection Ce nom est associé à un logo utilisé sur la page principale. Démarrage Ba, Démarrage Tri, Démarrage, Auxiliaire, Propulseur, Service, Service I, Service II... -
Page 14: Shunt - Mode Energie
– M HUNT NERGIE Paramètre Commentaire Sélection Ce nom est associé à un logo Alternateur, utilisé sur la page principal. Solaire, Hydrogénérateur, Eolienne Info Numéro de série du shunt, équipement version logicielle et matérielle. Reset Ah Le compteur des Ampères- counter heures (Ah) de la source peut être réinitialisé... -
Page 15: Mode Batterie
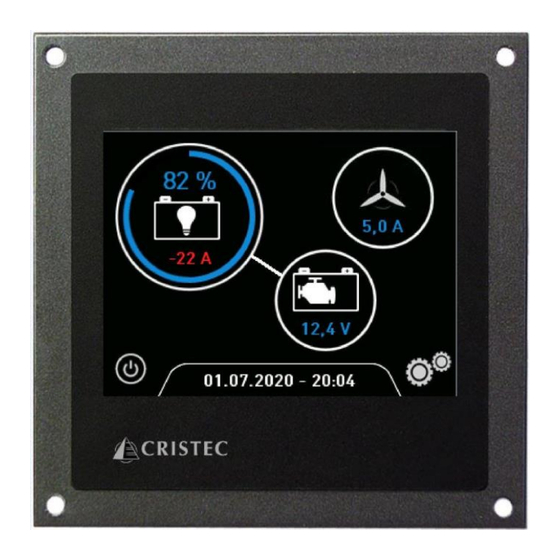
Voir section 5.1.1 Voir section 5.1.2 MODE ATTERIE En mode Batterie, les informations détaillées suivantes sont disponibles : • Batterie Batterie principale (+1) : nom, tension et courant • Capacité Capacité instantanée en pourcentage (%) • Temps restant Temps estimé jusqu’à déclenchement de l'alarme de capacité, ou estimation de la durée de charge, •... -
Page 16: Mode Energie
NERGIE La production d'énergie des 30 derniers jours est disponible sous forme de graphique (comptabilisation des Ah). ERMES ET DEFINITIONS Capacité nominale Pour obtenir une précision raisonnable de l’estimation du temps restant (voir section 5.1) ainsi que de l'affichage du pourcentage de charge, vous devez définir la capacité... -
Page 17: Notes Additionnelles
Cycles de charge Un cycle est comptabilisé lorsque la batterie est déchargée, selon la capacité définie dans la profondeur de cycle (voir section 4.3), puis rechargée. Avec le nombre de cycles, il est possible d'estimer la durée de vie de votre batterie. Les batteries de démarrage standard ont une durée de vie de 30 à... -
Page 18: Mise A Jour Logicielle
MISE A JOUR LOGICIELLE Pour mettre à jour le logiciel du moniteur de batterie, une carte micro SD est requise. Après réception du logiciel, le fichier doit être copié sur la carte micro SD précédemment vide (sans dossier, niveau supérieur). Pour effectuer la mise à... -
Page 19: 10 Annexe
10 ANNEXE Exemples d’installations avec plusieurs shunts : Figure 3 : Installation typique avec un shunt en position #1 en mode Batterie et un shunt en position #2 en mode Energie Figure 4 : Installation typique avec un shunt en position #1 en mode Batterie et deux shunts, en position #2 et #3, en mode Energie Figure 5 : Installation typique avec deux shunts, en position #1 et #2, en mode Batterie et un shunt en position #3 en mode Energie... - Page 20 Contents PRECAUTIONS – WARRANTY ......................20 PRECAUTIONS (WARNING) – PROVISIONS RELATING TO SAFETY ..........20 WARRANTY.............................. 22 OVERVIEW PRESENTATION......................... 23 OPERATING PRINCIPLE ......................... 23 SCOPE OF DELIVERY ..........................23 INSTALLATION............................24 MONITOR ..............................24 SHUNT ............................... 24 ELECTRICAL CONNECTION ......................... 25 LIN NETWORK SET-UP ...........................
-
Page 21: Precautions - Warranty
PRECAUTIONS – WARRANTY This document applies to battery monitor BAT-MON-3.5-3. It is also available in colour on our website www.cristec.fr. The manual is intended for users, installers and equipment maintenance staff. Please read this manual carefully before working on the appliance. This manual should be kept safely and consulted before attempting any repairs because it contains all the information required to use the appliance. - Page 22 Precautions regarding dust, seepage and falling water The battery monitor should be located so as to prevent penetration of damp, liquid, salt and dust, any of which could cause irreparable damage to the equipment and be potentially hazardous for the user. The battery monitor is not suitable for outdoor installation.
-
Page 23: Warranty
Our warranty on no account provides for any form of compensation. CRISTEC shall not be held liable for damage incurred as a result of using the battery charger. -
Page 24: Overview Presentation
PERATING PRINCIPLE With the battery monitor BAT-MON-3.5-3 you are able to monitor your complete battery system and the current flow of DC energy sources such as solar panels. The battery monitor can only be operated in conjunction with the shunt reference SHUNT-300-3.5-3 at low voltage DC 8-64V. -
Page 25: Installation
INSTALLATION ONITOR Install the battery monitor in a protected, dry and well-visible place so that it can be read at any time. The mounting cut-out is 88 x 88 mm and the required minimum depth is 40 mm. On the back, there is a 3-poles terminal for powering the monitor and the communication line to the shunts (single wire). -
Page 26: Electrical Connection
LECTRICAL CONNECTION The cables employed must be insulated, flexible and fire-resistant. It must be multi-conductor cables with minimum section of 1mm². Figure 1 : Typical installation to monitor the battery capacity with shunt #1 (Battery Mode) Note : See appendix for multiple shunt installations IN NETWORK SET Up to three shunts can be connected to the battery monitor. - Page 27 The LIN-Network page opens automatically when a new shunt is detected (this page is also accessible in the menu - see section 4.2). To add a new shunt, follow the 3 steps procedure detailed below: Step 1: If more than one shunt is used, disconnect all shunts power supplies. Connect the supply of the main Battery mode shunt only (In our case SN is 7029).
-
Page 28: Set-Up
SET-UP PIN C ODE TO ACCESS SET To access setup, press on the main screen. A PIN code is required to access setup (by default 1234). The configuration of the shunts is displayed in the setup menu with serial (SN) and identification (ID) number: 1: Monitor settings (see section 4.2) 2: Shunt #1 settings... -
Page 29: Relay
Relay 4.2.1 According to “Relay Control” field, the potential free relay output can be used to : • Either control of a gen-set depending on the SoC (state of charge) • Or control a switch based on voltage to switch On and Off a source according to an operating window. Note : It is possible to test the relay function by pressing Manual test. -
Page 30: Shunt - Battery Mode
HUNT ATTERY For proper operation of the battery management, the following data must be set during first connection: Data Comment Range Name This name is associated to a logo displayed on the main page Start Stb, Start port, Starter, Aux, Bow, House, House I, House II Battery type The battery type shall be selected. -
Page 31: Shunt - Energy Mode
HUNT NERGY Data Comment Range Name This name is associated to a logo Alternator, Solar, displayed on the main page Hydro, Wind Device Serial number of the shunt, Info software and hardware version. Reset Ah The total ampere hour (Ah) counter counter value for the source can be read and reset (PIN Code... -
Page 32: Battery Mode
See section 5.1.1 See section 5.1.2 ATTERY MODE After pressing the circle in Battery mode, specific battery details are shown: • Battery Main battery (+1) name, voltage and current • Capacity Actual capacity in percent (%) • Time remaining Expected remaining time until the capacity alarm triggers,or expected charging time during charging •... -
Page 33: Energy Mode
NERGY MODE After pressing the circle in Energy mode, energy harvest is graphically displayed over the last 30 days. So you can easily see how much energy (Ah) the charging source supplied to your battery system. ERMS AND DEFINITIONS Nominal (or rated) capacity To obtain a reasonable accuracy of the remaining time (see section 5.1) as well as the percentage charge display, the capacity of the battery to be monitored must be set. -
Page 34: Additional Notes
Charging cycles One cycle is counted when the battery has been discharged by the capacity set in the cycle depth (see section 4.3) and then recharged. With the number of cycles, you can estimate the life of your battery. Standard starter batteries have a lifespan of 30-50 cycles, while cycle batteries have a lifespan of up to 300 cycles if a modern battery charger is used. -
Page 35: Software Update
SOFTWARE UPDATE To update the software of the battery monitor, a micro-SD card is required. After receiving the software, the file must be copied to the previously empty micro-SD card (without folder, top level). To update, insert the micro-SD card into the micro-SD card slot on the back of the monitor and disconnect the power supply from the battery monitor. -
Page 36: Appendix
APPENDIX Typical installation with multiple shunts: Figure 3 : Typical installation with shunt #1 in Battery Mode and shunt #2 in Energy Mode Figure 4 : Typical installation with shunt #1 in Battery Mode and shunt #2 and #3 in Energy Mode Figure 5 : Typical installation with shunt #1 and #2 in Battery Mode + shunt #3 in Energy Mode...
Need help?
Do you have a question about the BAT-MON-3.5-3 and is the answer not in the manual?
Questions and answers