
Subscribe to Our Youtube Channel
Related Manuals for Meditech HEG neuro Connector


Summary of Contents for Meditech HEG neuro Connector
- Page 1 HEG neuro Connector Instructions for use ProComp not included in scope of delivery ®...
- Page 2 Preface This HEG neuro Connector (referred to as Connector in this manual) establishes the con- nec on between HEG neuro and a ProComp® from Thought Technology. This allows the HEG neuro to also be integrated as a sensor in the professional work with BioGraph® Infi ni...
-
Page 3: Table Of Contents
Contents Note In these instruc- Safety instruc ons ......4 ons, terms are Connec ng the Connector ....5 used as follows: Establishing a connec on ....8 Connector = HEG Training start ........10 neuro Connector End of training .......12 ProComp®: Ques oning and troubleshoo ng ..13 representa ve for Technical Data ........16 all encoders from... -
Page 4: Safety Instruc Ons
Safety instruc ons The connector was developed for connec ng the HEG neuro to a ProComp®. Use for other purposes is not intended and therefore not permi ed. Cau on Protect the connector from rain / water drops and high humidity. Note Do not tear at the cable. -
Page 5: Connec Ng The Connector
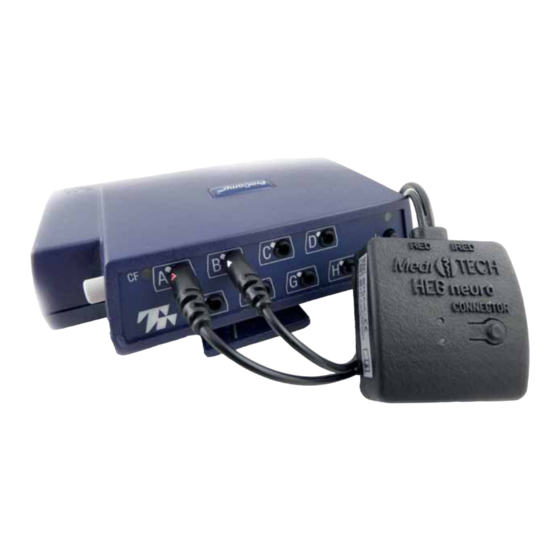
Connec ng the connector To connect the HEG neuro to a ProComp® it is necessary to ‚interconnect‘ the connector. 1. Determine in BioGraph® Infi ni at which channels the HEG input signals are expected. Example: Here, the sensor cables are expected at chan- nels G and H. - Page 6 2. Insert both plugs into the corresponding chan- nel sockets of the ProComp® which is switched on and connected to the computer. The plugs are each marked with an arrow. In addi on, there is a protrusion there. This must be inser- ted into the recess of the channel socket.
- Page 7 3. Press Repeat in BioGraph® to update the sensor check in the channel set. The error message should now have disappeared. Note: If BioGraph shows the adjacent informa on in the ‚Wrong Sensor Type‘ fi eld, the plugs have been inserted the wrong way round.
-
Page 8: Establishing A Connec On
Establishing the connec on A er you have connected the connector (it should now fl ash green) to the ProComp®, it must be connected to the HEG neuro. 1. Place the connector close to the HEG neuro. 2. Switch on the HEG neuro. To do this, press the key on the HEG neuro. - Page 9 A er a few seconds, the HEG neuro and the connector ‚fi nd each other‘. You can recog- nize this by the fact that the upper lamp on the connector lights up con nuously green. In addi on, the lower lamp starts to glow orange.
-
Page 10: Training Start
Training start A er the connec on between the HEG neuro and the con- nector has been established, the HEG neuro can be a ached to the head of the person being trained. Follow the instruc- ons in the HEG neuro manual. 1. - Page 11 2. Now start the training session in BioGraph®. Important: Keep to the order of the steps. Then, right at the beginning of the training session, measured values of the HEG neuro will already be taken into account.
-
Page 12: End Of Training
End of training To end a training session, please follow the sequence of the- se steps: 1. Stop the training session in BioGraph®. 2. Switch off the connector. This ends the measurement on the HEG neuro at the same me. 3. -
Page 13: Ques Oning And Troubleshoo Ng
Ques ons and troubleshoo ng Error Suggested solu on The connector It is possible that the Connector and fl ashes green a er the HEG neuro have already connec- being plugged ted without you no cing. into the ProComp and then lights up orange. - Page 14 The HEG neuro Are there possibly several HEG neuros does not light up, in the vicinity? Perhaps the connector although the con- has connected with another HEG nector lights up neuro. The range is about 10 m and orange. can also penetrate walls. Or is your HEG neuro possibly not suffi...
- Page 15 When using two When re-establishing the connec- HEG neuros, the ons, make sure that they are esta- connec on fails. blished one a er the other. Check the What now? control of the fi rst HEG neuro before establishing the second connec on. When I press the Is the connector connected to the Pro- key on the connec-...
-
Page 16: Technical Data
Technical data Power supply 7.2 V via cable to the ProComp® Opera ng current 9 – 13 mA Sampling rate 64 sps via wireless connec on Connec ons Cable to the ProComp® Dimensions 5 x 4.5 x 1.5 + cable (21 cm) (W x H x D in cm) Weight 25 g... - Page 17 Opera on Ambient temperature +10 °C up to +40 °C Rela ve humidity 30% up to 75% Air pressure 700 - 1,060 hPA Storage and transport Ambient temperature + 10 °C up to +50 °C Rela ve humidity 20 % up to 95 % Air pressure 700 - 1,060 hPa...
-
Page 18: Storage And Care
The plas c housing is then more durable. • Dust can be removed with a dry cloth or a very so brush. Note The connector housing is glued and not intended to be opened. Opening it is not permi ed and will void any claims against MediTECH. -
Page 19: Disposal
Disposal The connector consists of plas cs and electronic components and can be disposed of or recycled accordingly. The connector does not contain a ba ery or re- chargeable ba ery. Contact your local recycling company to fi nd out what dis- posal is required for these components. -
Page 20: Contact
Contact and further informa on MediTECH Electronic GmbH Langer Acker 7 D-30900 Wedemark Phone: +49 (0) 5130 977780 Mail: service@meditech.de Internet: www.meditech.de www.meditech.de/neurofeedback GBA-EN – HEG neuro Connector – V1 – 21.09.2022...
Need help?
Do you have a question about the HEG neuro Connector and is the answer not in the manual?
Questions and answers