
Related Manuals for Icy Box IB-1817MCT-C31


Summary of Contents for Icy Box IB-1817MCT-C31
- Page 1 Quick installation guide IB-1817MCT-C31 M.2 enclosure for NVMe & SATA SSDs Schnellinstallationsanleitung IB-1817MCT-C31 M.2 Gehäuse für NVMe & SATA SSDs...
-
Page 2: Safety Information
Safety information Please read carefully the following information to prevent injuries, damage to material and device as well as data loss: Warning levels Signal words and safety codes indicate the warning level and provide immediate information in terms of the probability of occurrence as well as the type and severity of the consequences if the measures to prevent hazards are not complied with. - Page 3 Safety information 4. Hazards caused by very small parts and packaging Risk of suffocation WARNING Risk of death by suffocation or swallowing • Keep small parts and accessories away from children • Store/dispose of plastic bags and packaging in an area that is inaccessible to children •...
- Page 4 Sicherheitshinweise Zur Vermeidung körperlicher Schäden, sowie von Sach-, Geräteschäden und Datenverlust beachten Sie bitte folgende Hinweise: Warnstufen Signalwort und Sicherheitszeichen kennzeichnen die Warnstufe und geben einen sofortigen Hinweis auf Wahrscheinlichkeit, Art und Schwere der Folgen, wenn die Maßnahmen zur Vermeidung der Gefahr nicht befolgt werden. warnt vor einer unmittelbar gefährlichen Situation, die zum GEFAHR Tod oder zu schweren Verletzungen führen wird.
- Page 5 Sicherheitshinweise • keine Gegenstände auf dem Gerät/Netzteil abstellen 4. Gefahren durch Kleinstteile und Verpackung Erstickungsgefahr WARNUNG Lebensgefahr durch Ersticken oder Verschlucken • Kleinteile, Zubehör für Kinder unzugänglich verwahren • Plastiktüten und Verpackung für Kinder unzugänglich verwahren/entsorgen • Kleinteile und Verpackungen nicht in Kinderhände geben 5.
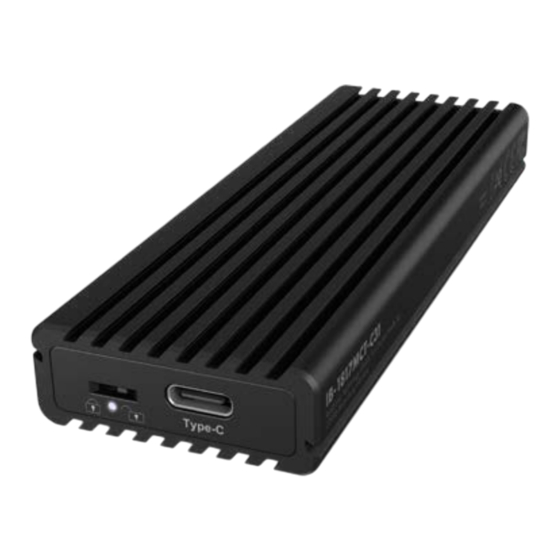
- Page 6 Quick installation guide IB-1817MCT-C31 Product overview Status LED for power, access & write protection Switch for write protection USB Type-C host connection ® Slide button System requirements One free USB 3.1 (Gen 2) Type-C or Type-A port on your host computer ®...
- Page 7 Quick installation guide IB-1817MCT-C31 SSD Installation Attention: During the SSD installation the cabling of the enclosure has to be disconnected from the computer or notebook. Push the slide button to unlock the inner frame. Slide out the inner frame to be...
- Page 8 Quick installation guide IB-1817MCT-C31 Place your SSD carefully with the connector side first and at an angle of about 30° into the M.2 slot so that it fits without resistance. Now place the M.2 rubber mount on the semicir- cular notch at the end of the M.2 SSD and carefully press it...
- Page 9 Quick installation guide IB-1817MCT-C31 Place the delivered thermal pad directly onto the M.2 SSD. Place the supplied heat sink on the thermal pad and carefully press it down. Hint: Make sure that the heat sink is inserted in the correct direction.
- Page 10 Type-A adapter of the USB cable to your host ® computer • Once the IB-1817MCT-C31 has been plugged in correctly the LED lights up white! • The external enclosure can be connected or disconnected while the computer is running.
- Page 11 Schnellinstallationsanleitung IB-1817MCT-C31 Produktübersicht Status LED für Betrieb, Zugriff & Schreibschutz Schalter für Schreibschutz USB Type-C Hostanschluss ® Schiebeschalter Systemanforderungen Ein freier USB 3.1 (Gen 2) Type-C oder Type-A Anschluss an Ihrem ® Hostcomputer. Verpackungsinhalt • 1x IB-1817MCT-C31 • 1x Handbuch •...
- Page 12 Schnellinstallationsanleitung IB-1817MCT-C31 SSD Installation Achtung! Während des SSD Einbaus muss die Verkabelung des Gehäuses vom Computer oder Notebook getrennt sein. Schieben Sie den Schieber zur Seite, um den Innenrahmen zu entriegeln. Schieben Sie den Innenrahmen heraus, um die SSD einbauen...
- Page 13 Schnellinstallationsanleitung IB-1817MCT-C31 Setzen Sie die SSD vorsichtig mit der Anschlussseite voran und in einem Winkel von ca. 30° in den M.2 Sockel, sodass sie sich ohne Wider- stand einfügt. Setzen Sie nun die M.2 SSD Gummihalterung auf die halbrunde Kerbe am Ende der M.2 SSD und...
- Page 14 Schnellinstallationsanleitung IB-1817MCT-C31 Setzen Sie das mitgelieferte Wärmeleitpad direkt auf die M.2 SSD auf. Setzen Sie den mitgelieferten Kühlkörper auf das Wär- meleitpad und drücken Sie ihn vorsichtig an. Hinweis: Achten Sie darauf, dass der Kühlkörper in der richtigen Ausrichtung aufgelegt wird.
- Page 15 • Verbinden Sie den Type-C - oder Type-A-Adapter des USB Kabels ® mit Ihrem Hostcomputer. • Wenn das IB-1817MCT-C31 korrekt eingesteckt ist, leuchtet die LED weiß! • Das externe Gehäuse kann bei laufendem Computer angeschlossen oder getrennt werden. • Bitte warten Sie das Ende von Lese-/Schreibvorgängen ab, bevor Sie das Gerät abschließen, um Datenverluste zu vermeiden.
- Page 16 Nos produits et emballages se recyclent, ne les jetez pas! Trouvez où les déposer sur le site www.quefairedemesdechets.fr Copyright 2021 by RaidSonic Technology GmbH. All Rights Reserved © The information contained in this manual is believed to be accurate and reliable. RaidSonic Technology GmbH assumes no responsibility for any errors contained in this manual.
Need help?
Do you have a question about the IB-1817MCT-C31 and is the answer not in the manual?
Questions and answers