Table of Contents
Advertisement
Quick Links
AMPLIFIER, TRANSFORMER, AND POWER REQUIREMENTS:
1. CAUTION: For reasons of safety, an AC mains operated amplifier used with an underwater speaker
must meet the following minimum requirements: 1) UL or ETL label on the rear panel, 2) Grounded
3-prong power cord, 3) Proper output rating (wattage & ohms) to match Lubell transformer box
rating, 4) Class AB output circuitry recommended for stability. The amplifier and transformer box
must be used in a dry area at least 10' away from the pool, and must be connected to a GFCI
protected AC outlet.
2. CAUTION: For reasons of swimmer safety and proper amplifier operation, the Lubell underwater
speaker must be used with the correct Lubell Isolation Transformer Box. The Lubell LL916C
(caged) and LL916H (harnessed) underwater speakers are rated at 20 volts rms maximum, and
are fitted with a Conxall 3182-3PG-524 3-pin (not XLR) connector that connects to mating Conxall
4182-3SG-300 connector on Lubell transformer boxes. Pin 3 hot. Warning: Do not exceed
wattage rating printed on the Lubell transformer box label, and use/store box in dry location only.
CHOOSE THE CORRECT LUBELL TRANSFORMER BOX:
Please call us for assistance in choosing the correct transformer, speaker, and amp for your application.
AC102C: For connection to
amplifiers up to 200 watts @ 8 ohms (40 Vrms) per channel. Lowers amplifier voltage to 20 volt rating
of LL916C or LL916H underwater speaker. Connect two AC102C boxes / LL916C (one per channel)
to the Crown Xli 800 for full 50 meter Olympic pool coverage.
AC202C: Included with the
Lubell approved amplifiers
Vrms). 1/4" mono phone jack input; Includes HOSA SKJ-600 2 ft speaker cable with ¼ TS plugs.
AC205B: Included with the Lubell 9484 in-wall pool speaker kit. 25V screw terminal input, 20V screw
terminal output for connection to LL916-XXX underwater speaker. For connection to UL or ETL listed
commercial sound amplifier having 25V constant voltage output, allowing 37.5 watts power
consumption for each LL916 / AC205C connected in parallel. Use one Russound A2100 amplifier (8
ohm mode) to power one LL916-XXX speaker per channel (2 total), and link multiple amplifiers for
additional speaker pairs. Also available is InterM A-120 powered mixer or Bosch PLE-1P120-US
power amplifier for 1-3 speakers, and PLE-1P240-US power amplifier for 4-6 speakers.
AC205C: Same as above except ¼ in mono phone jack input and Conxall 4182-3SG-300 output for
connection to one Lubell LL916C or LL916H underwater speaker.
AC203E Circuit Master: For connection to the 4 ohm output (21.9 Vrms) of the InterM A-120 mixer
amplifier. Has single Conxall 4182-3SG-300 output connector for connection to mating Conxall
3182-3PG-524 on the Lubell LL916C or LL916H underwater speaker. Also has one 8 ohm air
speaker output jack (1/4") with autoformer volume control for connection to the EV ZX1 air speaker.
Set volume of underwater speaker using amplifier master volume control, then set volume of air
speaker using autoformer volume control on box.
AC211 Circuit Master: Same as above except 200 watt 8 ohm input rating. For a powerful 50 meter
pool competition system, connect two AC211 boxes (one per channel) to the Crown Xli 800 power
amplifier. Connect one LL916C-100 underwater speaker and one EV ZX1-90 air speaker to each
AC211 box, and position speakers at the ¼ and ¾ positions down the length of the 50 meter pool.
Portable LL916C & LL916/H Underwater Speaker Instructions
SPEAKER OUT
Chiayo StageMan and APEXPro CAWSS sound systems, or for connection to
rated up to 50 watts @ 8 ohms (20 Vrms), or 100 watts @ 4 ohms (20
connector on UL listed powered mixers and power
Advertisement
Table of Contents

Related Manuals for Lubell Labs LL916C


Summary of Contents for Lubell Labs LL916C
- Page 1 200 watts @ 8 ohms (40 Vrms) per channel. Lowers amplifier voltage to 20 volt rating of LL916C or LL916H underwater speaker. Connect two AC102C boxes / LL916C (one per channel) to the Crown Xli 800 for full 50 meter Olympic pool coverage.
- Page 2 6’ -15' (1.83 -4.57 meters); Tie rope to gutter hook or place caged speaker on pool bottom. 7. Connect 3-pin connector on end of LL916C/H underwater speaker cord to mating 3-socket connector on transformer box (located on equipment table). Cover cord with cord protector to prevent tripping over cord.
- Page 3 APEX PRO Operation manual Portable Wireless PA System CHIAYO ELECTRONICS CO., LTD.
- Page 4 APEX PRO Portable Wireless PA System Important safety instructions ⚫ Read all of the instructions before the product is operated. ⚫ Keep these instructions well for future reference. ⚫ Follow all of the warnings and instructions when installing, setting up and using the product. ⚫...
- Page 5 Operation manual Warning Please read and follow the instructions in this manual thoroughly to obtain optimum results from this unit. We also recommend that you keep this manual handy for future reference. Safety Precautions ⚫ Be sure to read the instructions in this section carefully before use. ⚫...
-
Page 6: Table Of Contents
APEX PRO Portable Wireless PA System INDEX 1. Instruction .......................... 4 1-1 In the box ........................4 1-2 Optional related products ..................... 4 1-3 Parts and functions ...................... 5 1-4 Charging the battery ....................6 1-5 Module compartment ....................7 1-6 Connection with external audio sources ................ -
Page 7: Instruction
Instruction 1. Instruction Congratulations and thank you for purchasing this all-in-one portable sound system. To ensure a trouble-free operation, please read the manual thoroughly to fully understand its controls and functions. Module compartment The rear panel of these portable sound systems is divided into 3 sections: 1. -
Page 8: Parts And Functions
APEX PRO Portable Wireless PA System 1-3 Parts and functions MIC/LINE ② volume control REVERB control MIC/LINE ① volume control REVERB push MIC/LINE ① button level switch MIC/LINE ② level switch MIC/LINE input ① (combo) MIC/LINE input ② VOICE PRIORITY push button (combo) EXTERNAL SPEAKER... -
Page 9: Charging The Battery
Instruction BLUETOOTH pairing indicator BLUETOOTH power push button audio link output audio input of computer DC IN DC input jack (30V/4A) battery indicator charging indicator power switch 1-4 Charging the battery This amplifier uses either two lead-acid batteries or one lithium battery. The battery power is leveled from 25%, 50%, 75% and FULL. -
Page 10: Module Compartment
APEX PRO Portable Wireless PA System 1-5 Module compartment For receiver / For receiver module repeater module For receiver / MP3 For receiver module module For module bracket MB-50 which offers 2 slots for adding receiver / MP3 module. 1-6 Connection with external audio sources WIRED MIC / INSTRUMENT TABLET / PHONE PASSIVE SPEAKER... -
Page 11: Settings And Operations
Settings and Operations 2. Settings and Operations 2-1 Using the wired microphone (MIC 1, MIC 2) Plug a wired microphone with a 6.3mm or XLR connector to MIC 1 or MIC 2. Slide MIC/LINE switch to MIC position. Turn on master POWER and then adjust its individual volume control to a desired level. TREBLE / MIDDLE / BASS EQUALIZER (refer to P.17) and REVERB (refer to P.18) levels can be adjusted individually. -
Page 12: Using The Wireless Receiver
APEX PRO Portable Wireless PA System 2-2 Using the wireless receiver 2-2-1 Parts and functions Diversity A/B Transmitter battery RF signal meter Channel antenna power Audio signal meter IR sensor area SYNC Power switch / PWR/VOL volume control Frequency DOWN button UP button SET button IrDA synchronization button 2-2-2 Channel synchronization of the receiver and transmitter 10~30cm... -
Page 13: Channel Scanning
Settings and Operations 2-2-3 Channel scanning For an interference- free operation, a cleaner channel might be necessary if the current one receives too much interference. To operate the scanning: Press ▼(down) or ▲(up) button to make Hold SET button until this icon the frequency icon appear on the flashes to denote readiness for setting. -
Page 14: Volume And Other Settings
APEX PRO Portable Wireless PA System 2-2-5 Volume and other settings Turn on master POWER and then adjust its individual volume control to a desired level. SYNC PWR/VOL TREBLE / MIDDLE / BASS EQUALIZER (refer to P.17) and REVERB (refer to P.18) levels can be adjusted individually. -
Page 15: Using The Electronic Instrument (Mic 1, Mic 2)
Settings and Operations 2-3 Using the electronic instrument (MIC 1, MIC 2) Plug an electronic guitar / keyboard with a 6.3mm or XLR connector to MIC 1 or MIC 2. Slide MIC/LINE switch to LINE position. Turn on master POWER and then adjust its individual volume control to a desired level. TREBLE / MIDDLE / BASS EQUALIZER levels can be adjusted individually. -
Page 16: Using The Electronic Instrument (Line In)
APEX PRO Portable Wireless PA System 2-4 Using the electronic instrument (LINE IN) Plug an electronic guitar / keyboard with a 6.3mm or XLR connector to the COMBO jack of LINE IN. Turn on master POWER and then adjust its individual volume control to a desired level. TREBLE / MIDDLE / BASS EQUALIZER levels can be adjusted individually. -
Page 17: Music Audio Input (Line In)- Smart Phone / Tablet / Mp3 Player
Settings and Operations 2-5 Music audio input (LINE IN)- Smart phone / tablet / MP3 player Plug the audio cable a 3.5mm phone plug to the 3.5mm jack of LINE IN. Turn on master POWER and then adjust its individual volume control to a desired level. TREBLE / MIDDLE / BASS EQUALIZER levels can be adjusted individually. -
Page 18: Music Audio Input (Digital In)- Computer/Notebook
APEX PRO Portable Wireless PA System 2-6 Music audio input (DIGITAL IN)- Computer/notebook Use a USB cable to connect the unit and your PC/Notebook to use APEX PRO as the speaker of your device. Turn on master POWER and then adjust master volume control to a desired level. TREBLE / MIDDLE / BASS EQUALIZER levels can be adjusted individually. -
Page 19: Operating Bluetooth Receiver (Bluetooth)
Settings and Operations 2-7 Operating BLUETOOTH receiver (BLUETOOTH) Turn on master POWER and then press the SWITCH button 3 seconds to turn on the BLUETOOTH receiver. The pairing indicator will flash green. flash GREEN Approximately 9 seconds later, the pairing indicator flashes green and red, which means it is ready for pairing. -
Page 20: Equalizer For Wired And Wireless Microphone And Music
APEX PRO Portable Wireless PA System Important ◼ The BLUETOOTH automatically turns off after no pairing for 5 minutes. ◼ Press SWITCH button for disconnection and getting ready for new pairing. ◼ The BLUETOOTH can memorize and automatically connect to last-paired device. 2-8 EQUALIZER for WIRED and WIRELESS MICROPHONE and MUSIC EQUALIZER adjustment is actually used to increase or reduce the high/medium/low frequency component of the speaker's restored sound. -
Page 21: Voice Priority
Settings and Operations 2-9 VOICE PRIORITY Voice Priority operation is only necessary when CD/USB/MP3 is playing. When the Voice Priority switch is ON, the ducking function will be activated. While the music is playing, a voice input from either a WIRED or WIRELESS MICROPHONE will temporarily override and lower the volume of the background music and voice could be heard more clearly. -
Page 22: Application
APEX PRO Portable Wireless PA System 3. Application 3-1 Active audio link: APEX PRO to APEX PRO APEX PRO operates as the MASTER as well as companion unit in an audio link (wired) configuration. Connect one APEX PRO after the other via the COMBO LINE IN and ACTIVE OUT jacks. -
Page 23: Active Audio Link: Apex Pro To Apex Slave
Application 3-2 Active audio link: APEX PRO to APEX SLAVE APEX PRO operates as the MASTER unit in an audio link (wired) configuration with active companion powered speakers APEX SLAVE . Connect the APEX PRO (master unit) and APEX SLAVE (active companion powered speakers) via ACTIVE OUT and ACTIVE IN jacks. -
Page 24: Wireless Audio Link: Repeat All Audio To Linked Apex Pro / Apex Slave
APEX PRO Portable Wireless PA System 3-3 Wireless audio link: repeat all audio to linked APEX PRO / APEX SLAVE APEX PRO operates as the MASTER unit in a wireless audio link with other APEX PRO or active companion powered speakers APEX SLAVE . The repeater module RP-5100M of master APEX PRO can transmit all audio signals, including wired/wireless microphone, music, instrument etc., to other units installed with receiver module. -
Page 25: Music Audio Input (Aux In)- Smart Phone / Tablet / Mp3 Player
Application 3-3-3 Music audio input (AUX IN)- Smart phone / tablet / MP3 player Connect your device to the 3.5mm jack of AUX IN with a 3.5mm 3-pole stereo audio cable. Use a mini screw driver to adjust the volume of the input audio. ... - Page 26 APEX PRO Portable Wireless PA System Install a repeater module RP-5100M on the master APEX PRO. Set the channel/frequency on the repeater module which will be used to transmit signals to other units. The channel/frequency must be different from other modules on all master and companion units.
-
Page 27: More Extension
Application 3-4 More extension To reach wider coverage, the companion unit APEX PRO / APEX SLAVE can serve as SUB- MASTER to transmit signals to SUB-COMPANION units. Important: Please do not set the SUB-COMPANION as next MASTER in order to guarantee best sound quality. -
Page 28: Connecting A Passive Companion Speaker
APEX PRO Portable Wireless PA System 3-5 Connecting a passive companion speaker Plug the passive companion speaker’s audio cable with a 6.3mm connector to the speaker input socket of APEX SP or another 4~8Ω load speaker. Max cable length less than 20m. -
Page 29: Installing Or Replacing A Receiver/Repeater/Mp3 Module
Installing or replacing a receiver/repeater/MP3 module 4. Installing or replacing a receiver/repeater/MP3 module There are four slots above the control panel and two on MB-50 module bracket for installing optional modules which includes receiver, repeater and MP3 recorder modules. Use a Phillips-head screwdriver (not included) to remove the screws of the blank cover panel or current module’s panel. -
Page 30: Operation Of The Storage For Transmitters And Accessories
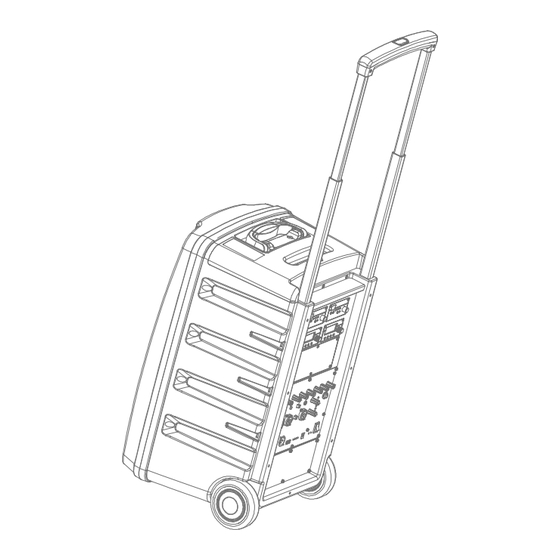
APEX PRO Portable Wireless PA System 5. Operation of the storage for transmitters and accessories Open the lid. Be careful of the gap between the trolley handle and the lid. Slots handheld transmitters. Please make the handheld’s power switch face ❶... -
Page 31: Faq & Useful Operation Tips
FAQ & useful operation tips 6. FAQ & useful operation tips How to adjust the best volume? For CHIAYO PA system with a master volume control, turn the master volume to 12 o'clock and then gradually adjust the volume of audio inputs (microphone, CD, MP3, etc.) from minimum to an appropriate level. - Page 32 APEX PRO Portable Wireless PA System Is it possible to record the sound of Microphone or external devices when using APEX PRO? Yes. Install an MP3 recorder player (DPR-500m) on APEX PRO to obtain recording function. Does a wireless amplifier need to be installed with a tripod? What is the ideal height for Amplifier above the ground? Higher position of a wireless PA will be helpful for signal reception.
-
Page 33: Maintenance-Free Lead-Acid And Lithium Batteries
Maintenance-free Lead-acid and Lithium batteries 7. Maintenance-free Lead-acid and Lithium batteries Cautions when using the battery 1. Lead-acid batteries/lithium batteries have no memory effect. Please charge them up immediately after each use, no matter how much power they left. If the battery is not charged for a long time, it may cause the battery to be over-discharged and damaged, shortening the battery life or even making it impossible to charge normally. - Page 34 CHIAYO ELECTRONICS CO., LTD. Http://www.chiayo.com.tw | Email: sales@chiayo.com.tw Office: 30, Lane 27, Section 4, Jen-Ai Road, Taipei 10685, Taiwan Tel: 886-2-27415741 | Fax: 886-2-27525242 Factory: 88, Chung-Hsiao Street 2, Chiayi 60080, Taiwan Tel: 886-5-2711000 | Fax: 886-5-5767611 12I1395B...
Need help?
Do you have a question about the LL916C and is the answer not in the manual?
Questions and answers