Table of Contents
Advertisement
Quick Links
Advertisement
Table of Contents

Subscribe to Our Youtube Channel
Related Manuals for Godrej RHINO


Summary of Contents for Godrej RHINO
- Page 1 RHINO USER MANUAL...
- Page 2 Safety of your valuables becomes paramount in today’s fast paced and highly uncertain times. Precisely the reason we, at Godrej Security Solutions, have a range of Home Lockers that take care of your exact safety requirements. What’s more, these lockers are 10X stronger and come with various cutting-edge safety features like Ultra Key, Digital or Biometric locking.
- Page 3 100X Stronger USB & KEY than a Wooden for emergency Cupboard access Anchoring Electronic provision for controlled lock installation...
-
Page 4: Table Of Contents
CONTENT Package Contents....................01 Important Instructions..................01 Know your Product....................02 Home Mode Operation...................03 Trick to change the Master Code................04 Hot Key........................05 Testing the Battery Level..................05 Simple Program to Access the Programming............06 In Case of Emergency use the Override Key............08 USB Access......................08 Error Messages....................09 Replacing the batteries...................10 Tools Required......................11 Mounting.........................11... -
Page 5: Package Contents
DO NOT overstuff the locker or you can damage the motor mechanism or the contents. For security purposes, you should change the factory default code i.e. Personal Code and Master Code as soon as possible. Godrej Security Solutions shall not be responsible for any theft caused by such negligence. -
Page 6: Know Your Product
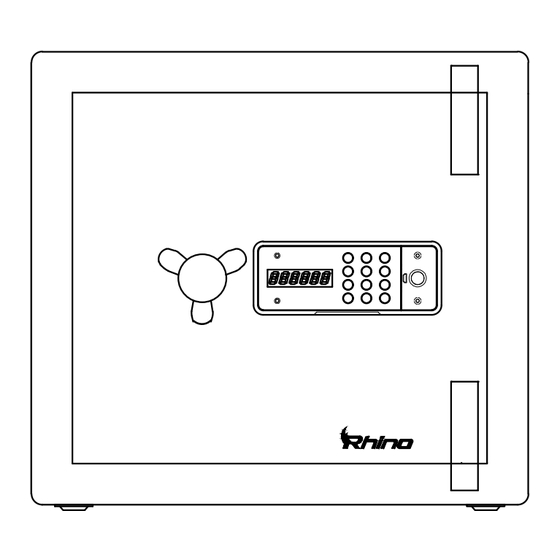
3. KNOW YOUR PRODUCT Display Keypad Mechanical Override Key Slot Shooting Bolts Battery Cover... -
Page 7: Home Mode Operation
4. HOME MODE OPERATION To open the locker: Enter the correct personal code. The display shows status “OPENED”, after entering correct personal code the solenoid bolts are unlocked for 6 sec. Rotate the knob anticlockwise to open the safe. To lock the locker: Close the door and rotate the knob clockwise. Note: The master code and personal code can only be used to unlock the locker. -
Page 8: Trick To Change The Master Code
WARNING: For security purposes, you should change the factory default code as soon as possible. Godrej Security Solutions shall not be responsible for theft caused by such negligence. Do not use Function code for the new... -
Page 9: Hot Key
6. HOT KEY – VIEWING/NOT VIEWING PASSWORD WHILE KEYING IN If your lock is set so that your code appears every time and you do not want it to appear for that one time, you can press (0) then # key before your code. Only dashes will appear for that one time. The next time you press your code, it will appear as usual. -
Page 10: Simple Program To Access The Programming
8. SIMPLE PROGRAM TO ACCESS THE PROGRAMMING • Open the locker • Press * twice, the display will show “PROG” • Press 751019 while the word “PROG” disappears • The current setup will appear with the first digit flashing • All 6 sections must be entered within 10 seconds. You can change one or more sections, but all 6 sections must be entered. - Page 11 Section c (3rd Digit) Lockout Delay If the wrong code is entered 4 times in a row, the touch pad will shut down for a length of time that you set. This is to deter someone from opening your locker by keying in a random number. You must pick one of these three options: Press 0: For no Lockout Delay.
-
Page 12: In Case Of Emergency Use The Override Key
9. IN CASE OF EMERGENCY USE THE OVERRIDE KEY 1 Open the keyhole. 2 Use one of the override keys and insert it into the cylinder. Turn the key Anticlockwise and then rotate the knob anticlockwise to open the locker.” 3 While the door is open and the key is still turned, follow the instructions to set your personal code. -
Page 13: Error Messages
11. FREE YOURSELF FROM THE ERROR MESSAGES Listed below are error codes that you might encounter: This means that you have pressed an incorrect personal code. You need to Verify your personal code and try again. If you get this error four times consecutively, the keypad will lock out for 0/15/30 minutes. -
Page 14: Replacing The Batteries
12. REPLACING THE BATTERIES 1. Open the Locker. 2. Remove the battery cover by unscrewing the back panel. 3. Remove all the 4. Replace the batteries four used with four 1.5V AA batteries. size alkaline batteries. 5. Put back the 6. -
Page 15: Tools Required
13. TOOLS REQUIRED Drill Machine Spirit leveler Spanner Mallet Drill Bits 14. MOUNTING – DO IT RIGHT TO KEEP TROUBLE OUT 1. Use the spirit leveler to check if 2. To make your work easy the Spirit the locker is evenly placed on the leveler lets you know precisely if ground or against the wall or the locker is evenly placed. - Page 16 3. Next, make markings on the 4. Then, Drill holes into the ground or ground or the wall or inside the the wall or the inside of the wardrobe through the holes inside wardrobe. the locker 5. Fix the locker firmly by 6.
- Page 17 Mounting through the bottom of the locker: • Check the exact type of floor, whether it’s wood, tile, concrete or anything else. • Get the appropriate anchors for the particular type of floor • Check and mark the location on floor for concealed wires or pipes •...
-
Page 18: Information On E-Waste Handling And Management
. P l e a s e r e f e r t o o u r w e b s i t e h ps://www.godrej.com/godrej-security-solu ons#GreenThink under the ‘Green Think’ sec on of Godrej Security Solu ons Division Page for more details on registered recyclers and collec on centers/pick up points of the company. - Page 19 NOTES...
- Page 20 Godrej & Boyce Mfg. Co. Ltd. Godrej Security Solutions Regd. Office: Plant No.17, Pirojshanagar, Vikhroli, Mumbai - 400 079. Toll-free: 1800 209 9955 (Sales) 1800 209 5511(Service) Email: secure@godrej.com | Visit: www.godrejsecure.com An ISO 9001:2015, ISO 14001:2015, ISO 45001:2018...
Need help?
Do you have a question about the RHINO and is the answer not in the manual?
Questions and answers