Table of Contents
Advertisement
Quick Links
MODEL DAS 72.1 MKIII MANUAL
DIGITAL LOAD CELL AMPLIFIER WITH ANALOGUE OUTPUT AND SETPOINTS
This Manual refers to software version 4.31
Ideas in Measuring ..
TECHNIQUES LIMITED
www.sensortechniques.com
Tel : +44 (0)1446 771185
Fax: +44 (0)1446 771186
H&B ApS
www.haubac.com
Tel : +45 4816 0880
Fax: +45 4816 0870
Ideen & Meßtechnik
www.soemer.de
Tel : +49 (0)2721/9262-0
Fax: +49 (0)2721/9262-50
DAS72.1MKIII Manual v 4.xx Page 1
Advertisement
Table of Contents

Subscribe to Our Youtube Channel
Related Manuals for H&B SENSOR SOEMER DAS 72.1 MKIII

Summary of Contents for H&B SENSOR SOEMER DAS 72.1 MKIII
- Page 1 MODEL DAS 72.1 MKIII MANUAL DIGITAL LOAD CELL AMPLIFIER WITH ANALOGUE OUTPUT AND SETPOINTS This Manual refers to software version 4.31 Ideas in Measuring .. Ideen & Meßtechnik TECHNIQUES LIMITED www.soemer.de www.sensortechniques.com H&B ApS Tel : +44 (0)1446 771185 Tel : +49 (0)2721/9262-0 Fax: +44 (0)1446 771186 Fax: +49 (0)2721/9262-50 www.haubac.com...
-
Page 2: Table Of Contents
CONTENTS DAS72.1MKIII Wiring Diagram and Key Functions Page 3 Quick Setup and Calibration using Weights Page 4 Quick Setup and Calibration using the load cell mV/V Sensitivities Page 6 1. Enable Zero Button / Calibrate Zero point Page 9 2. Setup and calibrate the Span Function / Display Input Signal in mV/V Page 12 3. -
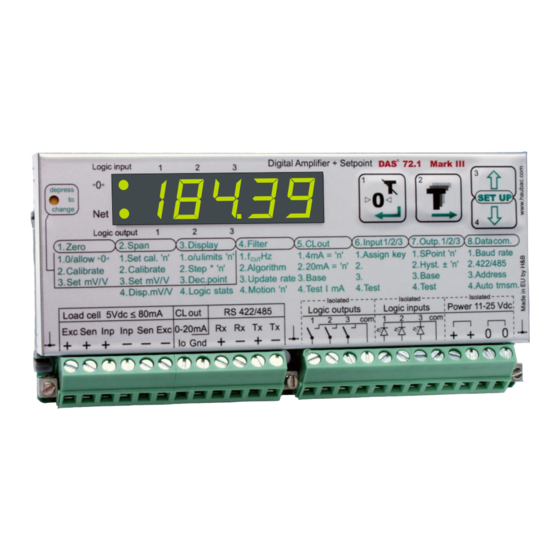
Page 3: Wiring Diagram And Key Functions
DAS72.1MKIII Recessed Enable Switch Centre of Zero LED (±0.5d) Zero Key - Sets new zero (if enabled). Reverts to calibrated zero if the button is held down for more than 3 seconds. (Enables changes to be made to important parameters. Must be pressed AFTER entering ‘Set up’... -
Page 4: Quick Setup And Calibration Using Weights
QUICK SET UP AND CALIBRATION USING WEIGHTS DAS72.1MKIII (Also see calibration examples on page 22) Enter the Press the UP or DOWN key for more than 3 seconds to enter the Set-up Menu SET UP Setup menu Please note that if you wish to change any values in these sections, you have to first press the recessed enable switch (top left corner of unit) Set the Decimal SELECT THE DECIMAL POINT POSITION ON THE DISPLAY (0, 0.0, 0.00,... - Page 5 QUICK SET UP AND CALIBRATION USING WEIGHTS (Continued) SELECT THE DISPLAY STEP SIZE. (1, 2, 5, 10, 20, 50, 100, 200 or 500) Set the Display Use this menu point to select the display step size. The minimum display step Step Size size is 1 [Factory default] up to a maximum step size of 500.
-
Page 6: Quick Setup And Calibration Using The Load Cell Mv/V Sensitivities
QUICK SET UP AND CALIBRATION USING THE LOAD CELL mV/V SENSITIVITY DAS72.1MKIII (Also see calibration examples on page 23) Enter the Press the UP or DOWN key for more than 3 seconds to enter the Set-up Menu SET UP Setup menu Please note that if you wish to change any values in these sections, you have to first press the recessed enable switch (top left corner of unit) Set the Decimal... - Page 7 QUICK SET UP AND CALIBRATION USING LOAD CELL mV/V (Continued) SELECT THE DISPLAY STEP SIZE. (1, 2, 5, 10, 20, 50, 100, 200 or 500) Set the Display Use this menu point to select the display step size. The minimum display step Step Size size is 1 [Factory default] up to a maximum step size of 500.
- Page 8 This page is intentionally left blank. DAS72.1MKIII Manual v 4.xx Page 8...
-
Page 9: Enable Zero Button / Calibrate Zero Point
ENTERING THE SETUP MENU DAS72.1MKIII Press the UP or DOWN key for more than 3 seconds to enter the Set-up Menu SET UP If you wish to change any values in these sections, you have to first press the recessed enable switch (top left corner of unit) ENABLE ZERO BUTTON / SET ZERO TRACK RANGE / CALIBRATE ZERO POINT ZERO BUTTON ENABLE / ZERO TRACK RANGE (±... - Page 10 ENABLE ZERO BUTTON / CALIBRATE ZERO POINT (Continued) CALIBRATE OR ADJUST THE ZERO POINT. (CONVENTIONAL WEIGHING SYSTEM) Use this menu point to store a new calibration zero. The display will show the actual input signal in mV/V from the load cells. Ensure that the weighing system is at zero or has no load on it. Pressing the Enter key will store the new zero.
- Page 11 ENABLE ZERO BUTTON / CALIBRATE ZERO POINT (Continued) ENABLE STORING OF ZERO VALUE (NON-VOLATILE) Use this menu point to enable (0 - on) the storing of the zero value in memory. This will prevent the loss of the zero value in the event of a power failure. There are 2 possible settings 0 - off (factory default) zero storing not enabled or 0 - on zero storing enabled.
- Page 12 DAS72.1MKIII If you wish to change any values in these sections, you have to first press the recessed enable switch (top left corner of unit) SET UP AND CALIBRATE SPAN / DISPLAY INPUT SIGNAL IN mV/V DEFINE THE SPAN CALIBRATION VALUE. This menu point defines the span calibration value.
- Page 13 SET UP AND CALIBRATE SPAN /DISPLAY INPUT SIGNAL IN mV/V (Continued) CALIBRATE THE SPAN FROM THE LOAD CELL mV/V READING If you are calibrating the weighing system without weights, use this menu point to enter the mV/V value for the weighing system. The weighing system mV/V value can be derived from the load cell test data. Normally a test data certificate is provided with each load cell stating amongst other things, the Output at Rated Load (ORL) in mV/V.
-
Page 14: Setup The Display (Over/Under Range Limits, Steps Size & Decimal Point, Logic I/O Status)
DAS72.1MKIII If you wish to change any values in these sections, you have to first press the recessed enable switch (top left corner of unit) SET UP THE DISPLAY (OVER/UNDER RANGE LIMITS, STEP SIZE & DECIMAL POINT, LOGIC I/O STATUS) SET THE DISPLAY OVER RANGE LIMIT. - Page 15 SET UP THE DISPLAY (Continued) SELECT THE DECIMAL POINT POSITION ON THE DISPLAY (0, 0.0, 0.00, 0.000 or 0.0000) Use the UP or DOWN key to set the required decimal point position on the display. The factory default is no decimal place [0].
-
Page 16: Filter Setting And No Motion
DAS72.1MKIII FILTER SETTINGS & NO MOTION SELECT THE LOW PASS FILTER CUT OFF FREQUENCY. (RANGE 0 - 8) Use the UP/DOWN keys to select the cut off frequency required. A setting of 0 will disable the filter in both FIR & IIR modes. -
Page 17: Filter Setting Tables & Update Rates (Number Of Readings Averaged)
FILTER SETTINGS TABLES & UPDATE RATES (NUMBER OF READINGS AVERAGED) MENU 4.1-4.2 FILTER TYPE IIR (MODE 0) SECOND ORDER GAUSSIAN LOW Filter Setting 3dB Cut-off Update Rate in Settling time to Damping in dB This section refers to Menu points 4.1 - 4.3. Frequency in Hz Samples/sec. -
Page 18: Analogue Output (4-20Ma) Settings
DAS72.1MKIII ANALOGUE OUTPUT (4-20 mA) SETTINGS SET THE WEIGHT VALUE AT WHICH 4 mA IS SENT Use the UP/DOWN & MOVE RIGHT keys to set the weight value at which 4 mA is sent. This typically will be set to zero, so that when the display reads zero weight, 4 mA will be sent down the analogue output. -
Page 19: Logic Inputs 1, 2
DAS72.1MKIII LOGIC INPUTS SET THE FUNCTION OF LOGIC INPUT 1. (RANGE 00 - 14) Use the UP/DOWN keys to set the function of logic input 1. .00 - No function. .01 - Remote Zero. .02 - Remote Tare. .03 - Up Arrow Key. .04 - Down Arrow Key. - Page 20 LOGIC INPUTS (Continued) NOT IN USE NOT IN USE READ THE STATUS OF LOGIC INPUT 2. (In2 0 or In2 1) Read the status of Logic Input 2. If the input is high the display reads In2 1. If the input is low the display reads In2 0.
-
Page 21: Logic Outputs 1, 2
DAS72.1MKIII LOGIC OUTPUTS SET WEIGHT VALUE AT WHICH LOGIC OUTPUT 1 SWITCHES Use the UP/DOWN and MOVE RIGHT keys to set the weight value (SETPOINT) at which logic output1 changes state (switches on/off) SET WHETHER LOGIC OUTPUT 1 SWITCHES ON OR OFF Use the UP/DOWN keys to set whether logic output 1 switches on or off at the set point. -
Page 22: Data Communication Settings
DAS72.1MKIII DATA COMMUNICATION SETTINGS (See Programmers Manual for full Communication Protocol) SET THE BAUD RATE (9600, 19200, 38400, 57600, 115200). [FACTORY DEFAULT 9600] Use the UP or DOWN key to set the required baud rate. SELECT EITHER RS422 OR RS485 INTERFACE (422, 485). [FACTORY DEFAULT RS485] Use the UP or DOWN key to select either the RS422 or the RS485 interface. -
Page 23: Error Codes / Return To Factory Settings
DAS72.1MKIII ERROR CODES The zero key is not enabled (See menu 1.1) Set final zero out of range. (You are trying to set a zero which is greater than ±20% of the Upper Display Limit menu 3.1o) Excessive sensitivity requested. (The input signal is being divided into too many divisions i.e the size of each division is less than 0.5uV) The input signal is in excess of ±... -
Page 24: Calibration Procedure Using Weights
CALIBRATION PROCEDURE USING WEIGHTS DAS72.1MKIII It is assumed that the load cell system is connected to the DAS72.1 and the power Example: is on. The maximum and minimum display values, display increment size and 3 leg tank or silo fitted with 3 off 1000Kg 2mV/V load cells Dead load 500Kg, Live range 2000Kg in 1 Kg steps decimal point position should be defined prior to carrying out the calibration (See Menu 3). -
Page 25: Calibration Procedure From Known Load Cell Mv/V Sensitivities - Multiple Active Load Cells
CALIBRATION PROCEDURE USING KNOWN LOAD CELL MV/V SENSITIVITY DAS72.1MKIII MULTIPLE ACTIVE LOAD CELLS It is assumed that the load cell system is connected to the DAS72.1 and the power Example: is on. The maximum and minimum display values, display increment size and 3 leg tank or silo fitted with 3 off 1000Kg 2mV/V load cells Dead load 500Kg, Live range 2000Kg in 1 Kg steps decimal point position should be defined prior to carrying out the calibration (See... -
Page 26: Single Active Load Cell Plus Pivot
CALIBRATION PROCEDURE USING KNOWN LOAD CELL MV/V SENSITIVITY DAS72.1MKIII SINGLE ACTIVE LOAD CELL PLUS HINGE PIVOT It is assumed that the load cell system is connected to the DAS72.1 and the power Example: is on. The maximum and minimum display values, display increment size and A rectangular tank fitted with 1 off 2000Kg 2mV/V load cell central on the left hand side and a pivot (hinge) along the decimal point position should be defined prior to carrying out the calibration (See... -
Page 27: Technical Specification
DAS72.1MKIII Technical Specifications of the DAS 72.1: Linearity <0.002% Full Scale Load Cell Excitation 5 V DC, load cell(s) input impedance 80-2000 Ohms, 6-wire technique ±3.2 mV/V (bipolar, for push/pull weighing or tension/compression forces) Analogue Input Range Minimum input per vsi 0.05µV per interval Resolution Internal ±260,000 counts, ±...
Need help?
Do you have a question about the SENSOR SOEMER DAS 72.1 MKIII and is the answer not in the manual?
Questions and answers