Table of Contents
Advertisement
Advertisement
Table of Contents

Subscribe to Our Youtube Channel
Related Manuals for Insta360 Flow Pro

Summary of Contents for Insta360 Flow Pro
- Page 1 Flow Pro User Manual User Manual...
-
Page 2: Table Of Contents
Button Instructions ....................12 Interfaces ......................... 19 Gimbal Modes ......................21 Gimbal Grips ......................22 Manual Rotation ...................... 26 Indicator Lights ....................... 27 Insta360 App ......................... 29 Connect to the Insta360 app .................. 29 Shooting Interface ....................30 Firmware Update ......................34... -
Page 3: Product Introduction
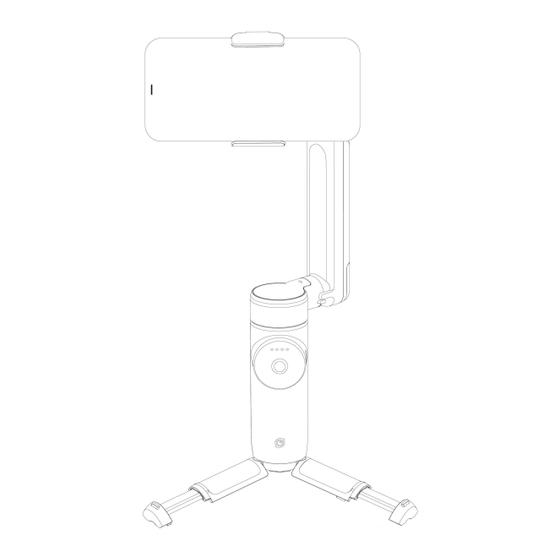
Flow Pro User Manual Product Introduction Flow Pro Introduction Tracking Ring Light Magnetic Phone Clamp Pan Axis Motor Power Output Port (Type-C) Power Input Port (Type-C) Battery Level/Gimbal Mode Indicator Lights Roll Axis Motor Shutter Button NFC Pairing LED Zoom Wheel... -
Page 4: First Use
Flow Pro User Manual The SmartWheel includes the Touch Panel, Gimbal Mode Indicator Lights, Joystick, Power Button, Shutter Button, Switch Button and Zoom Wheel. First Use Charging Please use the included Type-C Cable to connect the USB Port on the handle to the charger. The battery level indicator lights will cycle from left to right during charging according to the remaining power level. -
Page 5: Unfolding And Folding
Attach your phone to the Magnetic Phone Clamp first, then attach and unfold Flow Pro. • Each time Flow Pro is powered on, it automatically detects if a phone is mounted within 30 • seconds. If no phone is detected, it automatically enters standby mode. - Page 6 Flow Pro User Manual Built-In Selfie Stick and Tripod Flow Pro comes with a built-in selfie stick and tripod. The selfie stick has five sections and extends to a maximum length of 215mm. The angle adjustment range is 0-90°. Once fully extended and unfolded, the tripod can be used to temporarily place Flow Pro on a...
- Page 7 If you have the selfie stick extended for a long time, it's recommended to attach an external • tripod through the 1/4" screw hole at the bottom of Flow Pro's handle for more support and use in a wider range of scenarios.
-
Page 8: Find Your Serial Number
Flow Pro User Manual Find Your Serial Number The serial number is a unique code that can be used to quickly identify your gimbal. You can find the serial number in the following ways: Product Box The serial number is on the back of the original product box. -
Page 9: Activation
Open the Insta360 app. The pop-up window should automatically display "Discover New Devices". Select your device (the name is "Flow Pro ******" by default, where ****** is the last six digits of the serial number, which can be found on the product box or the transparent battery shell), and then follow the on-screen instructions to connect and activate your gimbal. -
Page 10: One-Tap Pairing Via Nfc
"Video" mode, point it at the subject, and tracking will turn on automatically. ○ When Flow Pro is tracking, the tracking ring light will be green and flash slowly. To stop tracking, press the trigger button once. The tracking ring light will turn off. To start tracking again, press the trigger button once. - Page 11 If you cannot connect via NFC, please check the following: Ensure the NFC area on your phone is close to the NFC mark on Flow Pro. If there is no response, move the phone a few millimeters away, wait for around 10 seconds, then try again.
-
Page 12: Native Camera And Third-Party App Tracking
Flow Pro User Manual Native Camera and Third-Party App Tracking iOS: After pairing your iPhone with Flow Pro via NFC, you can control or track with the native camera app or third-party iOS apps without connecting to the Insta360 app. Additionally, you can use Deep Track 3.0 when the gimbal is connected to the Insta360 app, as well as... - Page 13 Android phones don't support tracking in the native camera app. Both iOS and Android devices support tracking in third-party apps such as live streaming apps and video calling apps through Live Mode on the Insta360 app. Head to the shooting page once Flow Pro connects to the Insta360 app.
-
Page 14: Basic Use
Flow Pro User Manual Basic Use Button Instructions *When tracking with the iPhone native camera and third-party iOS apps, some of the button operations are temporarily unavailable, and full button functionality is available through the Insta360 app. Power Button Gimbal Status... - Page 15 Flow Pro User Manual Switch Button Gimbal Status Operation Description Powered on Press twice Switch the phone's orientation between • horizontal and vertical. Insta360 app open on the Press once Switch between the front and rear cameras. • shooting page Press three Switch between video and photo mode.
- Page 16 Flow Pro User Manual Shutter Button Gimbal Status Operation Description Insta360 app open on Press once Take photo or start recording video. • the shooting page Long press Start shooting in Burst Mode. • Insta360 app open on Press once Switch to the next file.
- Page 17 All four LEDs blink slowly when Flow Pro is in standby mode. All four LEDs blink quickly when an error has occurred. The two most common reasons are: Flow Pro is physically prevented from moving or is experiencing a technical error. Remove •...
- Page 18 Flow Pro User Manual Touch Panel There are two ways to switch gimbal and shooting modes on the Touch Panel. You can choose via the "Custom" button in gimbal settings in the Insta360 app. Gimbal Status Description Powered on Option A Swipe: Swipe a semicircle clockwise or counterclockwise to switch •...
- Page 19 Flow Pro User Manual Zoom Wheel Gimbal Status Operatio Description FPV Mode Turn the Turn clockwise: Rotate roll axis clockwise. • Wheel Turn counterclockwise: Rotate roll axis • counterclockwise. (Zoom is not available in FPV Mode.) Connected to Turn the...
- Page 20 Flow Pro User Manual Trigger Button Gimbal Status Operation Description Powered on Press twice Recenter the gimbal. Press three times Change phone between forward-facing and backward-facing. Long press Enter Lock Mode (release button to exit). Press once and then Enter Active Plus Mode (release button to exit).
-
Page 21: Interfaces
Connect the charging cable to charge Flow Pro. Flow Pro can be used while charging. Power Output Port (Type-C) Use Flow Pro as a power bank. Connect the cable to a phone or other device to charge. 1/4" Mounting Point... - Page 22 Flow Pro User Manual Built-In Cold Shoe Connect to other accessories, such as a microphone. Notes: Do not remove the cold shoe door when connecting • accessories. Ensure the Anti-Dust Cover remains in place. •...
-
Page 23: Gimbal Modes
Flow Pro User Manual Gimbal Modes When Flow Pro is turned on, you can choose from five gimbal modes: Auto (on by default), Follow, Pan Follow, FPV and Lock Mode. Auto Mode (AUTO): • Beginner-friendly mode that automatically adjusts tilt and pan axis settings based on your movements (e.g., running vs stationary), making it easier to shoot stable videos. -
Page 24: Gimbal Grips
Flow Pro User Manual Gimbal Grips Flow Pro has the following five grip positions: Quick Grip: Unfold the gimbal in one motion for quick, on-the-go shooting. • Do not extend the tripod or selfie stick. - Page 25 Flow Pro User Manual Classic Grip: Provides a more comfortable grip with an improved shooting angle. • Slightly pull the selfie stick out. Tilt the hinge area. Pull out the tripod to extend the handle. Do not pull out the legs.
- Page 26 • shots. Pull out the tripod and selfie stick. Turn Flow Pro upside down 180°. Side Grip: Provides a more comfortable grip. Suitable for sliding and low-angle shots. • Pull out the tripod. Tilt Flow Pro 90° left or right.
- Page 27 Flow Pro User Manual Low Grip: Provides a more comfortable grip. Suitable for push-through and low-angle shots. • Pull out the tripod and selfie stick. Adjust the selfie stick to a low-angle position.
-
Page 28: Manual Rotation
Flow Pro User Manual Manual Rotation You can manually adjust the direction of the roll axis by moving the gimbal. When the angle of the mobile phone clamp is less than 30º, the gimbal will rotate to the position where it is swung. -
Page 29: Indicator Lights
Flow Pro User Manual Indicator Lights Status Indicator Light Status Power on Gimbal Mode Indicator Lights light up one by one from left to right Power off Gimbal Mode Indicator Lights light up at the same time and then go out one by one from right to left... - Page 30 Gimbal Mode Indicator Lights light up one by one from left to right, with a 0.2-second interval. Once the update is complete, all four will light up at the same time, then turn off. Flow Pro will reboot after 1 second. Low battery Gimbal Mode Indicator Lights: Left indicator light blinks rapidly...
-
Page 31: Insta360 App
Turn on Flow Pro. Turn on the phone's Bluetooth and Wi-Fi. Open the Insta360 app and tap the camera icon at the bottom of the page. Follow the on- screen instructions to activate your gimbal. The first time you connect to the Insta360 app, you need to authorize the connection and provide information. -
Page 32: Shooting Interface
Raise your palm again to stop shooting if you choose video with tracking. Note: Gesture Control works up to 13.1ft (4m) away from Flow Pro. This feature consumes more power and may cause the gimbal to heat up. - Page 33 ○ Horse Tracking: Turn on/off. Once turned on, press the trigger button or manually draw a box around the horse you wish to track. Flow Pro will turn on horse tracking as a priority. ○ Front Cam Auto Tracking: When turned on, Flow Pro will track subjects using the front camera instead of the rear camera.
- Page 34 Adjust Horizontal Axis: Another option to fix incorrect alignment. Unfold the tripod and place Flow Pro on a flat surface. Attach your phone, then start the adjustment process. The axis can be tuned in units of 0.1° and the maximum adjustable angle is 10°.
- Page 35 Flow Pro User Manual Notes: Flow Pro and the Insta360 app are updated regularly with new features. Please refer to the • interface in the latest version of the Insta360 app. Settings and supported functions vary depending on the phone model and system. For full •...
-
Page 36: Firmware Update
Connect Flow Pro to the Insta360 app. The app will prompt you to update the firmware if a new version is available. Please follow the on-screen prompts to update Flow Pro's firmware. - Page 37 Flow Pro User Manual Arashi Vision Inc. ADD: 11th Floor, Building 2, Jinlitong Financial Center, Bao'an District, Shenzhen, Guangdong, China WEB: www.insta360.com TEL: 400-833-4360 +1 800 6920 360 EMAIL: service@insta360.com V1.0...
Need help?
Do you have a question about the Flow Pro and is the answer not in the manual?
Questions and answers