Table of Contents
Advertisement
Quick Links
Advertisement
Table of Contents

Related Manuals for ARUVO ELYSIA STO-G5

Summary of Contents for ARUVO ELYSIA STO-G5
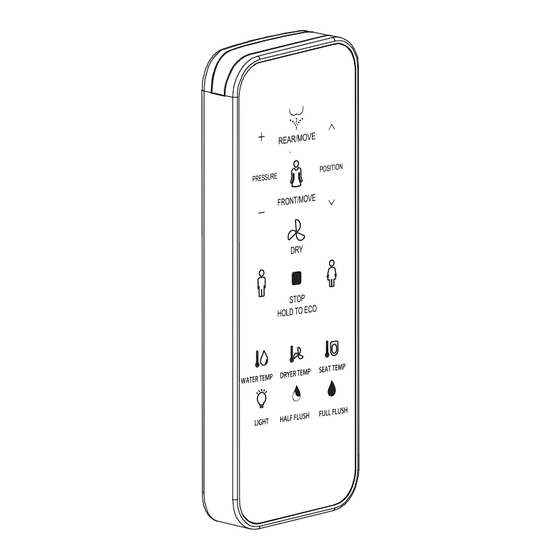
- Page 1 WATER TEMP DRYER TEMP SEAT TEMP LIGHT HALF FLUSH FULL FLUSH User Manual Intelligent Toilet Suite Remote Control Thank you for choosing our product. Please read the instructions carefully before installation and keep it available for future maintenance or reference.
-
Page 2: Table Of Contents
CONTENT INSTALLATION PREPARATION 01. Remote control installation USAGE INSTRUCTION 1. Remote control illustration 2. Rear/Front washing operation 3. Dry operation 4. Water volume adjustment 5. Spray nozzle position adjustment 6. Energy saver 7. Auto function 8. Temperature adjustment 9. Night light 10. -
Page 3: Installation Preparation
INSTALLATION PREPARATION Remote control installation Remote control hanger installation (1) Place the remote control hanger upright on the (2) Put the expansion tube into the wall hole pre-installed area of the wall and mark the location and the hanger is tight against the wall. of the two mounting holes on the wall with a marker. - Page 4 INSTRUCTION GUIDE Remote control installation Remote control hanger installation (Only for the hanger matching with fixing board and foam gasket.) (1) Clean and dry the pre-installed area of the (2) Remove the adhesive tape on the back remote control rack on the wall. (When determining of the hanger and place it tightly against the the installation location, make sure that the user wall, then cover the silicon gasket.
- Page 5 Rear washing / moving washing Water increasing Nozzle moving forward Front washing / moving washing Water reducing Nozzle moving backward Models without drying Drying function do not have this button Auto rear washing Auto front washing Indicator light (only Stop/Energy saver visible when the Models without drying light is on)
-
Page 6: Rear/Front Washing Operation
Rear/Front Washing · Press REAR/MOVE button, the indicator light is on showing current water temperature level, it starts " " rear washing; Press again REAR/MOVE button to shift to moving washing (nozzle moves forward " " and backward to expand washing area). The washing will last for a circle and stop automatically, while it will stop immediately if the user presses STOP button. -
Page 7: Water Volume Adjustment
Water Volume Adjustment · Press button when it is under function of rear washing or front washing, the indicator " " " " light will be on showing current water volume level, adjust water volume by 3 levels. Spray Nozzle Position Adjustment ∧... -
Page 8: Auto Function
Auto Function (Only for the toilet with auto flush function) · The automatic function of factory default setting is middle level for water volume, nozzle position, water temperature, dryer temperature, seat temperature. · Short press on the remote control button " ", "... -
Page 9: Night Light
Night Light (Only for toilet with night light function) ·Short press LIGHT button to turn on/turn off night light, long press LIGHT button to enter " " " " into intelligent mode (Night light will be on or off by detecting the lightness of surroundings). If the product is on intelligent mode, short press “Night light”... -
Page 10: Water Tank Flush Volume Adjustment
Water tank flush volume adjustment (Only for the toilet with water tank flush volume adjustment function) · Press and hold the "FULL FLUSH" button, and press the water volume " + " button to enter the full flush volume plus 1 gear adjustment; ·... -
Page 11: Other Operations
Other Operations Quite mode · Long press "SEAT TEMP" button to turn on/off quite mode. Auto deodorization · Long press "HALF FLUSH" button to turn on/off auto deodorization function. While the auto deodorization function is on, when it’s detected that the user is seated, it’ll start deodorizing and stops when user leaves above 3s. The auto deodorization function will turn off automatically during drying. - Page 12 The product image may not fully reflect the actual appearance and color due to ongoing improvements. Please refer to the actual product.
Need help?
Do you have a question about the ELYSIA STO-G5 and is the answer not in the manual?
Questions and answers