
Related Manuals for RedLINK RLC-833A


Summary of Contents for RedLINK RLC-833A
- Page 1 Q S G 1 _ A _ E N Quick Start Guide Apply to: RLC-833A, RLC-1224A @ R e o l i n kTe c h h t t p s ://re o l i n k . c o m...
-
Page 2: Table Of Contents
Content What's in the Box What's in the Box Camera Introduction Connection Diagram Set up the Camera Camera Waterproof Lid Ethernet Cable Mount the Camera Troubleshooting Specifications Notification of Compliance Quick Start Guide Surveillance Sign Mounting Hole Template Pack of Screws English English... -
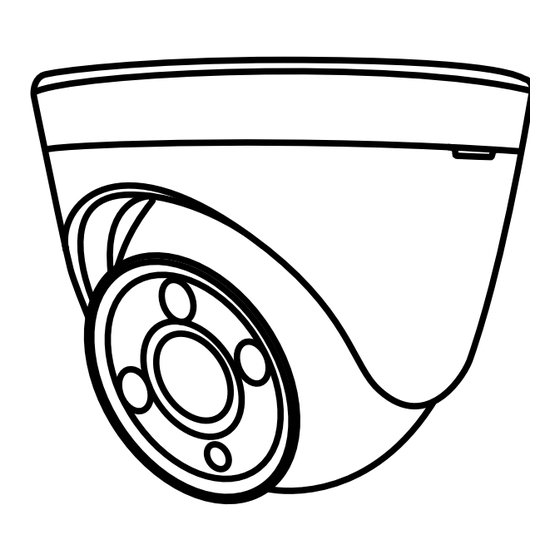
Page 3: Camera Introduction
Camera Introduction Mount Micro SD Card Slot Metal Case Spotlight Infrared Lights Lens Built-in Mic Daylight Sensor Waterproof Lid Speaker Network Cable eSATA Reset Button AUDIO * Press and hold for 10 seconds to restore camera HDMI to factory settings. Power Port (Optional) English English... -
Page 4: Connection Diagram
Connection Diagram Set up the Camera Before using the camera, please connect your camera as instructed Download and Launch the Reolink App or Client software, and follow the below to finish initial setup. onscreen instructions to finish initial setup. 1. Connect the camera to a Reolink NVR (not included) with an Ethernet cable. • On Smartphone 2. Connect the NVR to your router, and then power on the NVR. Scan to download the Reolink App. NOTE: The camera should be powered with a 12V DC adapter or a PoE powering device such as PoE injector, PoE switch or Reolink NVR (not included in the package). PoE IP Camera Power Adapter Reolink NVR Router • On PC eSATA Download path of the Reolink Client: Go to https://reolink.com > Support AUDIO DC 48V HDMI > App & Client. Ethernet Cable NOTE: If you are connecting the camera to a Reolink PoE NVR, please set up the camera via the NVR interface. -
Page 5: Mount The Camera
Mount the Camera Install the Camera Installation Tips • Do not face the camera towards any light sources. Hold and press on the camera top • Do not point the camera towards a glass window. Or, it may result in and turn anticlockwise to separate poor image quality because of the window glare by spotlights, mounting plate from the camera. ambient lights or status lights. • Do not place the camera in a shaded area and point it towards a well-lit area. Or, it may result in poor image quality. To ensure best image quality, the lighting condition for both the camera and the capture object shall be the same. -
Page 6: Troubleshooting
Troubleshooting Camera is not Powering on If your camera is not powering on, please try the following solutions: • Make sure your camera is powered properly. The PoE camera should be powered by a PoE switch/injector, the Reolink NVR or a 12V power adapter. • If the camera is connected to a PoE device as listed above, connect the Align the camera to the mounting plate and turn the camera clockwise camera to another PoE port and see if the camera will power on. to lock it tightly. Pay attention that these two points should be aligned, • Try again with another Ethernet cable. which means the camera has been locked correctly. If these won’t work, contact Reolink Support. NOTE: Run the cable through the cable notch on the mount base. Picture is not Clear If the picture from the camera is not clear, please try the following solutions: Once the camera is installed, you may rotate the camera body • Check the camera lens for dirt, dust or spiderwebs, please clean the manually to adjust the camera’s lens with a soft, clean cloth. -
Page 7: Specifications
• Restore the camera to factory settings and check out again. Operating Temperature: -10°C to 55°C (14°F to 131°F) Operating Humidity: 10%-90% If these won’t work, contact Reolink Support. Waterproof Rating: IP66 For more specifications, visit the Reolink official website. Spotlight is not on Notification of Compliance If the spotlight on your camera is not on, please try the following solutions: FCC Compliance Statement • Ensure the spotlight is enabled under Device Settings page via Reolink App/Client. This device complies with Part 15 of the FCC Rules. Operation is subject • Upgrade the firmware of your camera to the latest version. to the following two conditions: (1) this device may not cause harmful • Restore the camera to factory settings and check out the spotlight interference, and (2) this device must accept any interference received, settings again. including interference that may cause undesired operation. Changes or modifications not expressly approved by the party responsible for If these won’t work, contact Reolink Support. compliance could void the user’s authority to operate the equipment. Specifications NOTE: This equipment has been tested and found to comply with the limits for a Class B digital device, pursuant to Part 15 of the FCC Rules. These limits are designed to provide reasonable protection Hardware Features against harmful interference in aresidential installation. This equipment generates, uses and can radiate radio frequency energy and, if not Power: By PoE(802.3af) /DC 12V installed and used in accordance with the instructions, may cause Day/Night Mode: Auto Switchover harmful interference to radio communications. However, there is no guarantee that interference will not occur in a particular installation. - Page 8 reception, which can be determined by turning the equipment off and on, recycle it responsibly to promote the sustainable reuse of material the user is encouraged to try to correct the interference by one or more resources. To return your used device, please use the return and of the following measures: collection systems or contact the retailer where the product was purchased. They can take this product for environment safe recycling. • Reorient or relocate the receiving antenna. • Increase the separation between the Limited Warranty equipment and receiver. • Connect the equipment into an outlet on a circuit different from that to This product comes with a 2-year limited warranty that is valid only if which the receiver is connected. purchased from Reolink Official Store or a Reolink authorized reseller. • Consult the dealer or an experienced radio/ TV technician for help. Learn more: https://reolink.com/warranty-and-return/. FCC RF warning statement: NOTE: We hope that you enjoy the new purchase. But if you are not The device has been evaluated to meet general RF exposure requirement. satisfied with the product and plan to return, we strongly suggest that The device can be used in portable exposure condition without restriction. you reset the camera to factory default settings and take out the inserted SD card before returning. Simplified EU Declaration of Conformity Terms and Privacy Reolink declares that this device is in compliance with the essential Use of the product is subject to your agreement to the Terms of Service requirements and other relevant provisions of Directive 2014/53/EU.
- Page 9 ISED Radiation Exposure Statement This equipment complies with RSS-102 radiation exposure limits set forth for an uncontrolled environment. This equipment should be installed and operated with minimum distance 20cm between the radiator & your body. Technical Support If you need any technical help, please visit our official support site and contact our support team before returning the products, https://support.reolink.com. English...
Need help?
Do you have a question about the RLC-833A and is the answer not in the manual?
Questions and answers