
Related Manuals for I-GO CareCo Ultra X Fold

Summary of Contents for I-GO CareCo Ultra X Fold
- Page 1 U S E R M A N U A L C a r eC o ( U K ) L t d , H u b er t R oa d , B r e nt wood, E sse x, CM1 4 4 J E...
-
Page 2: Table Of Contents
CONTENTS 1. SAFETY GUIDELINES 2. SAFETY NOTICE 3. PARTS INTRODUCTION 4. OPERATION Control Panel How to operate your scooter 5. BATTERY CHARGING AND CARE 6. INSPECTION AND MAINTENANCE 7. TROUBLE SHOOTING AND SPECIFICATION 8. WARRANTY INTENDED USE Maximum safe slope: 6° The product is not intended for visually impaired people. -
Page 3: Safety Guidelines
1. SAFETY GUIDELINES Please carefully read this owner’s manual before using the scooter. Improper use of the scooter could result in harm, injury or traffic accidents. » This owner’s manual includes operation instructions for every aspect of the scooter, assembly instructions, as well as instructions for how to deal with possible accidents. »... -
Page 4: Safety Notice
2. SAFETY NOTICE Suggestion To maximize your battery’s efficiency and service life, please fully recharge your new battery before its first use. Mandatory! Do not operate your new Scooter for the first time without completely reading and understanding this owner’s manual and the Consumer Safety Guide. - Page 5 2. SAFETY NOTICE PRE-RIDE SAFETY CHECK Get to know the feel of your Scooter and its capabilities. We recommend that you perform a safety check before each use to make sure your Scooter operates smoothly and safely. Perform the following inspections prior to using your Scooter: »...
- Page 6 2. SAFETY NOTICE Mobile Phones and other electrical equipment » Do not use a mobile phone or other wireless communication device while driving. » Always switch off the scooter and remove the ignition key before using a mobile phone. » Do not charge the mobile phone or any other electrical device from your scooter’s battery.
- Page 7 2. SAFETY NOTICE Warning! Do not set in the freewheel mode when driving on a gradient. » Always re-engage the anti-freewheel device before use. Failure to do » so may result in injury. To protect your safety, the power will automatically cut off and »...
- Page 8 2. SAFETY NOTICE Driving on the pavement The maximum speed of the scooter is 6.4 km/h. Motor Vehicle Transport Do not remain seated on your scooter while traveling in a motor vehicle. The scooter should be stowed in the trunk of a car or in the back of a truck or van with the batteries removed and properly secured.
- Page 9 2. SAFETY NOTICE LABELLING Please carefully read all labels on the scooter before driving it. For your future reference, do not remove them. 1. WARNING EMI LABEL 2. FREEWHEEL LABEL 3. SEAT PINCH WARNING LABEL PAG E 7...
- Page 10 2. SAFETY NOTICE This section will provide the user with basic information that describes the problems with EMI, known sources of EMI, protective measures either to lessen the possibility of exposure or to minimize the degree of exposure, and suggested action should unexpected or erratic movement occur.
-
Page 11: Parts Introduction
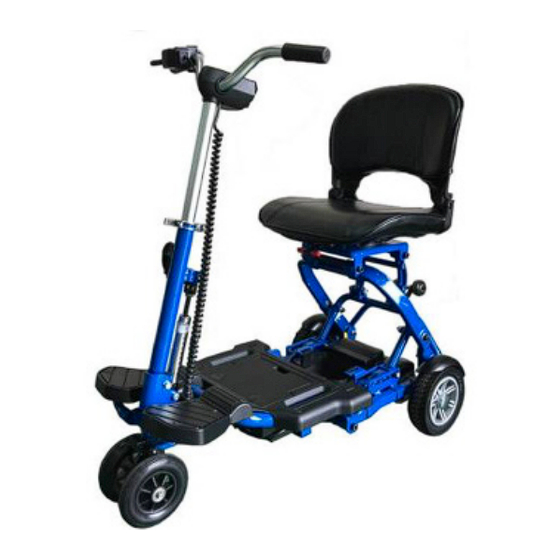
3. PARTS INTRODUCTION Parts Description 1. Power switch 7. Battery Case handle 2. Charger Socket Cover 8. Frame Separate Handle 3. Tiller Extend Lever 9. Circuit Breaker 4. Tiller Angle Adjust Lever 10. Freewheel Lever 5. Separate Frame safety Lever 11. -
Page 12: Operation
4. OPERATION 4.1 CONTROL PANEL 1. Battery Level Indicator 2. Forward / Reverse Selector Prohibited! Do not expose the tiller console to moisture. In the event that the tiller console does become exposed to moisture, do not attempt to operate your Scooter until the tiller console has dried thoroughly. - Page 13 4. OPERATION Braking Release the speed control lever freely while either going forward or reverse, and the electromagnetic brake in the motor will be activated causing the scooter will stop. Battery Indicator The battery indicator on the tiller console uses a colour code to indicate the approximate power remaining in your batteries.
- Page 14 4. OPERATION How to Set Freewheel Mode Whenever you need or want to push your Scooter for short distances, you can put it in freewheel mode. 1. Locate the manual freewheel lever at the top right of the rear section. 2.
- Page 15 4. OPERATION Anti-Tip Wheels The anti-tip wheels are an integral and important safety feature of your Scooter. They are bolted to the frame at the rear of the Scooter. Prohibited! Do not remove the anti-tip wheels or modify your Scooter in any way that is not authorized by your provider.
- Page 16 4. OPERATION Seat The seat can be turned to 45 degrees or 90 degrees. » Pull the seat adjustment lever swivel seat. » Release the lever, then continue swivelling the seat » until it locks in position. Warning! Return the seat to the forward position before driving. Main Circuit Breaker (Reset Button) When the voltage in your Scooter’s batteries becomes low or the Scooter is heavily strained because of excessive loads or steep inclines, the main circuit breaker may trip...
- Page 17 4. OPERATION Battery Pack Your scooter is equipped with an innovative, easy-to-remove battery pack. A handle on the top of the battery pack makes it easy to lift the pack off of the Scooter with one hand. The battery pack contains two rechargeable batteries.
- Page 18 4. OPERATION Disassembling the Scooter Warning! To avoid personal injury ask for assistance if necessary when disassembling or assembling your scooter. Please follow the steps. 1. Turn key switch to “OFF”. 2. Place the freewheel mode lever in the drive position. 3.
- Page 19 4. OPERATION 4. Pick up the frame separately with the handle bar and fold the rear frame. 5. Push the tiller adjustment knob and fold the tiller. 6. Loosen the tiller adjustment lever, fold down the tiller and re-tighten lever. PAG E 1 7...
- Page 20 4. OPERATION Assembling the Scooter No tools are required to disassemble or assemble your scooter. 1. Push the tiller adjustment knob and set the tiller angle. 2. Pull the Separate Frame Safety Lever to unfold. 3. Put down the front and rear sections until the scooter is level. 4.
-
Page 21: Battery Charging And Care
5. BATTERY CHARGING AND CARE Charging The Battery 1. Follow the procedure below step by step: 2. Turn the power switch to (OFF) 3. Connect the charger’s power cord into the power outlet. 4. Open the charging socket cap on the battery pack. - Page 22 5. BATTERY CHARGING AND CARE Battery Do not expose the battery to temperatures below -10°C or above 50°C when » charging or storing the scooter. Under the above temperature range can cause the battery either to freeze or overheat. This will damage the batteries and shorten their life.
- Page 23 5. BATTERY CHARGING AND CARE Prohibited! Removal of grounding prong can create electrical hazard. If necessary, » properly install an approved 3-pronged adapter to an electrical outlet having 2-pronged plug access. Never use an extension cord to plug in your battery charger. Plug the »...
- Page 24 5. BATTERY CHARGING AND CARE Warning! If the battery charger is equipped with cooling slots, then do not attempt » to insert objects through these slots. Be aware that the battery charger case may become hot during charging. » Avoid skin contact and do not place on surfaces that may be affected by heat.
-
Page 25: Inspection And Maintenance
6. INSPECTION AND MAINTENANCE Suggestion 1. Make sure the terminals are installed properly and put the cover back on. 2. Do not use the battery to charge telecom equipment or other items. 3. Battery efficiency will vary with outside conditions; the driving distances will be shorter in the winter. - Page 26 6. INSPECTION AND MAINTENANCE Regular Checking Record To make sure your scooter is correctly serviced, take it to your dealer for regular maintenance checks. This should be at intervals of six months after the first inspection after one month. Your dealer may charge a fee for this service. Year Year Service Dates...
- Page 27 6. INSPECTION AND MAINTENANCE Tyres The condition of the tyres depends on how you drive and use your scooter. Inspecting tyre tread » Please check the tread groove regularly. Replace the tyres when the tread groove is » less than 0.5 mm. Warning! 1.
-
Page 28: Trouble Shooting And Specification
7. TROUBLE SHOOTING AND SPECIFICATION Trouble Shooting Symptom Remedy The scooter will not switch on Try recharging the battery » Check the fuse and circuit breaker in the scooter » The scooter switches on, but Ensure there is enough power in the batteries. If not, »... - Page 29 7. TROUBLE SHOOTING AND SPECIFICATION Specification Model Reference Expand Dimension (L x W x H mm) 47.2” ×20” ×38.1” (L x W x H inch ) 1200mm×510mm×970mm Fold Dimension (L x W x H mm) 20”×18.1”×25.9” (L x W x H inch ) 510mm×460mm×660mm Weight with battery 31 kg / 68.2 lbs...
-
Page 30: Warranty
Quality / Warranty Declaration Products are to be fit for purpose and of excellent quality and performance. For valid warranty claims I-GO will, at their discretion, replace / repair / refund items mutually agreed to be defective. The scooter’s warranty is as follows: »... - Page 31 NOTES PAG E 2 9...
Need help?
Do you have a question about the CareCo Ultra X Fold and is the answer not in the manual?
Questions and answers