
Related Manuals for Frigelux RETT136A


Summary of Contents for Frigelux RETT136A
- Page 1 MANUEL D’INSTRUCTIONS / USE INSTRUCTIONS RÉFRIGÉRATEUR / REFRIGERATOR RETT136A - RE2T136A FR – MANUEL D’UTILISATION GB – USE INSTRUCTIONS p. 2 p. 21...
- Page 2 Cher client, Avant de faire fonctionner votre nouveau réfrigérateur, veuillez lire attentivement ce mode d’emploi. Il contient des informations très importantes concernant les règles de sécurité, d’installation et d’entretien. Veuillez conserver ce mode d’emploi. Veuillez en informer dans la mesure du possible tout nouvel utilisateur. Des notes relatives à...
- Page 3 SECURITE GENERALE — ATTENTION Cet appareil est conçu pour fonctionner dans un foyer domestique. ATTENTION — Ne rangez jamais de substances inflammables tels que des aérosols à l’intérieur de cet appareil, car elles pourraient s’y déverser. ATTENTION — Si le cordon d’alimentation est endommagé, vous devez le remplacer immédiatement auprès de votre fabricant, ou d’un revendeur qualifié, afin d’éviter tout risque d’électrocution.
- Page 4 ▪ Cet appareil fonctionne sur un courant à phase unique de 220~240V/50Hz. L’appareil doit utiliser une prise murale reliée à la terre selon les recommandations en vigueur. ▪ Si le câble d’alimentation est endommagé, ne procédez pas à son remplacement mais contactez votre service après-vente.
-
Page 5: Économies D'énergie
Information importante à propos de l’installation ! ▪ Pour que les branchements électriques soient corrects, suivez bien les consignes livrées dans ce manuel. ▪ Déballez l’appareil et vérifiez qu’il n’est pas endommagé visuellement. Ne branchez pas l’appareil si ce dernier est endommagé. Signalez tout dommage au point de vente où... - Page 6 Les pièces de rechange esthétiques et fonctionnelles conformément au RÈGLEMENT (UE) 2019/2019 (Annexe II, point 3.), sont mises à disposition des réparateurs professionnels et utilisateurs finaux pour une période maximale de 7 ans ou 10 ans (liste en Annexe II, point 3.a.1 et 3.a.2) à...
-
Page 7: Description De L'appareil
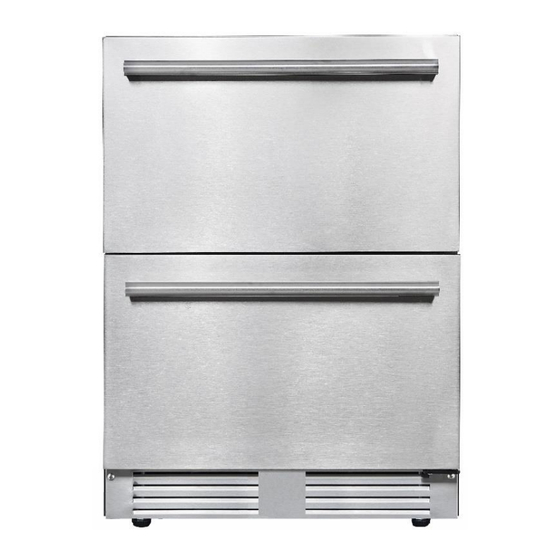
2. DESCRIPTION DE L’APPAREIL RETT136A Panneau de contrôle Filtre à charbon Plaque de conduit d'air Étagère Serrure Grille d'aération Charnière inférieure Poignée Porte pleine Joint de porte Charnière supérieure RE2T136A Panneau de contrôle Tiroir supérieur Séparateur de tiroir supérieur Poignée supérieure Porte pleine supérieure... -
Page 8: Instruction D'installation
Pour en savoir plus sur votre produit, consulter la Base EPREL en ligne. Tel que défini dans le règlement délégué (UE) 2019/2016 de la Commission, toutes les informations relatives à cet appareil de réfrigération sont disponibles sur la Base EPREL (European Product Database for Energy Labelling). - Page 9 l’exposition directe au soleil. Assurez-vous que l’appareil n’est pas placé à proximité d’humidité (sèche-linge par exemple) pour éviter la formation de condensation sur les parois. Ne jamais placer le réfrigérateur dans un mur ou encastré dans les armoires encastrées ou mobilier.
- Page 10 Avant de brancher votre appareil Vérifiez que vous avez une prise qui est compatible avec la fiche fournie avec le réfrigérateur. Si ce n'est pas le cas voire la section intitulée INFORMATIONS ÉLECTRIQUES. NE METTRE EN MARCHE QUE QUATRE HEURES APRÈS LE DÉPLACEMENT DU REFRIGERATEUR.
- Page 11 diminuer la température de 1°C. Attention ! après avoir sélectionné la température souhaitée, l'écran continuera à afficher la température réelle à l'intérieur de l'appareil, qui variera progressivement jusqu'à atteindre la température sélectionnée. Appuyez simultanément sur les boutons de réglage de la température pendant 3 secondes pour changer l'affichage de la température de Celsius à...
- Page 12 Fixation séparateur (gauche) 2 pièces Fixation séparateur (droite) 2 pièces Séparateur ajustable 2 kits Tige pour séparateur supérieur 2 pièces Tige pour séparateur inférieur 2 pièces 2) Veuillez suivre les étapes de la figure pour l'installer : Étape 1 : Installez la fixation du séparateur 1 pièce à droite et 1 pièce à gauche des deux côtés du tiroir supérieur (figure 1) et du tiroir inférieur (figure 2).
- Page 13 Étape 4 : Pour assembler le séparateur sur le tiroir inférieur, veuillez voir la figure 4 ci-dessous. Étape 5 : Installez la tige pour empêcher les bouteilles placées dans le tiroir inférieur de tomber lors de l'ouverture et de la fermeture de la porte. Installation des poignées (selon le modèle): Pour installer la poignée, veuillez suivre les instructions ci-dessous : 1.
- Page 14 de la porte en acier inoxydable. 3. Remplacez le joint de porte. Remplacer le filtre à charbon (selon le modèle) : Cet appareil est équipé d'un filtre à charbon pour rafraîchir l'air à l'intérieur, il s'agit d'une rondelle noire en haut à gauche à l'arrière de l'appareil, elle doit être remplacée annuellement et peut être achetée auprès du fabricant.
-
Page 15: Conservation Des Aliments
3. Pour le retirer, tournez le filtre à charbon pour dégager les picots et tirez-le directement de l'intérieur du refrigérateur vers vous. Filtre à charbon Pour accéder à la plaque signalétique, suivez les mêmes étapes pour retirer le tiroir inférieur. 5. -
Page 16: Rangement Des Aliments
emballages carton autour des pots de yaourt. Vérifiez bien la date limite de consommation indiquée sur les produits que vous avez achetés. Elle ne doit pas être dépassée RANGEMENT DES ALIMENTS La température n'est pas uniforme à l'intérieur de votre réfrigérateur. Certaines zones sont plus froides que d'autres et vous devez stocker les aliments selon leur nature dans la zone appropriée de votre réfrigérateur pour en garantir une bonne conservation en toute sécurité. - Page 17 Le non-respect de ces températures de conservation implique des risques d’intoxication et de gaspillage alimentaire. Pour une conservation optimale des denrées alimentaires, il est recommandé de régler les températures des compartiments comme ci-dessous : Type Température de Type de nourriture compartiment stockage [°C] Œufs, Nourriture cuisinée, aliments emballés, fruits et...
-
Page 18: Entretien Et Maintenance
Porc, Bœuf, poisson, poulet, aliments transformés Compartiment -6<=0 (aliment à consommer le jour de l’ouverture, durée de 0 étoile stockage recommandée de 3 jours) Non adapté aux produits congelés. Porc, Bœuf, poisson, poulet (aliment à consommer le Frais 2<=3 jour de l’ouverture ou jusqu’à 2 jours après, durée de stockage recommandée de 7 jours) Non adapté... - Page 19 ▪ Déplacement Tout d'abord, débranchez votre appareil. Retirez toutes les bouteilles et fixez toutes les pièces détachées. Pour éviter d'endommager les vis de nivellement des pieds, vissez-les fermement dans la base. Déplacez l'appareil en position verticale (de préférence) ou notez le sens dans lequel l'appareil peut être posé...
-
Page 20: Guide De Depannage
défectueuses, veuillez contacter votre service après-vente pour toute intervention. 7. GUIDE DE DEPANNAGE Vous pouvez résoudre seul et facilement quelques problèmes communs, économisant ainsi le coût d’une intervention d’un dépanneur. Essayez les suggestions suivantes pour voir si votre problème peut être résolu sans l’aide d’un dépanneur. Problèmes Solutions ✓... -
Page 21: General Safety Instructions
Dans un souci d’amélioration constante de nos produits, nous nous réservons la possibilité de modifier les caractéristiques techniques sans préavis. Les garanties des produits de la marque FRIGELUX sont exclusivement énoncées par les distributeurs que nous avons choisis. Aucun élément des présentes ne peut être interprété comme une garantie supplémentaire. - Page 22 • User cleaning and servicing operations should not be carried out by children, unless they are more than 8 years old and are supervised. • Keep all packaging away from children as there is risk of suffocation. • Risk of child entrapment. Child entrapment and suffocation are not problems of the past.
- Page 23 • Keep the appliance and its power cable out of reach of children less than 8 years old. • Before you throw away your old wine cooler: take off the door. Leave the shelves in place so that children may not easily climb inside. •...
- Page 24 ▪ Make sure that you can access the main plug of the appliance. ▪ Do not pull the main cable. ▪ If the power plug socket is loose, do not insert the power plug. There is a risk of electric shock or fire.
-
Page 25: Energy Savings
Caution! Care and cleaning ▪ Before maintenance, switch off the appliance and disconnect the mains plug from the mains socket. ▪ Do not clean the appliance with metal objects, steam cleaner, ethereal oils, organic solvents or abrasive cleansers. ▪ Do not use sharp objects to remove frost from the appliance. Use a plastic scraper. Installation Important! For electrical connection, carefully, follow the instructions given in this manual. - Page 26 Service ▪ Any electrical work required to do the servicing of the appliance should be carried out by qualified electrician or competent person. ▪ This product must be serviced by an authorized Service Center, and only genuine spare parts must be used. This appliance is for domestic use only.
- Page 27 R600a Safety regulation Warning: Do not use mechanical devices or other means to accelerate the defrosting process, other than those recommended by the manufacturer. Warning: Keep ventilation openings in the appliance enclosure or in the structure clear of obstruction. Do not store explosive substances such as aerosol cans with a flammable propellant in this appliance.
-
Page 28: Product Description
2. PRODUCT DESCRIPTION RETT136A: Control panel Carbon filter Air duct plate Shelf Lock Ventilation grille Lower hinge Handle Foaming door Door gasket Upper hinge RE2T136A: Control panel Upper drawer Upper drawer divider Upper handle Upper foaming door Lower drawer Lower drawer divider... -
Page 29: Installation Instructions
To find out more about your product, consult the online EPREL database. As defined in Commission Delegated Regulation (EU) 2019/2016, all information relating to this refrigeration appliance is available on the EPREL Base (European Product Database for energy labeling). This database enables you to consult the information and technical documentation of your refrigeration appliance. - Page 30 damp course, otherwise condensation will occur on the cabinet. Never place the appliance in a wall recessed or into fitted cabinets or furniture when it is working, the metal grid at the back may become hot and the sides warm. Never place the Fridge in a wall recessed or into fitted cabinets or furniture when your Fridge is working, the grille at the back may become hot and the sides warm.
-
Page 31: Operating Your Appliance
Before filling your fridge Before storing foods in your fridge, turn the fridge on and wait for 24 hours to make sure it is working properly and to allow the fridge to fail to the correct temperature. 4. OPERATING YOUR APPLIANCE Temperature Control this appliance is with infrared sensor, to avoid malfunction of the appliance, do Attention! - Page 32 Alarm system: 1) Door open alarm: If door is left open for over 5 minutes, door open alarm will activate. The alarm pictogram flashes display on the LCD screen with beeping warning sound, press any key to stop beeping warning sound. The warning will automatically stop if door is properly closed. 2) High temperature alarm: If inside temperature is over 25°C for over 6 hours, high temperature alarm will activate, the pictogram will flash on the screen with beeping warning sound, press any key to stop...
- Page 33 2) Please follow the steps in the figure to install: Étape 1: To install 1pc right and 1pc left divider permanent seat on the two side on upper drawer (figure 1) and lower drawer (figure 2) Étape 2: To assemble the movable divider, the parts that need to be prepared are 2pcs upper drawer pipe, 2 U-shaped tubes and 2 rotators, please following below figure 3.
- Page 34 Étape 4: To assemble the divider on lower drawer, please see below figure 4. Étape 5: Install S.S. tube to prevent bottles placed in the lower drawer from falling during opening and closing the door. Handle installation (depends on the model): There is a handle in the accessory bag, please follow below instructions to install handle.
- Page 35 Charcoal filter (depends on the model): This appliance is equipped with a charcoal filter to fresh the air inside, it is a black washer in the top left at the back of appliance, it should be replaced annually and can be bought from the manufacturer. To remove it, turn the charcoal filter to set free pins and pull it directly from the inside of the appliance towards you.
-
Page 36: Food Conservation
3. To remove it, turn the charcoal filter to set free pins and pull it directly from the inside of the cellar towards you To access the nameplate (rating label), follow the same steps to remove the bottom drawer. 5. FOOD CONSERVATION PREPARING FOOD FOR THE REFRIGERATOR Carefully wrap fresh foods: they will then keep their flavor, color, humidity content and freshness. - Page 37 Food preservation and storage. The storage of foodstuffs must comply with the regulatory conservation temperatures established by the National Agency for Food, Environmental and Occupational Health Safety (ANSES). Failure to comply with these storage temperatures involves risks of poisoning and food waste. Under the recommended setting, the best shelf life is no more than 3 days in the refrigerator and 3 months in the freezer (4 stars);...
-
Page 38: Care And Maintenance
6. CARE AND MAINTENANCE Defrosting The defrost of the fridge part is automatic. When the refrigerator is in operation, beads of condensation or frost will form on the back wall. This phenomenon is normal. It is not necessary to wipe off any condensation or frost. The back wall automatically defrosts. - Page 39 Cleaning inside the fridge After defrosting you should clean the fridge internally with a weak solution of bicarbonate of soda. Then rinse with warm water using a damp sponge or cloth and wipe dry. Wash the baskets in warm soapy water and ensure they are completely dry before replacing in the Fridge. Condensation will form on the back wall of the Fridge;...
-
Page 40: Troubleshooting Guide
▪ Be sure to wrap foods properly, and wipe containers dry before placing them in the refrigerator. This cuts down on frost build-up inside the refrigerator. ▪ Refrigerator storage bin should not be lined with aluminum foil, wax paper, or paper toweling. Liners interfere with cold air circulation, making the refrigerator less efficient. - Page 41 As we continuously improve our products for the benefit of our customers, we reserve the right to modify technical characteristics without notice. Warranties for FRIGELUX brand products are offered exclusively by selected retailers. No part of these instructions may be considered as a supplementary guarantee.
Need help?
Do you have a question about the RETT136A and is the answer not in the manual?
Questions and answers