
Related Manuals for Directed Hema HM-MNT

Summary of Contents for Directed Hema HM-MNT
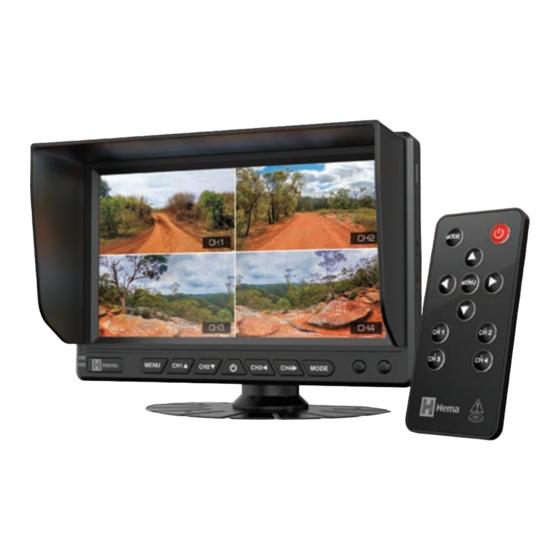
- Page 1 HM-MNT 7.0" Multi-Channel AHD Monitor With 4 Camera Inputs User Manual hema.com.au | hema.co.nz...
-
Page 3: Table Of Contents
CONTENTS 1.0 INTRODUCTION ....................2 1.1 Components List ....................2 1.2 Specifications ......................4 2.0 PRODUCT OVERVIEW ..................5 3.0 GETTING STARTED ..................7 4.0 MENU NAVIGATION ..................9 4.1 Split Screen Options .....................9 4.2 Individual Camera Settings .................9 4.3 Mirror Flip ......................10 4.4 Trigger Delay ....................... 11 4.5 Screen Rotate ...................... -
Page 4: Introduction
INTRODUCTION Thank you for purchasing the Hema HM-MNT AHD Quad Display Touchscreen Monitor. We are certain that our product will give you trouble- free operation while providing you with a safety feature that enhances your driving experience. DISCLAIMER The HM-MNT has been designed to help drivers reverse and park, but is not a substitute for driver discretion. You should drive your vehicle with your full attention and use this system as an aid only. The manufacturer and its distributors do not guarantee or assume liability for collisions or damages while the HM-MNT is in use. CAUTION • Ensure you are familiar with your local road legislation and you are using your monitor within your countries’ road laws. COMPONENTS LIST 1. HM-MNT 7" AHD Touchscreen Monitor 2. Remote Control 3. U-shape Mounting Bracket 4. U-shape Bracket Mounting Bolts x4 5. Detachable Sun Visor 6. 3M Adhesive Dashboard Mount 7. Wire Harness 8. User Manual... - Page 5 IMPORTANT NOTICE • Please read this user manual carefully before using the product. • Always insulate your wire connection points. • Always install wiring away from heat sources and electrical components. • Once installed, test your camera to ensure it is working correctly. • This system is an aid only. Drivers must always be careful when operating a vehicle, even while this system is in use. • Specifications are subject to change without notice. WARNING • Do not disassemble the monitor or cut the monitor cable as this voids the warranty. WARNING KEEP OUT OF REACH OF CHILDREN THIS PRODUCT CONTAINS A BUTTON BATTERY If swallowed, a lithium button battery can cause severe or fatal injuries within 2 hours.
-
Page 6: Specifications
SPECIFICATIONS LCD Size: 7 " Analogue High Definition ( AHD ) IPS Touchscreen Brightness: 600 cd/m Touchscreen: Backlight: Screen Resolution: 600 H x 1024 W Video System: PAL/NTSC auto Camera Compatibility: AHD (720P, 960P, 1080P) / CVBS compatible Viewing Angle: Left/Right/Up/Down: 90° Quad Split: Built-in quad interface View Mode: Selectable single / dual / quad view Trigger Priority: CH 1 > CH 2 > CH 3 > CH4 Trigger Specification: 12V-32V DC (adjustable delay time 0-20 seconds) Input Voltage: 12V-32V DC Input Current: 700mA at 12V DC Working Temperature: -10°C to 65°C Menu Language: English Mirror Image: Mirror image and rotation available Camera Inputs: Sun Visor: Detachable... -
Page 7: Product Overview
2.0 PRODUCT OVERVIEW Monitor Remote Control MENU MODE Only compatible with HEMA cameras Heavy-duty Bracket (with double-sided 3M sticker) - Page 8 MONITOR 1. MENU: Press to enter menu settings 2. CH1 : F unction 1 - Switch to CAM1 in full aspect Function 2 - Menu UP/DOWN selection 3. CH2 : F unction 1 - Switch to CAM2 in full aspect Function 2 - Menu UP/DOWN selection Standby ON/OFF 5. CH3 : F unction 1 - Switch to CAM3 in full aspect Function 2 - Menu LEFT/RIGHT selection 6. CH4 : F unction 1 - Switch to CAM4 in full aspect Function 2 - Menu LEFT/RIGHT selection 7. MODE: Display Switch Mode REMOTE CONTROL 1. MODE: Display Switch Mode Standby ON/OFF 3. MENU , , , : MENU/LEFT/RIGHT/UP/DOWN 4.
-
Page 9: Getting Started
3.0 GETTING STARTED 1. Attach the optional detachable sun visor to the monitor. (as shown in image 1). 2. Mount the monitor with the U-bracket and screws or by using the heavy-duty bracket with the 3M tape. 3. Connect the RED wire (labelled ACC) to your chosen power source (either accessories or ignition). Both sources will be powered by a 12V or 24V battery, depending on the type of the vehicle. Refer to diagram on page 5. 4. Connect the YELLOW wire (labelled B+) to a constant 12V or 24V power source. This connection can be made directly from the positive battery terminal or to the vehicle’s main fuse box. Connect the BLACK wire to the chassis, while the vehicle is on solid ground (earth). This wire can be connected to the negative terminal of the vehicle's battery. 5. Connect the 6-pin camera cable to the monitor. To have a particular camera appear on the monitor when triggered, a (+) positive power feed is required. E.g.: The monitor’s brown trigger wire could be connected to the (+) positive reverse lamp wire. This will ensure the reverse camera will appear on the monitor when your vehicle is in reverse. This wire only has power when the reverse gear is in use. NOTE: • The HM-MNT will only connect to Hema cameras with a 6-pin Din connection. Please confirm your chosen camera is suitable for your vehicle with your retailer. Other cameras may require a 6-pin Din adaptor. 6. When your vehicle is on, (either with the ignition turned on, or in accessory mode) your monitor will turn on automatically. - Page 10 7. The default display is CH1 Full Screen. By pressing the Mode button continuously, the display input can be changed with the following sequence: Sequence 1: CH 1 Full screen Sequence 2: CH 2 Full Screen Sequence 3: CH 3 Full Screen Sequence 4: CH 4 Full Screen SPLIT SCREEN OPTIONS: Sequence 5: A ll channels displayed Sequence 6: C H 1 Half Screen with CH 2 and CH 3 Sequence 7: C H1 and CH 2 Half Screen Sequence 8: C H 3 and CH 4 Half Screen Sun visor Image 1 NOTE: • The Mode Switch will skip a channel if there is no camera connected to that channel input. When triggered, the Mode will switch to full display.
-
Page 11: Menu Navigation
4.0 MENU NAVIGATION The Hema logo will appear when you turn on the monitor for the first time. When the camera is connected, it will switch to Full Screen mode. Select the display mode by pressing the Mode button. If the monitor is turned off, the most recent display mode chosen will be shown. SPLIT SCREEN OPTIONS Sequence 5 Sequence 6 Sequence 7 Sequence 8 4.2 INDIVIDUAL CAMERA SETTINGS You can adjust the display settings of the HM-MNT's connected cameras. Step 1: Press Menu Step 6: Select the channel using the LEFT/RIGHT key Step 2: Press UP/DOWN key to Step 7: Select the setting by select the Icon pressing the UP/DOWN key Step 3: Press RIGHT key to enter Step 8: Change the selected Step 4: Press the DOWN key to setting with the LEFT/RIGHT key... -
Page 12: Mirror Flip
Brightness: Increase or decrease brightness ( Value 0-100, Default 50 ) Colour: Increase or decrease colour saturation ( Value 0-100, Default 50 ) Contrast: Increase or decrease contrast ( Value 0-100, Default 50 ) Reset: Activating Reset will revert all the settings to Default mode Channel1 Channel2C hannel3C hannel4 Camera Setting Step 4 Image Step 6 Image 4.3 MIRROR FLIP The Mirror Flip function will flip the image horizontally. It is best used when the camera is located at the front or side of a vehicle. When using the Mirror Flip function, it is not safe to use it while the vehicle is in reverse. Step 1: P ress MENU Step 2: P ress UP/DOWN key to select the icon Step 3: P ress RIGHT key to enter Step 4: Use UP/DOWN key to select the setting you require to change Step 5: U se UP/DOWN key select Mirror Flip Step 6: P ress RIGHT key to enter camera selection Step 7: P ress UP/DOWN key to select the camera Step 8: P ress RIGHT/LEFT key to turn ON/OF Mirror Flip Channel 1... -
Page 13: Trigger Delay
4.4 TRIGGER DELAY When the trigger is activated on the respective camera, it will override any previous selections. The selected camera view will return to a full-screen image. The default transition time between triggered screens is less than a second, until it is adjusted otherwise (this can be between one and 20 seconds). When the trigger is deactivated, the display will revert to the selected mode display. Increasing the trigger delay time will also increase the full-screen display time of this camera, even if deactivated. Step 1: Press MENU Step 5: Press RIGHT key to enter Step 2: Press UP/DOWN key to Step 6: Press UP/DOWN key to select the Icon select the camera Step 3: Press RIGHT key to enter Step 7: Press LEFT/RIGHT key to change the trigger delay time Step 4: Use UP/DOWN key to (range is from 0-20 seconds) select Trigger Delay Trigger Delay: Duration of the triggered camera display after the trigger is off is between 0 and 20 seconds. -
Page 14: Screen Rotate
4.5 SCREEN ROTATE Screen Rotate will flip and rotate the orientation of the screen to upside down or left and right. To rotate the screen follow the below steps: Step 1: P ress MENU Step 2: P ress UP/DOWN key to select the Icon Step 3: P ress RIGHT key to select Step 4: U se UP/DOWN key to select Rotate There are 3 different ways to rotate the image: 1. Press Right Key Once: Normal image switches to Mirror image 2. Press Right Key a Second Time: Normal image rotated 180º 3. Press Right Key a Third Time: Mirrored image is rotated 180º 4. -
Page 15: Guidelines
4.6 GUIDELINES Enabling the Guidelines feature will show the guidelines when the camera is triggered and is ideal for reversing cameras. Guidelines are disabled by default. To turn guidelines on or off, please follow the below steps: Step 1: Press MENU Step 2: Press UP/DOWN key to select Step 3: Press RIGHT key to enter Step 4: Use the UP/DOWN key to select Guidelines Step 5: Press RIGHT key to enter Step 6: Press UP/DOWN keys to select camera Step 7: P ress RIGHT and LEFT to turn ON/OFF Guidelines The Guidelines function will turn on when the trigger has been activated. -
Page 16: Warranty Terms And Conditions
5.0 WARRANTY TERMS AND CONDITIONS Our goods come with guarantees that cannot be excluded under the Australian Consumer Law. You are entitled to a replacement or refund for a major failure and for compensation for any other reasonably foreseeable loss or damage. You are also entitled to have the goods repaired or replaced if the goods fail to be of acceptable quality and the failure does not amount to a major failure. This warranty is provided in addition to your rights under the Australian Consumer Law. Directed Electronics Australia Pty Ltd (Directed Electronics) warrants that this product is free from defects in material and workmanship for a period of 36 months from the date of purchase or for the period stated on the packaging. This warranty is only valid where you have used the product in accordance with any recommendations or instructions provided by Directed Electronics. This warranty excludes defects resulting from alterations of the product, accident, misuse, abuse or neglect. In order to claim the warranty, you must return the product to the retailer from which it was purchased or if that retailer is part of a national network, a store within that chain, along with satisfactory proof of purchase. The retailer will then return the goods to Directed Electronics. Directed Electronics will repair, replace or refurbish the product at its discretion. The retailer will contact you when the product is ready for collection. All costs involved in claiming this warranty, including the cost of the retailer sending the product to Directed Electronics, will be borne by you. Please scan the QR code for Hema support Or visit Hema support at: https:/ /support.hema.com.au Phone: +61 03 8331 4800 www.hema.com.au... - Page 17 INDEMNITY You agree to defend, indemnify and hold harmless Directed, Hema and its subsidiaries and affiliates from and against any and all claims, proceedings, injuries, liabilities, losses, costs and expenses (including reasonable legal fees), including but not limited to, claims alleging negligence, invasion of privacy, copyright infringement and/or trademark infringement against Hema and its subsidiaries and affiliates, relating to or arising out of your breach of any provision of these terms, your misuse of Hema products or its services, or your unauthorised modification or alteration of products or software. WARRANTY AND WARRANTY DISCLAIMER Hema has a limited warranty on whereby Directed warrants to you and only to you that this Hema product will be free from defects in materials and workmanship for three (3) years from the date of your purchase (unless a longer warranty period is required by law). The specifics of this Hema limited warranty are covered in this manual. To the extent possible under governing law, other than the above product warranty for the Hema product, you understand and agree that the Hema products and services are provided on an “as is” and “as available” basis. Directed makes no warranty that the Hema products and services will meet your requirements or that use of the Hema products and services will be uninterrupted, timely, secure or error-free nor does Directed make any warranty as to the accuracy or reliability of any information obtained through Hema (including third party content), that any defects in Hema products and services will be corrected or that Hema products or services will be compatible with any other specific hardware or service. Further, Directed does not warrant that Hema products or services or Hema servers will provide you with data and content are free of viruses or other harmful components. Directed also assumes no responsibility for and shall not be liable for any damages caused by viruses that may infect your Hema product, computer software, or other hardware.
- Page 18 In the event of any loss, damage or injury, you will not look to Hema to compensate you or anyone else. You release and waive for yourself and your insurer all subrogation and other rights to recover against Directed arising as a result of the payment of any claim for loss, damage or injury. Hema equipment and services do not cause and cannot eliminate occurrences of certain events and Hema makes no guarantee or warranty, including any implied warranty of merchantability or fitness for a particular purpose or that Hema equipment and services provided will detect or avert such incidents or their consequences. Directed does not undertake any risk that you or property, or the person or property of others, may be subject to injury or loss if such an event occurs. The allocation of such risks remains with you, not Hema. Other than the above product warranty for Hema products, its suppliers disclaim all warranties of any kind, whether express, implied, or statutory, regarding Hema products and services, including any implied warranty of title, merchantability, fitness for a particular purpose, or non-infringement of third party rights. Because some jurisdictions do not permit the exclusion of implied warranties, the last sentence of this section may not apply to you. Hema hereby further expressly disclaims all liability for claims for service failures that are due to normal product wear, product misuse, abuse, product modification, improper product selection or your noncompliance with all applicable federal, state or local laws. This warranty and warranty disclaimer give you specific legal rights, and you may have other rights that vary by state, province or country. Other than as permitted by law, Hema does not exclude, limit or suspend other rights you have, including those that may arise from the non-conformity of a sales contract. For a full understanding of your rights, you should consult the laws of your state, province, or country. For our Australian customers: please note that this warranty is in addition to any statutory rights in Australia in relation to your goods which, pursuant to the Australian Consumer Law, cannot be excluded.
- Page 19 LIMITATIONS OF LIABILITY Under no circumstances will Directed be liable in any way for any content, including, but not limited to, the loss of content, any errors or omissions in any content, or any loss or damage of any kind incurred in connection with use of or exposure to any content posted, emailed, accessed, transmitted, or otherwise made available via Hema. Hema liability for damages, especially for breach of duty or obligation, delay in performance, non-performance, or malperformance shall be precluded, except when these are due to negligent breaches of any significant contractual duty or obligation on the part of Hema. Any liability for negligence is limited to direct losses usually and typically foreseeable in such case. Should the claim for damages be based on wilful or grossly negligent breach of contractual duty or obligation on the part of Hema, the preclusion and limitation of liability mentioned in the preceding sentences will not apply. The preceding preclusion and limitation of liability will also not apply to claims for damages arising out of loss of life, bodily injury or health impacts for which Hema may be liable, or for non-contractual liability. Some states and countries do not allow the exclusion or limitation of incidental or consequential damages, so the above limitation or exclusion may not apply to you. Additionally, this provision is not intended to limit Hema’s liability in the event of Hema’s wilful or intentional misconduct.
-
Page 20: Notes
6.0 NOTES... - Page 24 V1.0 Hema Maps Pty Ltd. hema.com.au | hema.co.nz Hema®, Hema Maps® and Map Patrol® are registered trademarks of Hema Maps Pty Ltd. HERE® is a trademark of Here Technologies LLC. © 2024 Hema Maps Pty Ltd. © 2024 Hemax Digital Pty Ltd. Hema and Hema Maps are used under license by Directed Electronics. All Images, Information and Content are ANOTHER Copyright © 2024 Directed Electronics Australia BRAND FROM DIRECTED Pty Ltd. All Rights Reserved.
Need help?
Do you have a question about the Hema HM-MNT and is the answer not in the manual?
Questions and answers