
Related Manuals for ENDEAVOUR E222A

Summary of Contents for ENDEAVOUR E222A
- Page 1 Inset LED Electric Fire Model No: E222A INSTALLATION AND OPERATION INSTRUCTIONS Please read the instruc�ons carefully before installa�on or use and keep for future reference...
-
Page 3: Table Of Contents
CONTENTS 1. Important Safety Informa�on ······················································· 1 2. Technical Specifica�ons ······························································ 3 3. Parts and Hardware ··································································· 4 4. Appliance Dimensions ································································ 5 5. Installa�on Instruc�ons ······························································ 5 6. Opera�ng Instruc�ons ······························································· 7 7. Maintenance ········································································· 9 8. Others ················································································· 10... -
Page 4: Important Safety Informa�On
1. IMPORTANT SAFETY INFORMATION 1.1 Read all of the instruc�ons carefully before using the appliance. 1.2 For indoor use only. This appliance is not suitable for use outside the house and only suitable for well insulated spaces or occasional use. 1.3 Do not use this appliance in the immediate surroundings of a bath, a shower or a swimming pool. - Page 5 1.10 To reduce the risk of fire, keep tex�les, curtains, or any other flammable material a minimum distance of 1 meter from the air outlet. 1.11 Keep the power cord away from hot surfaces and hot conditions. Do not route the power lead in front of the appliance.
-
Page 6: Technical Specifica�Ons
13A fuse or plug being 13A BS1363A approved. 2. TECHNICAL SPECIFICATIONS Model No.: E222A Supply Voltage: AC 220-240V 50Hz Maximum power consump�on: 1.8K W Power for flame effect: 6W (LED 2W + Motor for flame 4W) -
Page 7: Parts And Hardware
Type of heat output / room temperature control Single stage heat output and no room temperature control Two or more manual stages, no room temperature control With mechanic thermostat room temperature control With electronic room temperature control Electronic room temperature control plus day �mer Electronic room temperature control plus week �mer Other Control Op�ons Room temperature control, with presence detec�on... -
Page 8: Appliance Dimensions
4. APPLIANCE DIMENSIONS Unit: mm 5. INSTALLATION INSTRUCTIONS Tools Required A screwdriver will be needed. Loca�ng the Appliance Your new electric fireplace may be installed virtually anywhere in your home. However, when choosing a location ensure that the general instructions are followed. - Page 9 5.1 This fire is designed to be installed from the back of the mantle, to do so use 4pcs ST4×12 screws to fix like shown in figure (A) Figure (A) Mood lighting - to connect the mood lighting, unscrew the small metal plate on the rear of the appliance this will reveal a male connector.
-
Page 10: Opera�Ng Instruc�Ons
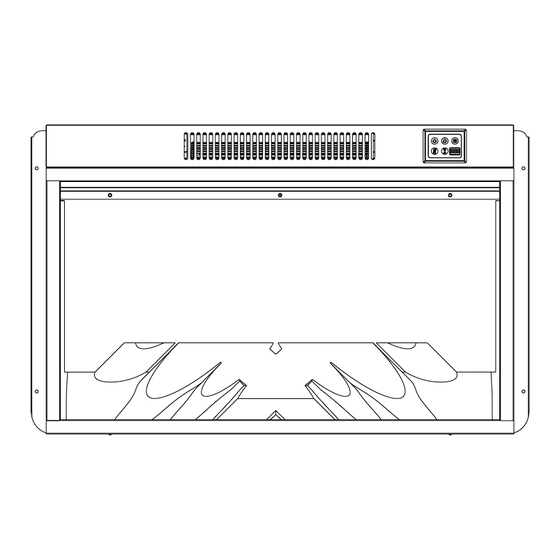
NOTE: Compa�ble mood lights are available from Appliance Development Services Ltd. Other makes may not be suitable and will void warranty. 6. OPERATING INSTRUCTIONS WARNING! Do not operate the appliance if it is damaged or has malfunc�oned. If you suspect the appliance is damaged or has malfunc�oned call a qualified service engineer to inspect the appliance and replace any part of the electrical system if necessary, before reuse. - Page 11 6a. MANUAL CONTROL PANEL MANUAL CONTROL PANEL REMOTE CONTROL Flame Color POWER(Switch on/off Button) Flame Brightness Mood lights HEATER(High Temperature & Low Temperature Setting) Timer NOTE: The ICONS on the keypad have the same func�on as the ICONS on the remote control. 6a.1 The manual bu�ons are located on the front in the upper right corner of the appliance.
-
Page 12: Maintenance
④ Timer :Timer can be set between 0-8 hours. The default �mer is 0 hours pushing this button will change the timer ( From OFF-1H-2H-3H-...7H-8H). ⑤ Flame Brightness :To adjust the flame brightness, press the "flame brightness " button. - The display window will show the level of the brightness. (L1-L2-L3-L4-L5)). - Press “Flame Brightness”... -
Page 13: Others
8. Others Environment Meaning of crossed –out wheeled dustbin: Electrical appliances should not be disposed as unsorted municipal waste. Separate collec�on facili�es should be used in the disposal of electrical appliances. To have this appliance processed at the end of its useful life please contact WEEECare Plc on 0844 8002004.
Need help?
Do you have a question about the E222A and is the answer not in the manual?
Questions and answers