Table of Contents
Advertisement
Advertisement
Table of Contents

Related Manuals for SureLife AOJ-30G

Summary of Contents for SureLife AOJ-30G
- Page 1 BLOOD PRESSURE MONITOR Instructions for Use...
-
Page 3: Table Of Contents
Table of Contents 1. Unpacking Inspection 2. Packing List 3. Safety Precautions 4. Product Composition 5. Intended Use/Instructions for Use 6. Contraindication 7. Product Parts 8. Four-Color Backlit Display 9. Power Connection 10. Function Setting 11. How to Apply the Arm Cuff 12. -
Page 4: Unpacking Inspection
Thank you for purchasing the SureLife® Arm Blood Pressure Monitor The monitor uses the oscillometric method of blood pressure measurement This means the monitor detects your blood movement through your brachial artery and converts the movements into a digital reading... -
Page 5: Safety Precautions
3. Safety Precautions Knowledge of the warning signs and symbols is crucial to the safe and proper use of this device Kindly get informed on the following signs and symbols which you might encounter within this user manual or on the label: Warning information Device classification: type BF applied part Comply with local regulations about disposal... -
Page 6: Product Composition
This product is composed of the main body and cuff 5. Intended Use/Instructions for Use The SureLife® Arm Blood Pressure Monitor is intended to measure the systolic blood pressure and diastolic blood pressure, as well as the pulse rate of the adult person via... -
Page 7: Product Parts
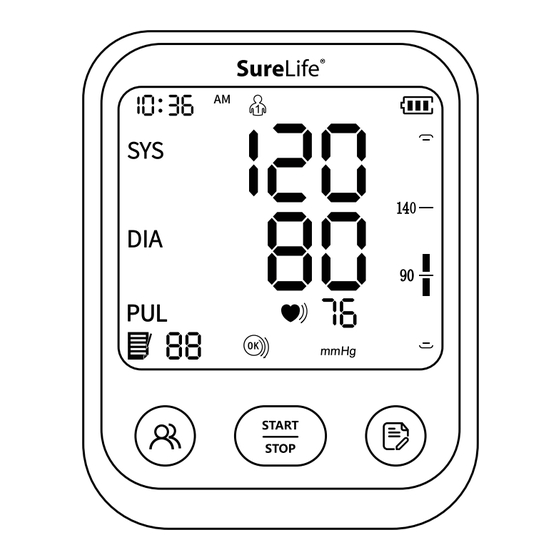
7. Product Parts Main Body LCD Screen User Selection/ General Setting Button START/STOP Button Memory Button Power Input of Type-C Charging Port Display Screen 1 Date and Time 2 Systolic Blood Pressure Icon 3 Systolic Blood Pressure Value 4 Diastolic Blood pressure Icon 5 Diastolic Blood Pressure Value 6 Pulse Rate Icon 7 Memory Icon... -
Page 8: Four-Color Backlit Display
8. Four-Color Backlit Display White for Standby Green for Normal Yellow for Mild High Blood Red for High Pressure or Hypotension Bood Pressure Systolic Blood Diastolic Blood Color Hierarchical Pressure (mmHg) Pressure (mmHg) Display Relationship ≥160 ≥100 and (or) 140–159 90–99 yellow and (or) -
Page 9: Function Setting
Remove the batteries if you do not intend to use the device for a long time (over 3 months) Type-C Connection for Power Supply In addition to the batteries, power can also be supplied by plugging into d c 5v external power supply through a Type-C port (the Type-C charging cable is not included) 10. - Page 10 Press the " " button Date and Time Setting In the power-off mode, press the “ ” button for about 5 seconds to enter the date setting interface, and the “year” will flash Press the “ ” button to adjust the year, and press the “...
-
Page 11: How To Apply The Arm Cuff
Unit Display Setting There are two units of blood pressure display, mmHg and kPa The default unit is mmHg In the power-off mode, press the “ ” button for about 5 seconds to enter the unit selection Press the “ ”... - Page 12 2. Place your hand through the cuff loop Pull the cuff until it reaches your upper arm Note: The bottom edge of the arm cuff should be 0.79–1.18 inches (2-3cm) above the elbow. The air tube should be on the inside of your arm and aligned with your middle finger.
- Page 13 Make sure that the air tube is positioned on the inside of your arm and wrap the cuff securely, so it can not move around your arm Note: Repeated measurement will result in blood congestion in the arm, which will affect the measurement result. How to avoid blood congestion and ensure the repeated measurement is accurate? You can raise the left hand and make a fist several times, or take off the cuff and rest for at least 2-3 minutes before taking the measurement.
-
Page 14: How To Take Proper Measurements
12. How to Take Proper Measurements Preparation Before Measurement • Move clothing on arm so that the cuff makes contact with the skin, only • Always measure with the same arm (generally the left arm) • Remain still and relax as much as possible Do not talk during measurement •... - Page 15 Taking a Measurement 1. Fasten the arm cuff following the instruction of “HOW TO APPLY THE ARM CUFF” Start the measurement after wearing the cuff correctly 2. Press the “ ” button After all icons are turned on, the monitor will start inflating for measurement and display “...
- Page 16 Note: if you feel uncomfortable during the measurement press the “ ” button immediately to stop the measurement. Please consult your doctor if unexpected readings are obtained. Memory Function 1. Each measure value is stored automatically under the appropriate user group This device can store up to 199 sets of measurements for each user Once the memory log is full, old values will be refreshed with new ones 3.
- Page 17 Delete Memory In the power-off mode, press the “ ” button to select the user group whose measured values need to be deleted Press the “ ” button to power off the device and press the “ ” button once to activate the screen Then keep pressing the “...
-
Page 18: Specifications
” icon flashes when you move your body or shake your arm during the measurement, which may cause incorrect measurement results Please adjust your posture and measure again 13. Specifications Model AOJ-30G Display LCD Screen Measuring Method Oscillometric measurement Measuring Part... - Page 19 Dimension 130mm (L) x 100mm (W) x 60mm (H) (5 12 inches x 3 94 inches x 2 36 inches) Screen Size 81 2mm (L) x 70 9mm (W) (4 2 inches) Cuff Size 8 66~16 53 inches (22~42cm) Weight About 263g (without batteries) Anti Electronic Shock Internal Power Supply...
-
Page 20: Contraindications, Precautions, Warnings And Prompt Instructions
Transportation and Avoid strong impact, direct impact, exposure or Storage Environment rain during transportation The device shall be stored indoors at the temperature of -4˚F~131˚F (-20˚C~55˚C) and the relative humidity of 10%~93% Atmospheric condition: 70kPa~106kPa without corrosive gas and with good ventilation 14. - Page 21 • DO NOT take medicine based on readings from the device Contact your physician for specific information about your blood pressure The patient should not self-diagnose or self-medicate per measured results Kindly adhere to the instructions of your health provider •...
- Page 22 • Stop using this monitor and consult with your physician if you experience skin irritation or discomfort • Consult with your physician before using this monitor if you have had a mastectomy • Consult with your physician before using this monitor if you have severe blood flow problems or blood disorders, because the cuff inflation can cause bruising...
-
Page 23: Common Q&A On Blood Pressure
• Do not use this device adjacent to or stacked on other equipment to prevent improper functioning If such use is necessary, all equipment involved must be checked for normal operation • The use of accessories and transducers other than those specified or provided by the manufacturer is prohibited Failure to adhere to this might result in increased electromagnetic emissions or decreased... - Page 24 • The cuff is not tight enough If the cuff is loose, the compression force might fail to transmit to the artery, causing the blood pressure value to be much higher than it is Therefore, re-adjust and tightened the cuff further •...
-
Page 25: Abnormal Phenomena And Handling
16. Abnormal Phenomena and Handling If the measurement is abnormal, any of the following symbols may appear Errors Cause Solution Er U The pressure cannot Please make sure that the cuff is reach 30 mmHg (4 kPa) inserted and worn correctly Please in 12 seconds check that the cuff and tube are not broken... - Page 26 Troubleshooting Anomaly Possible Cause Solution Failure to The power is insufficient Replace the batteries or power on insert the Type-C charging cable for power supply The positive and negative Install the batteries poles of the batteries are correctly Follow installed reversely instructions on pg 8 No pres- The air tube plug is not...
-
Page 27: Cleaning And Disinfection
17. Cleaning and Disinfection Cleaning The device can be cleaned with a soft, clean cloth dampened with a small amount of neutral detergent or water Do not use corrosive cleaning agents, and take care not to immerse any part of the monitor in any fluid. Disinfection Recommended Disinfecting Agent: 70% Isopropanol solution... - Page 28 It is suggested to disinfect the monitor before and after use each time Each disinfection should be completed within 1 minute Do not perform mroe than 2 disinfections in a row Disposal Dispose of the monitor, other components and optional accessories according to applicable local regulations Unlawful disposal may cause environmental pollution Notes...
-
Page 29: Upkeep And Maintenance
18. Upkeep and Maintenance Water or neutral detergent • Always keep the surface of the device clean and tidy, helpful to prolong its service life • If the device is dirty, wipe with a dry soft cloth If the dirt cannot be eliminated easily, wipe with a soft cloth stained with water or neutral detergent, and then dry with a dry cloth •... -
Page 30: Appendix 1 Emc Information
The SureLife® Arm Blood Pressure Monitor is intended for use in the elec- tromagnetic environment specified below The customer or the user of the SureLife® Arm Blood Pressure Monitor should assure that it is used in such an environment Emissions... - Page 31 The SureLife® Arm Blood Pressure Monitor is intended for use in the elec- tromagnetic environment specified below The customer or the user of the SureLife® Arm Blood Pressure Monitor should assure that it is used in such an environment Immunity test...
- Page 32 The SureLife® Arm Blood Pressure Monitor is intended for use in the elec- tromagnetic environment specified below The customer or the user of the SureLife® Arm Blood Pressure Monitor should assure that it is used in such an environment Radiated...
- Page 33 1720 1700- Pulse modu- 1990 1800; lation 217 Hz 1845 CDMA 1900; 1970 1900; DECT; LTE Band 1, 3, 4, 25; UMTS 2450 2400- Blue- Pulse modu- 2570 tooth, lation 217 Hz WLAN, 802 11 b/g/n, RFID 2450, LTE Band 7 5240 5100- WLAN Pulse modu-...
- Page 34 Guidance and manufacturer’s declaration - Electromagnetic Immunity Radiated RF Test Fre- Modulation IEC 60601-1- Compliance IEC61000- quency 2 Test Level level (A/m) 4-39 (Test (A/m) specifica- tions for 30 kHz ENCLOSURE PORT IMMUNITY to proximity 134 2 kHz Pulse magnetic modulation fields) 2 1 kHz...
- Page 35 Item #: 860213 Model: AOJ-30G Manual Version: A0 Software Version: V1.0 Revision Date: 2024-02...
- Page 36 Questions or Comments? Call 877.358.4342 MHC Medical Products, LLC 8695 Seward Road Fairfield, Ohio 45011 www MHCmed com Made in China Distributed by MHC Medical Products, LLC Package design © 2024 SureLife® is a trademark of MHC Medical Products, LLC AD-022324 5...
Need help?
Do you have a question about the AOJ-30G and is the answer not in the manual?
Questions and answers