Advertisement
Available languages
Available languages
Table of Contents
USA office: Fontana
AUS office: Truganina
GBR office: FDS Corporation Limited,Unit 4, Blackacre Road, Great Blakenham,Ipswich, Ip6 0FL,United Kingdom
If you're having difficulty, our friendly
customer team is always here to help.
FRA office: Saint Vigor d'Ymonville
THIS INSTRUCTION BOOKLET CONTAINS IMPORTANT SAFETY INFORMATION.
USA:cs.us@costway.com
AUS:cs.au@costway.com
PLEASE READ AND KEEP FOR FUTURE REFERENCE.
GBR:cs.uk@costway.com
FRA:cs.f r @costway.com
Outdoor Gazebo
Gazébo Extérieur
NP11779
Advertisement
Table of Contents

Related Manuals for Costway NP11779


Summary of Contents for Costway NP11779
- Page 1 GBR office: FDS Corporation Limited,Unit 4, Blackacre Road, Great Blakenham,Ipswich, Ip6 0FL,United Kingdom THIS INSTRUCTION BOOKLET CONTAINS IMPORTANT SAFETY INFORMATION. USA:cs.us@costway.com If you're having difficulty, our friendly AUS:cs.au@costway.com PLEASE READ AND KEEP FOR FUTURE REFERENCE. GBR:cs.uk@costway.com customer team is always here to help. FRA:cs.f r @costway.com...
-
Page 2: Before You Start
Before You Start Please read all instructions carefully. Retain instructions for future reference. Separate and count all parts and hardware. Read through each step carefully and follow the proper order. We recommend that, where possible, all items are assembled near to the area in which they will be placed in use, to avoid moving the product unnecessarily once assembled. -
Page 3: Parts List
● The product is designed to provide shade only. Do not use this product in strong wind and rain. Wind and rain can damage the product and could result in injury to you and others. It is WARNING: recommended that the canopy be removed during strong winds ●... - Page 4 Description Sketch Avertissement : Connector Tube ● Le tissu répond à la spécification CPAI-84 pour la résistance aux Connector Tube flammes. Ce n'est pas résistant au feu. Le tissu brûlera s’il est laissé en contact continu avec une source de flamme. Base Plate L’application de produits chimiques agressifs sur le tissu peut rendre inefficaces les propriétés ignifuges.
-
Page 5: Liste Des Pièces
● Vérifiez que toutes les vis sont bien serrées avant et pendant Description Image QTÉ l'utilisation. Ne placez aucun type de conducteur ou de source de chaleur sous ou à moins de 5 pieds de l'appareil, y compris, mais Barre de Poids sans s'y limiter, un barbecue ou un radiateur. - Page 6 Fig. 2 Fig. 3 Fig. 2 EN: Fig.2: Insert Connector Tube (F) to Roof Tube Curved (B1 & B2), make sure the Fig. 3 holes are aligned. Use Bolt (AA) to connect Connector Tube (F) and Roof Tube Curved (B1 & B2). FR: Fig.2 : Insérez le tube de connecteur (F) dans le tube de toit incurvé...
- Page 7 EN: Fig.5: Use Bolt (AA) to Fig. 5 Fig.5 connect Lintel (C1) and Roof C1/C2 Tube Curved (B1). Use Bolt (AA) to connect Lintel (C2) Fig. 4 Fig. 5 and Roof Tube Curved (B2). FR: Fig.5 : Utilisez le boulon Fig.
- Page 8 EN: Fig.6: Use Bolt (AA) to Fig.6 connect Roof Tubes (D1 &D2). FR: Fig.6 : Utilisez le boulon (AA) pour connecter les tubes de toit (D1 et D2). Fig. 8 Fig. 9 Fig.7 EN: Fig.7: Use Bolt (CC) to connect Roof Tube Curved (B1) and Roof Tubes (D1) / Fig.
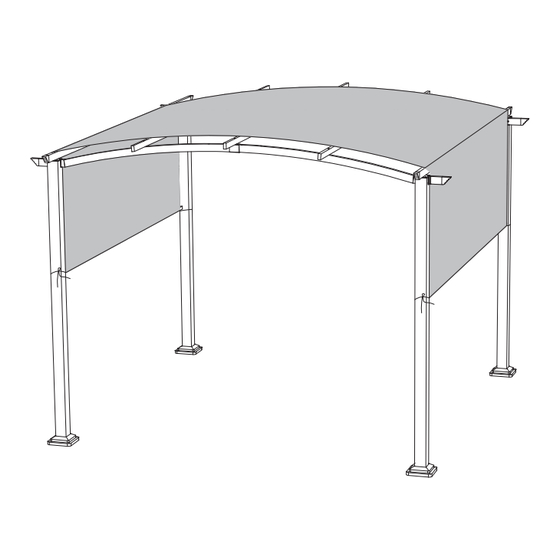
- Page 9 EN: Fig.9: Pass the Shade Fig. 9 Fabric (K) through the Roof Tube (D1/D2) in turn as above diagram. Make sure Lintel Return / Damage Claim Instructions (C1/C2) on the edge support the Shade Fabric (K) DO NOT discard the box / original packaging. In case a return is required, the item must be returned in original box.
Need help?
Do you have a question about the NP11779 and is the answer not in the manual?
Questions and answers
What is dimensions of np11779 ?