
Related Manuals for Ideal Clima MULTIEASY

Summary of Contents for Ideal Clima MULTIEASY
- Page 1 MULTIEASY PLENUM ADATTIVO PER FALKO OC MANUALE PER L’UTENTE E PER L’INSTALLATORE...
-
Page 2: Table Of Contents
Plenum MultiEasy – Manuale per l’utente e per l’installatore PRIMA DI UTILIZZARE L’UNITÀ LEGGERE CON ATTENZIONE IL PRESENTE MANUALE SOMMARIO SOMMARIO ..............................2 PREMESSA ..............................4 RESPONSABILITÀ ............................4 NORME DI SERVIZIO............................4 INTERVENTI E MANUTENZIONE ........................5 USO PREVISTO ..............................6 NORME DI SICUREZZA GENERALI ......................... - Page 3 Plenum MultiEasy – Manuale per l’utente e per l’installatore 11.1 DESCRIPTION ..............................29 11.2 STRUCTURE ..............................30 11.3 OPERATION ..............................30 11.4 OPERATING LIMITS ............................31 12 ELECTRICAL CIRCUITS ..........................32 12.1 ELECTRICAL EQUIPMENT ..........................32 12.2 CONTACT LEGEND ............................32 12.3...
-
Page 4: Premessa
Plenum MultiEasy – Manuale per l’utente e per l’installatore 1 PREMESSA Usare il manuale per l’utente e per la manutenzione nel seguente modo: ogni operatore e personale addetto all’uso e alla manutenzione dell’unità dovrà leggere interamente e con la massima attenzione il presente manuale e rispettare quanto è riportato;... -
Page 5: Interventi E Manutenzione
Plenum MultiEasy – Manuale per l’utente e per l’installatore All’atto dell’installazione o quando si debba intervenire sull’unità, è necessario attenersi scrupolosamente alle norme riportate su questo manuale, osservare le indicazioni a bordo unità e comunque applicare tutte le precauzioni del caso;... -
Page 6: Uso Previsto
Il plenum MultiEasy adattivo è un componente del sistema Clima Zone, che rende particolarmente semplice la realizzazione di un sistema di climatizzazione in caldo e freddo con gestione della temperatura a singole zone termiche. -
Page 7: Struttura
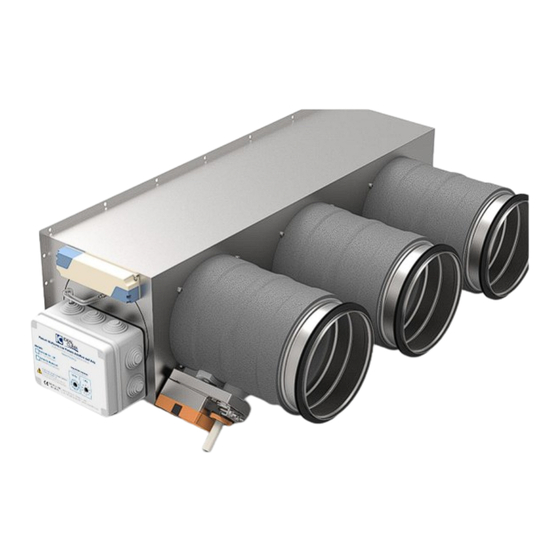
Serrande: Serrande a farfalla con corpo e stelo in polipropilene a bassa conducibilità termica, isolate termicamente sull’esterno. Attuatori: Alimentati dalla scheda di controllo, azionano le serrande. Contatto pulito per il plenum MultiEasy versione serrande ON/OFF, segnale 0-10 V per il plenum MultiEasy versione serrande modulanti. -
Page 8: Limiti Operativi
Plenum MultiEasy – Manuale per l’utente e per l’installatore TARATURA L’apparecchio è tarato in fabbrica per operare ad una pressione di 40 Pa. Nella maggior parte delle installazioni tale valore soddisfa le esigenze di impiego. Per modificare la pressione di lavoro si accede ai selettori con un piccolo cacciavite a taglio attraverso i due fori presenti sull’involucro, senza aprire la scatola elettrica. -
Page 9: Circuiti Elettrici
Plenum MultiEasy – Manuale per l’utente e per l’installatore 3 CIRCUITI ELETTRICI APPARECCHIATURE ELETTRICHE Il collegamento a terra è obbligatorio. L'installatore deve provvedere al collegamento del cavo di terra. Le apparecchiature elettriche sono realizzate e cablate in accordo alle normative EN bassa tensione e compatibilità... -
Page 10: Dati Tecnici
Plenum MultiEasy – Manuale per l’utente e per l’installatore 4 DATI TECNICI TABELLA DATI Descrizione MultiEasy Plenum adattivo Codice Numero serrande Da 2 a 5 (+1 opzionale) Numero zone termiche indipendenti Fino a 6 Segnale per serrande ON/OFF Contatto pulito... -
Page 11: Post Vendita
Plenum MultiEasy – Manuale per l’utente e per l’installatore 5 POST VENDITA RICERCA GUASTI Nelle pagine seguenti sono elencate le più comuni cause di blocco o di funzionamento anomalo dell’unità. La suddivisione è fatta in base ai sintomi facilmente individuabili. Le azioni correttive possono essere effettuate solo da personale tecnico qualificato. -
Page 12: Segnalazione Guasti
Plenum MultiEasy – Manuale per l’utente e per l’installatore ANALISI DELLE POSSIBILI ANOMALIA AZIONI CORRETTIVE CAUSE Controllare che sui morsetti cui è La valvola, se collegata la testina, esterni alla scatola installata, rimane elettrica ci siano 230V. chiusa Controllare collegamento elettrico,... -
Page 13: Installazione
Plenum MultiEasy – Manuale per l’utente e per l’installatore 7 INSTALLAZIONE PREMESSE ISPEZIONE All’atto del ricevimento dell’unità, verificarne l’integrità: la macchina ha lasciato la fabbrica in perfetto stato; eventuali danni dovranno essere immediatamente contestati al trasportatore e annotati sul Foglio di Consegna prima di controfirmarlo. -
Page 14: Installazione
INSTALLAZIONE MONTAGGIO SERRANDA AGGIUNTIVA Se è stata acquistata l’uscita aggiuntiva per plenum MultiEasy, in versione ON/OFF (cod. TGCL53) oppure in versione modulante (codice TGCL54), questa deve essere montata sul plenum MultiEasy prima che questo sia a sua volta installato sulla bocca di mandata di Falko OC. - Page 15 Plenum MultiEasy – Manuale per l’utente e per l’installatore Inserire dall’interno il codolo a corredo, e fissarlo Infilare la serranda sul codolo appena montato, con 4 viti autofilettanti con l’attuatore ruotato di circa 45° verso il basso rispetto al piano orizzontale Fissarlo con 4 viti autofilettanti.
- Page 16 Plenum MultiEasy – Manuale per l’utente e per l’installatore MONTAGGIO SU FALKO OC L’installazione del Plenum MultiEasy è più agevole se eseguita con Falko OC ancora a terra, non fissato a controsoffitto, Per le istruzioni di installazione di Falko OC, fare riferimento al relativo libretto di istruzioni a corredo della macchina.
- Page 17 Plenum MultiEasy – Manuale per l’utente e per l’installatore Posizionare le staffette a corredo nei punti più Sollevare ora Falko OC e il plenum MultiEasy agevoli per fissare i plenum MultiEasy al soffitto, mediante una piattaforma, avvicinandolo al sempre con viti autoperforanti (non fornite).
-
Page 18: Regolazione Apertura Massima E Minima Serrande
Plenum MultiEasy – Manuale per l’utente e per l’installatore Fissare i condotti isolati sui manicotti in acciaio, assicurandoli con una fascetta. Assicurarsi che Proseguire con il collegamento idraulico di Falko non ci sia interruzione tra l’isolamento della OC secondo il libretto di istruzioni a corredo serranda e quello dei condotti. -
Page 19: Collegamento Elettrico
Plenum MultiEasy – Manuale per l’utente e per l’installatore COLLEGAMENTO ELETTRICO Aprire la scatola elettrica per procedere ai collegamenti elettrici COLLEGAMENTO ELETTRICO A TERMOSTATI © Ideal Clima – Pagina 19 di... - Page 20 Plenum MultiEasy – Manuale per l’utente e per l’installatore COLLEGAMENTO ELETTRICO A FALKO OC Collegare il plenum MultiEasy a Falko OC come indicato nella seguente figura: ATT.: i termostati ON/OFF sono incompatibili con MultiEasy serrande modulanti. ATT.: i termostati 0-10V sono incompatibili con MultiEasy serrande ON-OFF...
-
Page 21: Avviamento
Plenum MultiEasy – Manuale per l’utente e per l’installatore MESSA A TERRA Assicurarsi di aver collegato il plenum a terra mediante la linguetta presente sulla lamiera (o direttamente la lamiera del plenum): Sulla stessa linguetta portare anche la messa a terra di Falko OC... -
Page 22: Condizioni Di Garanzia
Ideal Clima garantisce i propri prodotti per vizi o difetti di fabbricazione, con espressa esclusione di ogni vizio o fatto inerente all’installazione, alla conduzione ed alla manutenzione del prodotto. - 15.2 Soggetti destinatari - Ideal Clima fornisce prodotti unicamente ad imprese professionali. -
Page 23: Note
Plenum MultiEasy – Manuale per l’utente e per l’installatore 9 NOTE ……………………………………………………………………………………………………………………………………………. ……………………………………………………………………………………………………………………………………………. ……………………………………………………………………………………………………………………………………………. ……………………………………………………………………………………………………………………………………………. ……………………………………………………………………………………………………………………………………………. ……………………………………………………………………………………………………………………………………………. ……………………………………………………………………………………………………………………………………………. ……………………………………………………………………………………………………………………………………………. ……………………………………………………………………………………………………………………………………………. ……………………………………………………………………………………………………………………………………………. ……………………………………………………………………………………………………………………………………………. ……………………………………………………………………………………………………………………………………………. ……………………………………………………………………………………………………………………………………………. ……………………………………………………………………………………………………………………………………………. ……………………………………………………………………………………………………………………………………………. ……………………………………………………………………………………………………………………………………………. ……………………………………………………………………………………………………………………………………………. ……………………………………………………………………………………………………………………………………………. ……………………………………………………………………………………………………………………………………………. ……………………………………………………………………………………………………………………………………………. ……………………………………………………………………………………………………………………………………………. ……………………………………………………………………………………………………………………………………………. ……………………………………………………………………………………………………………………………………………. ……………………………………………………………………………………………………………………………………………. ……………………………………………………………………………………………………………………………………………. ……………………………………………………………………………………………………………………………………………. ……………………………………………………………………………………………………………………………………………. ……………………………………………………………………………………………………………………………………………. © Ideal Clima – Pagina 23 di... - Page 24 Plenum MultiEasy – Manuale per l’utente e per l’installatore ……………………………………………………………………………………………………………………………………………. ……………………………………………………………………………………………………………………………………………. ……………………………………………………………………………………………………………………………………………. ……………………………………………………………………………………………………………………………………………. ……………………………………………………………………………………………………………………………………………. ……………………………………………………………………………………………………………………………………………. ……………………………………………………………………………………………………………………………………………. ……………………………………………………………………………………………………………………………………………. ……………………………………………………………………………………………………………………………………………. ……………………………………………………………………………………………………………………………………………. ……………………………………………………………………………………………………………………………………………. ……………………………………………………………………………………………………………………………………………. ……………………………………………………………………………………………………………………………………………. ……………………………………………………………………………………………………………………………………………. ……………………………………………………………………………………………………………………………………………. ……………………………………………………………………………………………………………………………………………. ……………………………………………………………………………………………………………………………………………. ……………………………………………………………………………………………………………………………………………. ……………………………………………………………………………………………………………………………………………. ……………………………………………………………………………………………………………………………………………. ……………………………………………………………………………………………………………………………………………. ……………………………………………………………………………………………………………………………………………. ……………………………………………………………………………………………………………………………………………. ……………………………………………………………………………………………………………………………………………. ……………………………………………………………………………………………………………………………………………. ……………………………………………………………………………………………………………………………………………. ……………………………………………………………………………………………………………………………………………. ……………………………………………………………………………………………………………………………………………. © Ideal Clima – Pagina 24 /...
- Page 25 Plenum MultiEasy – Manuale per l’utente e per l’installatore © Ideal Clima – Pagina 25 di...
- Page 26 Plenum MultiEasy – Manuale per l’utente e per l’installatore © Ideal Clima – Pagina 26 /...
-
Page 27: Foreword
MultiEasy Plenum – Installer and user manual 10 FOREWORD Use the user and maintenance manual as follows: every operator and personnel assigned to the use and maintenance of the unit shall read this manual entirely and with the utmost attention and comply with what is stated;... -
Page 28: Operations And Maintenance
MultiEasy Plenum – Installer and user manual During installation or when you need to work on the unit, you must strictly follow the rules reported on this manual, follow the instructions on the unit and take any necessary precautions; Possible accidents to people and things can be avoided by following these technical instructions compiled with reference to the Machinery Directive 2006/42 / EC and subsequent amendments. -
Page 29: Intended Use
Do not operate other than as directed and do not neglect operations necessary for safety. The MultiEasy adaptive plenum is a component of the Clima Zone system, which makes particularly easy the set up of an air conditioning system with room-by-room zone temperature management. -
Page 30: Structure
The fan speed of Falko OC is modulated to keep the pressure in the plenum constant and ensure that flow rates are always correct, without overpressure. When no thermostat sends control signals (all rooms are satisfied), MultiEasy immediately stops the fan and cuts off the power supply to the valve. The green LED goes out. -
Page 31: Operating Limits
MultiEasy Plenum – Installer and user manual CALIBRATION The device is factory calibrated to operate at a pressure of 40 Pa. In most installations, this value meets the requirements of use. To change the working pressure, the selectors are accessed with a small slotted screwdriver through the two holes on the housing, without opening the electrical box. -
Page 32: Electrical Circuits
MultiEasy Plenum – Installer and user manual 12 ELECTRICAL CIRCUITS 12.1 ELECTRICAL EQUIPMENT The ground connection is required. The installer must make the connection of the ground wire. Electrical equipment is manufactured and wired in accordance with EN low voltage and electromagnetic compatibility standards. -
Page 33: Technical Datai
MultiEasy Plenum – Installer and user manual 13 TECHNICAL DATAI 13.1 DATA TABLE. Description MultiEasy Adaptive Plenum Code Number of dampers 2 to 5 (+1 optional) Number of independent thermal zones Up to 6 Signal for dampers ON/OFF Clean contact... -
Page 34: After Sale
MultiEasy Plenum – Installer and user manual 14 AFTER SALE 14.1 FAULT SEARCH The following pages list the most common causes of blockage or abnormal operation of the unit. The subdivision is made according to easily detectable symptoms. Corrective actions can only be carried out by qualified technical personnel. -
Page 35: Fault Reporting
MultiEasy Plenum – Installer and user manual ANALYSIS OF POSSIBLE ANOMALY CORRECTIVE ACTIONS CAUSES Check that there is 230V on the terminals to which the head is connected, outside the electrical box. Check electrical connection, Excessive pressure If the desired temperatures are reached,... -
Page 36: Installation
MultiEasy Plenum – Installer and user manual 16 INSTALLATION 16.1 PREMISES ISPECTION Upon receipt of the unit, check its integrity: the machine left the factory in perfect condition; any damage should be immediately reported to the carrier and noted on the Delivery Sheet before countersigning it. -
Page 37: Installation
ADDITIONAL DAMPER INSTALLATION If the additional output for MultiEasy plenum, ON/OFF version (cod. TGCL53) or in a modulating version (code TGCL54), this must be mounted on the MultiEasy plenum before it in turn is installed on the Falko OC supply port. - Page 38 MultiEasy Plenum – Installer and user manual Insert the supplied tang from the inside, and Thread the damper onto the newly mounted secure it with 4 self-tapping screws shank, with the actuator rotated about 45° downward from the horizontal plane Secure it with 4 self-tapping screws.
- Page 39 MultiEasy Plenum – Installer and user manual MOUNTING ON FALKO OC Installation of the MultiEasy Plenum is easier if done with Falko OC still on the floor, not fixed to a suspended ceiling, For installation instructions for Falko OC, refer to the relevant instruction booklet that came with the machine.
- Page 40 MultiEasy Plenum – Installer and user manual Place the supplied brackets in the easiest places Now lift Falko OC and the MultiEasy plenum by to attach the MultiEasy plenums to the ceiling, means of a platform, bringing it closer to the again using self-drilling screws (not supplied).
-
Page 41: Adjusting Maximum And Minimum Opening Dampers
MultiEasy Plenum – Installer and user manual Fasten the insulated ducts onto the steel sleeves, securing them with a clamp. Make sure there is Proceed with the hydraulic connection of Falko no interruption between the damper insulation OC according to the instruction booklet that and the duct insulation. -
Page 42: Electrical Connection
MultiEasy Plenum – Installer and user manual 16.5 ELECTRICAL CONNECTION Open the electrical box to make electrical connections ELECTRICAL CONNECTION TO THERMOSTATS © Ideal Clima – Pagina 42 /... - Page 43 MultiEasy Plenum – Installer and user manual ELECTRICAL CONNECTION TO FALKO OC Connect the MultiEasy plenum to Falko OC as shown in the following figure: ATT: ON/OFF thermostats are incompatible with MultiEasy modulating dampers. ATT: 0-10V thermostats are incompatible with MultiEasy ON-OFF dampers.
-
Page 44: Starting
MultiEasy Plenum – Installer and user manual EARTHING. Make sure you have connected the plenum to ground via the tab on the sheet (or directly the plenum sheet): On the same tab also bring the grounding of Falko OC 16.6 STARTING Verify that all connections (plumbing, electrical, and aeraulic) are properly installed and that all directions on labels and user manual are followed. -
Page 45: Warranty Conditions
Ideal Clima technicians. The components replaced under warranty remain the property of Ideal Clima, to which they must be returned ex works. - 15.4 Effective date and duration - The warranty starts from the date of purchase of the product and has a duration of two years. The purchase date is proven by the invoice and by the delivery note. -
Page 46: Note
MultiEasy Plenum – Installer and user manual 18 NOTE ……………………………………………………………………………………………………………………………………………. ……………………………………………………………………………………………………………………………………………. ……………………………………………………………………………………………………………………………………………. ……………………………………………………………………………………………………………………………………………. ……………………………………………………………………………………………………………………………………………. ……………………………………………………………………………………………………………………………………………. ……………………………………………………………………………………………………………………………………………. ……………………………………………………………………………………………………………………………………………. ……………………………………………………………………………………………………………………………………………. ……………………………………………………………………………………………………………………………………………. ……………………………………………………………………………………………………………………………………………. ……………………………………………………………………………………………………………………………………………. ……………………………………………………………………………………………………………………………………………. ……………………………………………………………………………………………………………………………………………. ……………………………………………………………………………………………………………………………………………. ……………………………………………………………………………………………………………………………………………. ……………………………………………………………………………………………………………………………………………. ……………………………………………………………………………………………………………………………………………. ……………………………………………………………………………………………………………………………………………. ……………………………………………………………………………………………………………………………………………. ……………………………………………………………………………………………………………………………………………. ……………………………………………………………………………………………………………………………………………. ……………………………………………………………………………………………………………………………………………. ……………………………………………………………………………………………………………………………………………. ……………………………………………………………………………………………………………………………………………. ……………………………………………………………………………………………………………………………………………. ……………………………………………………………………………………………………………………………………………. ……………………………………………………………………………………………………………………………………………. © Ideal Clima – Pagina 46 /... - Page 47 ……………………………………………………………………………………………………………………………………………. ……………………………………………………………………………………………………………………………………………. ……………………………………………………………………………………………………………………………………………. ……………………………………………………………………………………………………………………………………………. ……………………………………………………………………………………………………………………………………………. ……………………………………………………………………………………………………………………………………………. ……………………………………………………………………………………………………………………………………………. ……………………………………………………………………………………………………………………………………………. ……………………………………………………………………………………………………………………………………………. ……………………………………………………………………………………………………………………………………………. ……………………………………………………………………………………………………………………………………………. ……………………………………………………………………………………………………………………………………………. ……………………………………………………………………………………………………………………………………………. ……………………………………………………………………………………………………………………………………………. ……………………………………………………………………………………………………………………………………………. ……………………………………………………………………………………………………………………………………………. ……………………………………………………………………………………………………………………………………………. ……………………………………………………………………………………………………………………………………………. ……………………………………………………………………………………………………………………………………………. ……………………………………………………………………………………………………………………………………………. ……………………………………………………………………………………………………………………………………………. ……………………………………………………………………………………………………………………………………………. ……………………………………………………………………………………………………………………………………………. ……………………………………………………………………………………………………………………………………………. ……………………………………………………………………………………………………………………………………………. ……………………………………………………………………………………………………………………………………………. ……………………………………………………………………………………………………………………………………………. …………………………………………………………………………………………………………………………………………….
- Page 48 Tel. +39.030.35.45.319 – Fax +39 030.51.09.329 info@idealclima.eu – www.idealclima.eu Versione 4 - Giugno 2024 In un processo di costante miglioramento, la società di riserva il diritto di apportare modifiche al prodotto in qualunque momento, anche senza preavviso. © Ideal Clima – Pagina 48 /...
Need help?
Do you have a question about the MULTIEASY and is the answer not in the manual?
Questions and answers