Table of Contents
Advertisement
Available languages
Available languages
Quick Links
Advertisement
Table of Contents

Related Manuals for ROSIERES RI642CBB


Summary of Contents for ROSIERES RI642CBB
- Page 1 Instruction Manual For Induction Hob ENGLISH Manuel d’instruction pour plaque à induction FRANÇAIS MODEL: RI642CBB THANK YOU FOR PURCHASING THE ROSIERES INDUCTION HOB. PLEASE READ THIS INSTRUCTION MANUAL CAREFULLY BEFORE USING THE HOB KEEP IT IN A SAFE PLACE FOR FUTURE REFERENCE.
- Page 2 Download hOn App In the hOn App you’ll have access to several recipes and extra contents...
-
Page 3: Safety Warnings
SAFETY WARNINGS PLEASE READ THE FOLLOWING INSTRUCTIONS CAREFULLY BEFORE USING THE APPLIANCE. Installation Electrical Shock Hazard • Disconnect the appliance from the mains electricity supply before carrying out any work or maintenance on it. • Connection to a good earth wiring system is essential and mandatory. - Page 4 • This appliance is to be properly installed and earthed only by a suitably qualified person. • This appliance should be connected to a circuit which incorporates an isolating switch providing full disconnection from the power supply. • WARNING: Use only hob guards designed by the manufacturer of the cooking appliance or indicated by the manufacturer of the appliance in the instructions for use as suitable or hob guards incorporated in the appliance.
- Page 5 • During use, accessible parts of this appliance will become hot enough to cause burns. • Do not let your body, clothing or any item other than suitable cookware contact the ceramic glass until the surface is cool. • Metallic objects such as knives, forks, spoons and lids should not be placed on the hob surface since they can get •...
- Page 6 • Do not allow children to play with the appliance or sit, stand, or climb on it. • Do not store items of interest to children in cabinets above the appliance. Children climbing on the cooktop could be seriously injured. •...
- Page 7 • WARNING: The appliance and its accessible parts become hot during use. Young children should be kept away. • Care should be taken to avoid touching heating elements. • Children less than 8 years of age shall be kept away unless continuously supervised.
-
Page 8: Product Overview
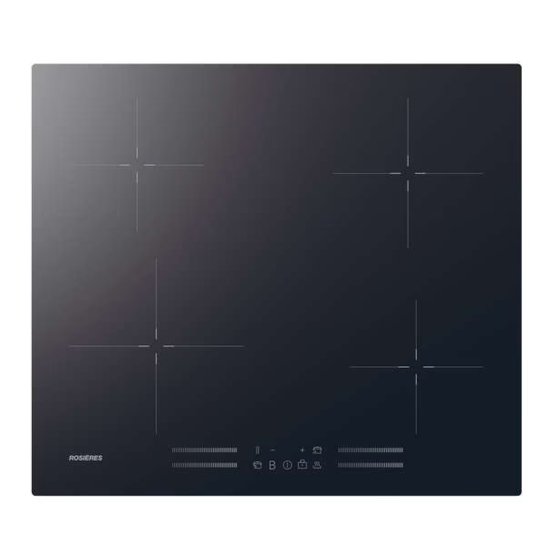
1. 2300 W zone, boost to 3000 W 2. 1200 W zone, boost to 1500 W 3. 1800 W zone, boost to 2100 W 4. 1200 W zone, boost to 1500 W Control panel RI642CBB The Control Panel RI642CBB 1. ON/OFF control 5. Energy efficiency 2. -
Page 9: A Word On Induction Cooking
the optimal choice for modern families. The hob centers on customers and adopts personalized design. The hob has safe and reliable performances, making your life comfortable and enabling to fully enjoy the pleasure from life. A Word on Induction Cooking Induction cooking is a safe, advanced, efficient, and economical cooking technology. -
Page 10: Choosing The Right Cookware
Choosing the right Cookware • Only use cookware with a base suitable for induction cooking. Look for the induction symbol on the packaging or on the bottom of the pan. • You can check whether your cookware is suitable by carrying out a magnet test. - Page 11 Use pans whose diameter of the ferromagnetic area (base of the pan) is in the range of dimensions in the table below. (Table 1) - If you use smaller pots, performance could be affected - If you use pot with a diameter smaller than the one indicated in the table above, pots may not be detected ...
-
Page 12: Using Your Induction Hob
Using your Induction Hob To start cooking • After power on, the buzzer beeps once, all the indicators light up for 1 second then go out, indicating that the hob has entered the state of standby mode. 1. Touch the ON/OFF switch. - Page 13 Using the Power Management It is possible to set a maximum power absorption level for the induction hob, choosing up to different power ranges. Induction hobs are able to limit themselves automatically in order to work at lower power level, to avoid the risk of overloading. To enter the power management function 1.
- Page 14 Using Boost function Activate the boost function 1. Touch the slider control of which zone you want to select. Note: The power setting of bridge zone works the same as any other normal area. 2. Touch the booster key when the display is blinking, power level indication shows “P”.
-
Page 15: Using The Keep Warm Function
If the timer, keylock or EE functions are activated at the same time, it will indicate the corresponding information alternately. Cancel the Energy Efficiency function Press the EE button, EE% indicator will go out and the function is canceled. Using the Keep Warm function Activate the Keep warm function 1. -
Page 16: Residual Heat Warning
• When the controls are locked and heating zones are working, all the controls except the ON/OFF and pause are disabled. To lock the controls Touch the keylock control. The timer indicator will show “Lo “. To unlock the controls 1. -
Page 17: Using The Timer As A Minute Minder
Using the Timer as a Minute Minder 1. Make sure the hob is turned on. And zone selection key is not activated (zone indication ‘-’ is not blinking). Note: You can set minute minder before or after cooking zone power setting finished. 2. -
Page 18: Cancel The Timer
4. When cooking timer expires, the corresponding cooking zone will be switch off automatically. Note: Other cooking zones will keep operating if they are turned on previously. If the timer is set on more than one zone: When you set timer for several cooking zones, red dots of the relevant cooking zones are indicated. -
Page 19: For Stir-Frying
• Using a lid will reduce cooking times and save energy by retaining the heat. • Minimise the amount of liquid or fat to reduce cooking times. • Start cooking on a high setting and reduce the setting when the food has heated through. -
Page 20: Heat Settings
Heat Settings Heat setting Suitability • delicate warming for small amounts of food 1 - 2 • melting chocolate, butter, and foods that burn quickly • gentle simmering • slow warming • reheating 3 - 4 • rapid simmering • cooking rice •... -
Page 21: Care And Cleaning
Care and Cleaning What? How? Important! Everyday soiling on 1. Switch the power to the cooktop off. • When the power to the cooktop is glass (fingerprints, 2. Apply a cooktop cleaner while the switched off, there will be no ‘hot marks, stains left by glass is still warm (but not hot!) surface’... -
Page 22: Hints And Tips
Hints and Tips Problem Possible causes What to do The cooktop cannot No power. Make sure the cooktop is connected to Be turned on. the power supply and that it is switched on. Check whether there is a power outage in your home or area. If you’ve checked everything and the problem persists, call a qualified technician. -
Page 23: Failure Display And Inspection
The above are the judgment and inspection of common failures. Please do not disassemble the unit by yourself to avoid any dangers and damages to the induction hob. Technical Specification Induction Hob RI642CBB Cooking Zones 4 Zones Supply Voltage 220-240V~ 50 / 60Hz... -
Page 24: Selection Of Installation Equipment
D(mm) A(mm) B(mm) X(mm) RI642CBB 50 mini Under any circumstances, make sure the hob is well ventilated and the air inlet and outlet are not blocked. Ensure the hob is in good work state. As shown below Note: The safety distance between the hotplate and the cupboard above the hotplate... -
Page 25: Before Locating The Fixing Brackets
A(mm) B(mm) C(mm) 50 mini 20 mini Air intake Air exit 5mm Before you install the hob, make sure that • The work surface is square and level, and no structural members interfere with space requirements. • The work surface is made of a heat-resistant material. •... - Page 26 Cautions The hob must be installed by qualified personnel or technicians. We have professionals at your service. Please never conduct the operation by yourself. The hob shall not be mounted to cooling equipment, dishwashers and rotary dryers. The hob shall be installed such that better heat radiation can be ensured to enhance its reliability.
-
Page 27: Connecting The Hob To The Mains Power Supply
Connecting the hob to the mains power supply The power supply should be connected in compliance with the relevant standard, or a single-pole circuit breaker. The method of connection is shown below. If the cable is damaged or needs replacing, this should be done by an after-sales technician using the proper tools, so as to avoid any accidents. - Page 28 This appliance is labeled in compliance with European directive2012/19/EU for Waste Electrical and Electronic Equipment (WEEE). By ensuring that this appliance is disposed of correctly, you will help prevent any possible damage to the environment and to human health, which might otherwise be caused if it were disposed of in the wrong way.
- Page 29 Téléchargez l’application hOn L’application hOn vous donne accès à de nombreuses recettes et contenus supplémentaires...
-
Page 30: Consignes De Sécurité
CONSIGNES DE SÉCURITÉ VEUILLEZ LIRE ATTENTIVEMENT CES INSTRUCTIONS AVANT D’UTILISER L’APPAREIL. Installation Risque d’électrocution Débrancher l’appareil du secteur avant d’effectuer tout • travail ou opération d’entretien. Le raccordement à un bon système de mise à la terre est • essentiel et obligatoire. Les moyens de déconnexion doivent être incorporés dans •... - Page 31 • AVERTISSEMENT : utilisez uniquement des protections de plaque de cuisson conçues par le fabricant de l’appareil de cuisson ou indiquées comme appropriées par le fabricant de l’appareil dans le mode d’emploi ou intégrées à l’appareil. L’utilisation de protections inappropriées peut provoquer des accidents.
-
Page 32: Consignes De Sécurité Importantes
Les enfants de moins de 8 ans doivent être tenus à l’écart • à moins d’être surveillés constamment. Les poignées des casseroles peuvent être chaudes • au toucher. Contrôlez que les poignées des casseroles ne soient pas au-dessus d’autres zones de cuisson allumées. Gardez les poignées hors de portée des enfants. - Page 33 • Ne laissez pas les enfants seuls ou sans surveillance dans la pièce où l’appareil est utilisé. • Les enfants ou les personnes ayant un handicap qui limite leur capacité à utiliser l’appareil doivent avoir une personne compétente et responsable pour leur apprendre à l’utiliser. L’instructeur doit être satisfait qu’ils puissent utiliser l’appareil sans danger pour eux ou leur environnement.
- Page 34 Cet appareil peut être utilisé par des enfants à partir • de 8 ans et par des personnes ayant des capacités physiques, sensorielles ou mentales réduites ou un manque d’expérience et de connaissances, s’ils sont sous surveillance ou si on leur a appris à utiliser l’appareil en toute sécurité...
-
Page 35: Présentation Du Produit
3. Zone de 1 800 W, boost jusqu’à 2 100 W 4. Zone de 1 200 W, boost jusqu’à 1 500 W 5. Panneau de commande RI642CBB Panneau de commande RI642CBB 1. Commande Marche/Arrêt 5. Efficacité énergétique 2. Commandes de sélection des 6. - Page 36 Un mot sur la cuisson à induction La cuisson à induction est une technologie de cuisson économique, efficace, pointue et sûre. Elle fonctionne par des vibrations électromagnétiques générant la chaleur directement dans la casserole, plutôt qu’indirectement en chauffant la surface en verre. Le verre ne devient chaud que parce que la casserole finit par le chauffer.
- Page 37 Sélection du bon ustensile de cuisson • N’utilisez que des ustensiles de cuisson ayant une base adaptée à la cuisson à induction. Cherchez le symbole de l’induction sur l’emballage ou le fond de la casserole. • Vous pouvez vérifier si votre ustensile de cuisson est adapté en effectuant un test magnétique.
- Page 38 Soulevez toujours les casseroles de la plaque vitrocéramique, ne les faites pas glisser car cela pourrait rayer le verre. • Utilisez des casseroles dont le diamètre de la zone ferromagnétique (base de la casserole) est dans la gamme de dimensions du tableau ci-dessous. (Tableau 1) •...
- Page 39 Utilisation de votre plaque à induction Pour commencer à cuire • Après la mise sous tension, le signal sonore retentit une fois, tous les voyants s’allument pendant 1 seconde puis s’éteignent, indiquant que la plaque est passée en mode veille. 1.
- Page 40 Utilisation de la gestion de la puissance Il est possible de régler un niveau d’absorption maximale de la puissance pour la plaque à induction, en choisissant différentes plages de puissance. Les plaques à induction sont en mesure de se limiter automatiquement pour fonctionner à...
- Page 41 Utilisation de la fonction Boost Activer la fonction Boost 1. Touchez le curseur de la zone que vous souhaitez sélectionner. Remarque : Le réglage de la puissance de la zone pont fonctionne de la même manière que toute autre zone normale. lorsque l’écran clignote, 2.
-
Page 42: Utilisation De La Fonction Pause
Activation de la fonction Efficacité énergétique Appuyez sur la touche EE, l’indicateur EE% s’allume. L’écran affiche le pourcentage d’énergie que vous utilisez. Si les fonctions de minuterie, de verrouillage des touches ou EE sont activées en même temps, les informations correspondantes s’affichent en alternance. Annulation de la fonction Efficacité... -
Page 43: Verrouillage Des Commandes
Verrouillage des commandes • Vous pouvez verrouiller les commandes pour éviter une utilisation indésirable (par exemple des enfants éteignant par inadvertance les zones de cuisson allumées). • Lorsque les commandes sont verrouillées et que les zones de cuisson fonctionnent, toutes les commandes sont désactivées, à l’exception des commandes Marche/Arrêt et pause. -
Page 44: Utilisation De La Minuterie
Utilisation de la minuterie Vous pouvez utiliser la minuterie de deux manières différentes : ⚫ Vous pouvez l’utiliser comme alarme. Dans ce cas-là, la minuterie n’éteindra pas la zone de cuisson quand le temps réglé se sera écoulé. ⚫ Vous pouvez l’utiliser comme minuterie de coupure pour éteindre une ou plusieurs zones de cuisson une fois le temps écoulé. - Page 45 REMARQUE : un point rouge dans le coin inférieur droit de l’indication du niveau de puissance indique que cette zone est sélectionnée. 4. Quand le temps de cuisson est terminé, la zone de cuisson correspondante s’éteint automatiquement. Remarque : les autres zones de cuisson continueront à fonctionner si vous les avez allumées auparavant.
-
Page 46: Astuces De Cuisson
Astuces de cuisson • Lorsque les aliments commencent à bouillir, réduisez le réglage de la puissance. • L’utilisation d’un couvercle réduira les temps de cuisson et économisera de l’énergie en conservant la chaleur. • Diminuer la quantité de liquide ou de matières grasses pour réduire les temps de cuisson. - Page 47 5. Faites revenir les légumes. Quand ils sont chauds mais encore croquants, baissez sous la zone de cuisson, remettez la viande dans la poêle et ajouter votre sauce. 6. Remuez les ingrédients délicatement pour être certain qu’ils sont bien chauds. 7.
-
Page 48: Entretien Et Nettoyage
Entretien et nettoyage Quoi ? Comment ? Important ! • Lorsque la plaque de cuisson est hors Salissures de tous les jours Mettez la plaque de cuisson hors tension. tension, il n’y a aucune indication sur le verre (empreintes, Versez un nettoyant pour plaque quand marques, taches laissées le verre est encore tiède (mais pas chaud !) de surface chaude, mais la zone... -
Page 49: Conseils Et Astuces
Conseils et astuces Problème Causes possibles Que faire Il est impossible d’allumer Pas de courant. Assurez-vous que la plaque de cuisson soit branchée sur le secteur et qu’elle la plaque de cuisson. soit sous tension. Vérifiez s’il y a une coupure de courant chez vous ou dans votre quartier. -
Page 50: Caractéristiques Techniques
Ces commentaires correspondent à l’analyse et l’inspection des pannes courantes. Veuillez ne pas démonter l’unité vous-même pour éviter tout danger et dégât pour la plaque à induction. Caractéristiques techniques Plaque à induction RI642CBB Zones de cuisson 4 zones Tension d’alimentation 220–240 V~ 50/60 Hz Puissance électrique installée... - Page 51 P (mm) A (mm) B (mm) X (mm) RI642CBB 50 mini Quelles que soient les circonstances, assurez-vous que la plaque est bien ventilée et que l’entrée et la sortie d’air ne sont pas obstruées. Assurez-vous que la table de cuisson est en bon état de fonctionnement. Comme cela est montré ci-dessous.
- Page 52 A (mm) B (mm) C (mm) Entrée d’air Sortie d’air 5 mm 50 mini 20 mini Avant d’installer la plaque de cuisson, vérifiez les éléments suivants : • La surface de travail est carrée et plane, et qu’aucun élément structural n’interfère avec les exigences d’espace.
- Page 53 Plan de travail Plan de travail Plaque de cuisson Plaque de cuisson Étrier Étrier Mises en garde • La plaque doit être installée par du personnel ou des techniciens qualifiés. Nous avons des professionnels à votre disposition. N’effectuez jamais l’opération vous-même. •...
- Page 54 Branchement de la plaque sur le secteur L’alimentation doit être raccordée conformément à la norme applicable ou avec un disjoncteur unipolaire. La méthode de raccordement est montrée ci-dessous. L1-L2 : 380-415 V ~ L-N : 220-240 V ~ • Si le câble est abîmé ou qu’il a besoin d’être remplacé, cette opération doit être effectuée par un technicien du service après-vente qui utilise ses propres outils, de manière à...
- Page 55 Cet appareil est marqué conformément à la Directive Européenne 2012/19/UE relative aux déchets d’équipements électriques et électroniques (DEEE). En vous assurant que cet appareil est mis au rebut correctement, vous aiderez à éviter de porter atteinte à l’environnement et à la santé humaine, ce qui aurait par contre lieu s’il était éliminé...
Need help?
Do you have a question about the RI642CBB and is the answer not in the manual?
Questions and answers