Table of Contents
Advertisement
Quick Links
Advertisement
Table of Contents

Related Manuals for Grand Cafe CGI09ALP


Summary of Contents for Grand Cafe CGI09ALP
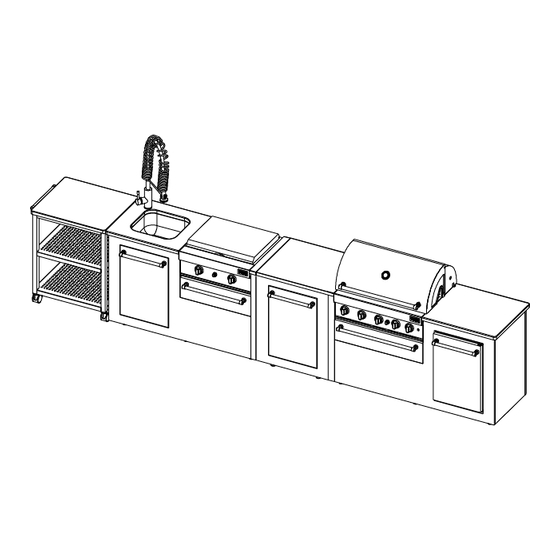
- Page 1 This Owner's Manual is provided and hosted by Appliance Factory Parts. Grand Cafe CGI09ALP Owner's Manual Shop genuine replacement parts for Grand Cafe CGI09ALP Find Your Grand Cafe Grill Parts - Select From 21 Models -------- Manual continues below --------...
-
Page 2: Primary Safety Warnings
OPERATOR'S MANUAL Grill Island Model CGI09ALP NOTE: Complete Island Kit requires 3 boxes FREE HELP WARNING FROM THE GRILL EXPERTS Ÿ Do not return to the store. At Grand Hall we're Failure to comply with these instructions could the experts on this product and trained to help result in a fire or explosion that could cause serious bodily injury, death or property damage. -
Page 3: Table Of Contents
Table of Contents WARNING Primary Safety Warnings ......1-3 Pre-Assembly Instructions ......3 Part Diagrams and Lists ......4-13 • LPG models must be used with Liquid Pro- pane Gas and the regulator assembly sup- Assembly Instructions......14-22 plied. Natural Gas models must be used with Use &... -
Page 4: Pre-Assembly Instructions
Pre-Assembly Instructions For Your Safety To expedite the assembly process follow these WARNING general guidelines: Tools Required for Assembly Failure to comply with these instructions may • Protective work gloves result in a hazardous situation which, if not • Phillips Head Screwdriver avoided, may result in injury. -
Page 5: Part Diagrams And Lists
Hardware Pack Parts List for Model CGI09ALP PART # PART DESCRIPTION QTY PURPOSE OF PART Hardware Pack For use in assem bly (Grill, Range and Party Cart) P06024008A S112G0406A Phillips Head Screw 1/4"x3/8" Attaches Cart Fram es to Left / Right Bowl Panels... - Page 6 Parts Diagram for Model CGI09ALP Grill...
- Page 7 Parts Diagram for Model CGI09ALP Range...
- Page 8 Parts Diagram for Model CGI09ALP Island Parts Diagram for Model CGI09ALP Party Cart...
- Page 9 Parts List for Model CGI09ALP Grill DESCRIPTION PART# Lid, Front P001472865 Lid, Rear P001472965 Tem perature Gauge P00601361A Lid Handle P00205104B Lid Handle Seat P00303128E Light,12V,10W P05383002B Light Cover Set P05383003B Light Wire Set P05352006B Protective Pad P05518011 I Cooking Rack/Secondary...
- Page 10 Parts List for Model CGI09ALP Grill DESCRIPTION PART # Decorative Panel P01306029P Decorative Panel Support Bracket P01306030P Cart Frame P01306028P Cart Panel, Top P07805007A Cart Panel/Stone P07702111M Cart Panel P03305069D Cart Panel P03305070D Cart Panel, Front/Stone P07621024D Cart Panel, Rear/Stone...
- Page 11 Parts List for Model CGI09ALP Range DESCRIPTION PART # P0014625M5 Protective Pad P05518011 I Bowl Panel, Top P0073943AP Bowl Panel, Left P0072075AP Bowl Panel, Right P0072175AP Control Panel Bracket, Left P033270741 Control Panel Bracket, Right P033270761 Bowl Panel, Rear P0072575AP...
- Page 12 Parts List for Model CGI09ALP Range DESCRIPTION PART # Decorative Panel P01306029P Decorative Panel Support Bracket P01306030P Cart Frame P01306028P Handle/Door P00216043B Handle Seat P00303118E Door Set with "L" Bracket P04304011P Support Bracket P03327075D Cart Basket P05203007G Door Bracket, Left...
- Page 13 Lower Bracket for Front & Rear Panels P03311036D Slide Bracket Level Adjuster P05322004A P07604024H Cart Panel, Corner P03303119T Corner Bracket Parts List for Model CGI09ALP Party Cart DESCRIPTION PART# P07805005A Table Top P033050661 Table Top Bracket P009030011 Cart Frame P00216043B...
- Page 14 Y0250170 Rotisserie Assembly Parts Diagram Y0250170 Rotisserie Assembly Parts List PART# DESCRIPTION Rot. Collar P05508200A Rot. Thumbscrew 1/4"x1/2" S196G04081 Rot. Spit P05508175A Rot. Holding Fork P05508023A Rot. Motor Bracket P05508197A Rot. Motor/AC P07101039B Rot. Screw#10-24x3/4"UNC S112G10121 Rot. W asher S411G03081 Rot.
-
Page 15: Assembly Instructions
Assembly Instructions Install Cart Frame (For Grill Model) Remove all packing materials from grill unit. Align the holes in the Cart Frame and the Grill Left Cart Legs (Front/Rear). Insert the 4 Phillips Head Screws 1/4"x3/8" and tighten securely. Phillips Head Screw 1/4"x3/8" Qty.4 Part # S112G0406A Install Cart Frame (For Range Model) - Page 16 Assembly Instructions Install Party Cart (This assembly process requires two people) Remove all packing materials. Install Party Cart as following 6 steps. 3/16"x3/8" 1/4"x3/8" Phillips Head Screw Step 1: Attach the cart shelf lower to 2 cart frames 3/16"x3/8" Flip the cart shelf lower upside down. Qty.
- Page 17 Assemble Island for Galley-Style Configration Align the 4 individual modules and slide together as shown in Option 1. Be sure to attach the Regulator with Hose installation from Range and Island before securely placing in position. (Please refer to Step 6). Table top surface Party Cart Range...
- Page 18 Assembly Instructions Assemble Island for L-Shape Configuration Separate the Island from Range and Grill modules. See Fig. 1. Remove Island Left Panel, Rear Panel and Cart Panel, Corner/Stone. See Fig. 2. Reinstall Island Left Panel, Rear Panel, Corner Bracket as shown in Fig. 3, reinstall Cart Panel, Corner using 3 Phillips Head Screws 1/4"x3/8".
- Page 19 Install Regulator with Hose to Hose Holder (This assembly process requires 2 people) Move Island away from Grill and Range in order to get access to outside of the Island side panels. Remove Drawers of the Grill and Range. Pull the Plugs out of the Grill and Range. (See Fig.1) Insert the Plugs of the Grill and Range into the Holes of the Island.
- Page 20 Install Gas Tank to Tank Tray Open Tank Tray Door. Turn your LP Gas Tank Valve clockwise to the closed or OFF positon. Unscrew the Wing Bolt from rear bracket of tank holder. Place LP Gas tank into tank holder on the Tank Tray. Install the tank so the Tank Valve faces the rear right corner of cabinet.
- Page 21 Install Faucet Assembly (This assembly process requires 2 people) Remove Cart Door. (See Fig.1). Apply pipe tape on the Faucet pipe inlet. Connect a 5/8" water supply hose, pipe or tube (not provided) to the Faucet Pipe Inlet. (See Fig.1) CAUTION: Avoid breaking the copper pipe by using 2 wrenches to connect your water supply fitting to the Faucet Pipe Inlet.
- Page 22 Pull Transformer Cord out Be sure gas is off before conducting electrode check. Pull the Transformer Cord out through the Be sure all Control Knobs are set to "OFF" and gap between the Back Wind Shield and the open the Grill Lid. Rear Cart Panel as shown.
- Page 23 Install Pot Support and Griddle Place Side Burner Cap on top of side burner. Place Pot Support on top of side burner body. Use the two Grate Lifters to place the Griddle on Pot Support top of griddle frame with the Grease Tube in the front as shown.
-
Page 24: Use & Care Instructions
USE AND CARE INSTRUCTIONS CORRECT LP GAS TANK USE Never allow children to operate your grill. Do not allow LP Gas grill models are designed for use with a 20 children or pets to play near your grill. Always supervise Ib or 30 lb. - Page 25 USE AND CARE INSTRUCTIONS NOTE about LP Gas Tank Exchange Programs LP Gas Model only: Ÿ Secure a 20 lb or 30 lb LP Gas Tank to Many retailers that sell grills offer you the option of your Island replacing your empty LP Gas tank through an ex- change service.
- Page 26 USE AND CARE INSTRUCTIONS Check all connections for LP Gas Leaks Check that the end of each Burner Tube is properly located over each Valve Orifice Never test for leaks with a flame. Prior to first use, Open lid. at the beginning of each season, or every time Remove Grease Tray and Drawer.
-
Page 27: Lighting Instructions
USE AND CARE INSTRUCTIONS Burner Control Knobs on Control Panel Grill Lighting Instructions Before each use, check all hoses for cracks, nicks, cuts, Grill burns or abrasions. If a hose is damaged in any way, do not use your grill before replacing the hose with an authorized part from the Parts List. -
Page 28: Troubleshooting
USE AND CARE INSTRUCTIONS Troubleshooting Manually Lighting Your Grill By Paper Match If the grill fails to light : To light your gas grill by match, insert a match into the Lighting Turn gas off at source and turn Control Knobs to OFF. Wait Stick and follow steps 1 through 5 of the Grill Lighting at least 5 minutes for gas to clear, then retry. - Page 29 USE AND CARE INSTRUCTIONS WARNING WARNING Keep any electrical supply cord and the fuel To protect against electrical shock, do not immerse electrical cord, plugs or motor in water or expose to supply hose away from any heated surface. rain. Protect electrical elements from burners, hot grill surfaces and grease.
-
Page 30: Rotisserie Instruction
Rotisserie Instructions 1. Remove all components from the carton. Attach the Motor Bracket on the outside of the right grill bowl panel. Align the two holes of the Bracket with the holes on the grill bowl. Tighten securely using two Screws #10-24x3/4" UNC, Plain Washers and Nuts provided. - Page 31 Install the AC (alternating current) Rotisserie Motor onto the Motor Bracket as shown below. Be sure the Motor attaches to the Bracket with the electrical cord down. This installation ensures that once the Spit is inserted into the Motor it will also rest securely into the slot of your grill bowl. Rotisserie Motor Rotisserie Spit must rest securely in the slot of...
-
Page 32: Faucet Operation
USE AND CARE INSTRUCTIONS Dual Function use Water supply and drainage system for Island Assembly Swivel and adjust the flexible faucet neck as needed to direct the spray head. Faucet neck Faucet Faucet holder head Remove the faucet neck from clamp holder for manual control and directional use. -
Page 33: Refrigerator Instruction
Refrigerator Instructions Operation To avoid vibration, the cabinet must be set level. To start the refrigerator, turn the temperature CAUTION control to the position corresponding to the desired cooling. The refrigerator temperature will vary depending on the quantity of the food stored This appliance must be grounded. -
Page 34: Cleaning And Maintenance
Cleaning Exterior Stainless Steel Surfaces: CLEANING AND MAINTENANCE Routine care and maintenance is required to preserve the ap- Proper care and maintenance will keep your grill in top operat- pearance and corrosion resistance of stainless steel. The fact ing condition and prolong its life. Follow these cleaning proce- is stainless steel can corrode, rust and discolor under certain dures on a timely basis and your grill will stay clean and operate conditions. - Page 35 CLEANING THE BURNER TUBES AND BURNER PORTS Regardless of which Burner cleaning procedure you To reduce the chance of FLASHBACK FIRE you must use, we recommend you also complete the following clean the Burner Tubes as follows at least once a month steps to help prolong Burner life.
- Page 36 Cooking Instructions Burn-Off Indirect Cooking using Main Burners The indirect cooking method can also be used with the Before cooking on your gas grill for the first time, you should supplied Cooking Grids. To cook indirectly, the food "burn off" the grill to eliminate any odor or foreign matter. should be placed on the left or right side of your grill with Ignite the main burners, lower the Lid, and operate grill on the main Burner lit on the opposite side.
- Page 37 Guide to Grilling using the Main Burners and Direct Cooking Method Approximate Cooking Times Grilling Steak and Ribs Cut of Meat Rare: 4-8 minutes Turn the grill Burners on HIGH, close the Lid and preheat your T-bone steak Medium: 10-14 minutes grill 3 to 5 minutes.
- Page 38 Guide to Searing using the Infrared Cooking Zone • Important notes about using the Infrared Burner Once lit, leave the Infrared Burner on High and sear both sides of meat using the guidelines below. Whether you are a seasoned chef or a newcomer to gas •...
- Page 39 Guide to Roasting and Baking Using the Main Burners An Important Note About Heat Settings Trim meat of excess fat. Truss meat and poultry with cooking The suggested heat settings shown are approximate. There string to retain shape if desired. Bacon strips can be used to cover the outside surface of lean meat and poultry to help are many factors such as outside temperature, wind condi- tions and grill location that affect your grill performance.
- Page 40 Guide to Rotisserie Cooking Guide to Smoking Preparing to Smoke Slow Cooking with a Rotisserie Smoking gives food a distinctive, delicious flavor. You will find Rotisserie cooking produces foods that are moist, flavor- a variety of wood chips available for use in smoking grilled ful and attractive.
- Page 41 Question: Question: Can I convert my grill from one fuel type to another in Sometimes I hear a humming sound coming from my regulator. What causes this? And - My grill has a low other words from LPG to NG or vice versa? flame and sometimes will not light.
- Page 42 After every use (after your grill has cooled down), wipe Question: stainless surfaces with a soft, soapy cloth or sponge The Regulator and Hose supplied with my gas grill then rinse with water. Be sure to remove all food par- does not fit the older LP Gas tank I’ve used for years.
- Page 43 Grand Hall Limited Warranty Grand Hall Enterprise Co., Ltd. will warrant to the ORIGINAL PURCHASER of this gas grill that it will be free of defects in material and workmanship for set periods below from the date of purchase when used under normal outdoor use and correct assembly: Full Warranty on Grill - 1 year (except for paint loss, rusting and ignitor battery) Tube Burners - 3 years no rust through...
Need help?
Do you have a question about the CGI09ALP and is the answer not in the manual?
Questions and answers