Table of Contents
Advertisement
Quick Links
®
Installation, Operation and Maintenance Manual
Please read and save these instructions for future reference. Read carefully before attempting to assemble, install,
operate or maintain the product described. Protect yourself and others by observing all safety information. Failure
to comply with these instructions will result in voiding of the product warranty and may result in personal injury
and/or property damage.
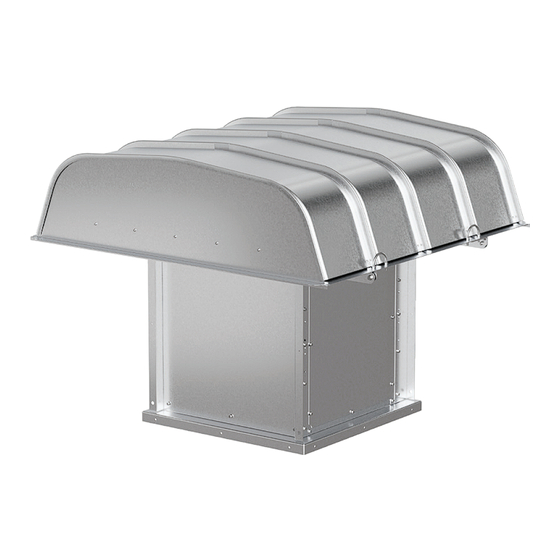
Hooded Mixed Flow Roof Fans
Fans are direct-driven with mixed flow wheels and
feature rigid construction, high efficiency, and low
sound levels. These fans are designed for roof supply
or exhaust applications. The fans are available in twelve
sizes and feature a hinged fabra hood and optional
1-inch washable aluminum filters in supply applications.
General Safety Information
Only qualified personnel should install this fan.
Personnel should have a clear understanding of these
instructions and should be aware of general safety
precautions. Improper installation can result in electric
shock, possible injury due to coming in contact with
moving parts, as well as other potential hazards. If more
information is needed, contact a licensed professional
engineer before moving forward.
1. Follow all local electrical and safety codes, as well as
the National Electrical Code (NEC) and the National
Fire Protection Agency (NFPA), where applicable.
Follow the Canadian Electric Code (CEC) in Canada.
2. The rotation of the wheel is critical. It must be free
to rotate without striking or rubbing any stationary
objects.
3. Motor must be securely and adequately grounded.
4. Do not spin fan wheel faster than max cataloged fan
RPM. This could cause catastrophic wheel failure.
Adjustments to fan speed significantly affects motor
load. If the fan RPM is changed, the motor current
should be checked to make sure it is not exceeding
the motor nameplate amps.
5. Do not allow the power cable to kink or come in
contact with oil, grease, hot surfaces or chemicals.
Replace cord immediately if damaged.
6. Verify that the power source is compatible with the
equipment.
7. Never open access doors to a duct or fan while the
fan is running.
8. Never remove covers protecting electrical
components while fan is energized.
®
Hooded Mixed Flow Roof Fans
DANGER
Always disconnect, lock, and tag power source before
installing or servicing. Failure to disconnect power
source can result in fire, shock, or serious injury.
CAUTION
When servicing the fan, motor may be hot enough
to cause pain or injury. Allow motor to cool before
servicing.
DANGER
Pour écarter les risques d'incendie, de choc électrique
ou de blessure grave, veiller à toujours débrancher,
verrouiller et étiqueter la source de courant avant
l'installation ou l'entretien.
ATTENTION
Lors de toute intervention sur la soufflante, le moteur
peut être suffisamment chaud pour provoquer une
douleur voire une blessure. Laisser le moteur refroidir
avant toute maintenance.
Hooded Mixed Flow Roof Fans
Document 486806
Model RSQ Direct Drive
1
Advertisement
Table of Contents

Related Manuals for Greenheck RSQ


Summary of Contents for Greenheck RSQ
- Page 1 Document 486806 Model RSQ Direct Drive Hooded Mixed Flow Roof Fans ® Installation, Operation and Maintenance Manual Please read and save these instructions for future reference. Read carefully before attempting to assemble, install, operate or maintain the product described. Protect yourself and others by observing all safety information. Failure to comply with these instructions will result in voiding of the product warranty and may result in personal injury and/or property damage.
- Page 2 Receiving configuration) has at least 3 times the wheel diameter of straight duct before any obstructions like an elbow or Upon receiving the product, check to ensure all items transition. See Dimensional Data (page 3) for physical are accounted for by referencing the delivery receipt or dimensions.
-
Page 3: Dimensional Data
Dimensional Data Fan Dimensions D Sq. E Sq. SUPPLY OR EXHAUST BOTTOM VIEW Supply or Exhaust Max. Fan Size Weight^ D Sq. E Sq. 30-1/4 27-1/8 11-3/8 15-7/8 34-7/8 39-1/8 15-1/8 19-5/8 35-1/2 40-1/4 39-1/8 18-1/4 22-3/4 42-3/4 51-1/8 26-1/2 51-1/8 28-1/2 Hood... -
Page 4: Parts List
HAUST BOTTOM VIEW Parts List Each fan bears a manufacturer’s nameplate with model number and serial number embossed. This information will assist the local representative and the factory in providing service and replacement parts. Before servicing, assure unit is not capable of operation during repairs. Hood Inlet Cone Mixed Flow Wheel... -
Page 5: Typical Installation
Typical Installation Units can be installed on the roof deck prior to • Attach the birdscreen or side filter tracks. assembling the hood. NOTE: For units supplied or used with a Variable Frequency Drive (VFD), reference the VFD documentation for installation requirements, start-up settings, parameter adjustments and trouble shooting. - Page 6 STEP 5 – Install Hinge Brackets and U-Bolts to STEP 8 – Attach Hood Panels Z-Channels NOTE: Overlapping flanges improve hood • Using the provided U-bolts and nuts, attach the weatherproofing and strength. Start with the hood panel two hinge brackets and U-bolts to the holes in each with the end panel attached equipped with the male of the hood Z-channels as seen in illustration.
-
Page 7: Roof Mounting
SUPPLY OR EXHAUST BOTTOM VIEW Roof Mounting STEP 3 - Install Ductwork • Good duct practices should be followed in accordance with SMACNA and AMCA guidelines, NFPA 96 and any local codes. The discharge should have approximately three duct diameters of straight duct to achieve cataloged performance (see table below). -
Page 8: Operation
Pre Start-Up Checks Before Fan Start-Up Operation Before starting up or operating fan, check all fasteners IMPORTANT: The fan has been checked for for tightness. In particular, check the cap screws in wheel bushing. mechanical noise at the factory prior to shipment. -
Page 9: Maintenance
Maintenance Motor DANGER Motor maintenance is generally limited to cleaning Always disconnect, lock and tag power source before and lubrication (where applicable). Cleaning should be servicing. Failure to disconnect power source can limited to exterior surfaces only. Removing dust buildup result in fire, shock or serious injury. -
Page 10: Maintenance Log
Bushing Installation 3. The socket head cap screws are adjustable from the inlet of the fan. Install the bushing socket head cap screws into the aligned holes by hand (or without excessive torque). 4. Adjust the axial location of the wheel in the fan relative to the inlet cone (venturi) as shown in Figure 1, page 8. - Page 11 Maintenance Log Date ___________________Time _____________ AM/PM Date ___________________Time _____________ AM/PM Notes: ___________________________________________ Notes: ___________________________________________ _________________________________________________ _________________________________________________ _________________________________________________ _________________________________________________ _________________________________________________ _________________________________________________ _________________________________________________ _________________________________________________ Date ___________________Time _____________ AM/PM Date ___________________Time _____________ AM/PM Notes: ___________________________________________ Notes: ___________________________________________ _________________________________________________ _________________________________________________ _________________________________________________ _________________________________________________ _________________________________________________ _________________________________________________ _________________________________________________ _________________________________________________ Date ___________________Time _____________ AM/PM...
-
Page 12: Troubleshooting
As a result of our commitment to continuous improvement, Greenheck reserves the right to change specifications without notice. Product warranties can be found online at Greenheck.com, either on the specific product page or in the literature section of the website at Greenheck.com/Resources/Library/Literature.
Need help?
Do you have a question about the RSQ and is the answer not in the manual?
Questions and answers