Advertisement
Quick Links
Advertisement

Subscribe to Our Youtube Channel
Related Manuals for Titan PARKGRILL2S


Summary of Contents for Titan PARKGRILL2S
- Page 1 MPN(s): PARKGRILL2S SKU(s): 899226 UPC(s): 840009206030...
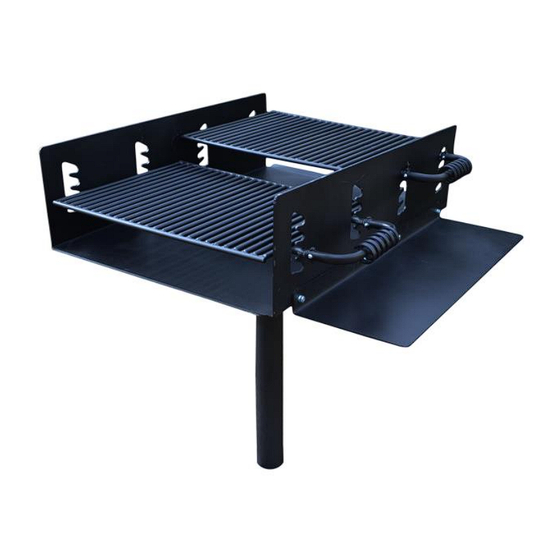
- Page 3 DESCRIPTION Grill Box Cooking Grate Food Tray Handle Upper Post Lower Post Countersunk Hexa Bolt M5x30 Hexa Nut M10x25 Flat Washer 10 (10) Spring Washer 10 (11) Hexa Nut M10 (12) Hexa Bolt M12x30 (13) Spring Washer 12 (14) Hexa Nut M12 (15) Flat Washer 5 (16)
- Page 4 A. Connect Upper Post to Lower Post - Screw Upper Post (5) onto Lower Post (6) and tighten. B. Foundation Work - Use a post hole digger to dig a hole with minimum diameter of 12” by 20” deep, and fill the hole with concrete.
- Page 5 C. Assembling the Grill 1. Taking of handle attached to Cooking Grate - Handles (4) are bolted onto Cooking Grate (2) for shipping. Using Allen Wrench to take off the Handle (4) from Cooking Grate (2) by unscrewing Countersunk Hexa Bolt M5x30 (7). Keep the hardware sets including also Flat Washer 5 (15) and Hexa Bolt M5 (16) for later use.
- Page 6 4. Installing Grill Box on Post - Make sure that the concrete holding the Post is fully cured. Align the hole of Grill Box (1) bottom bracket with the Post. Align bolt holes of the Grill Box bracket with that of the Post flange at Post top.
- Page 7 (both economic and non-economic), and losses of any type, which may occur, and you fully and forever release and discharge Titan, its insurers, employees, officers, directors, associates, and agents from any and all claims, demands, damages, rights of action, or causes of action, present or future, whether the same be known or unknown, anticipated, or unanticipated, resulting from or arising out of the use of said equipment.
Need help?
Do you have a question about the PARKGRILL2S and is the answer not in the manual?
Questions and answers